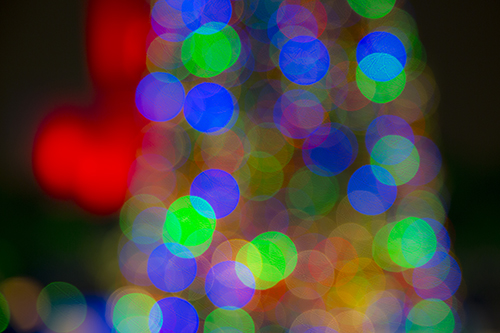
This time between Christmas and New Years Day is a great time to capture some blurry photos of holiday lights.
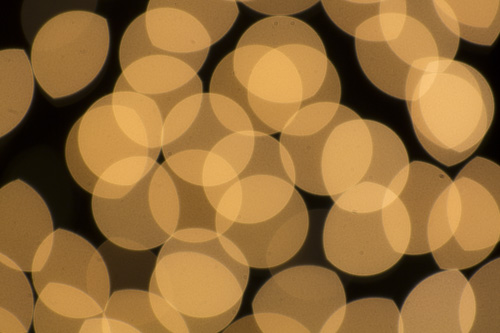
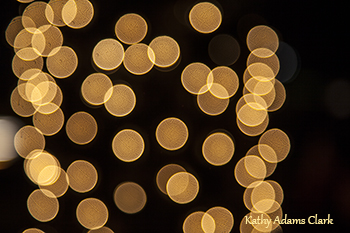
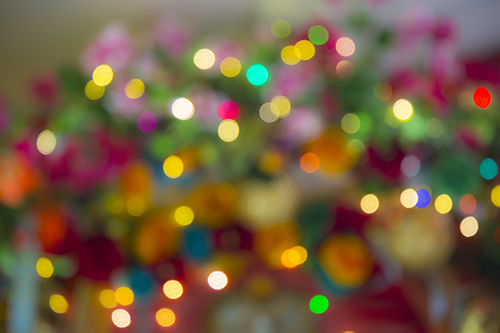
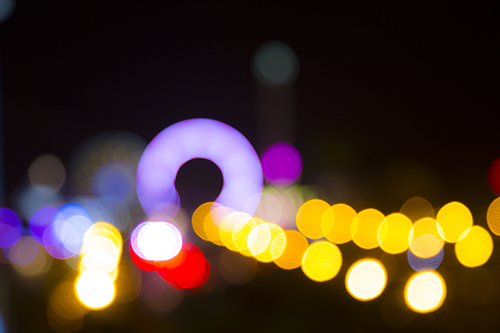
Simple and easy to capture. Turn off your auto focus. Turn the focus ring until everything is blurred. Then start looking for the composition.
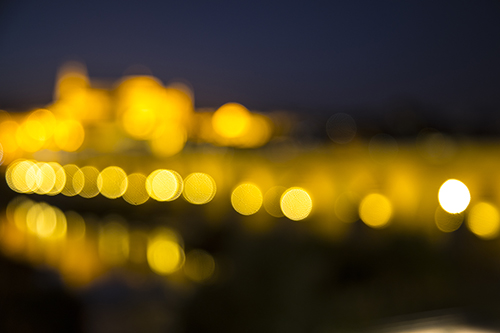
Simple white lights photographed at f/4 with the focus blurred.Same lights as above with f/22 and the lens blurred.Christmas lights in a storeLights dangling from a restaurant ceiling. (click to enlarge)Lights along a street. City of Houston in blur. (click to enlarge)Bridge and cathedral in Cordoba, Spain (click to enlarge)Simple autumn leaves on a tree (click to enlarge)Simple Christmas tree with f/4 and lens blurred. (click to enlarge)
Pinterest sent me this promo today. Here’s why I’m screaming at the computer screen.
I got this promo from Pinterest today. Photos like these are ruining travel photography and Pinterest is to blame — or maybe the readers of Pinterest are to blame.
Notice the young lady mugging for the camera in the promo for Barcelona? She is sitting on a bench in Park Güell in Barcelona. I suspect there are fifty other tourists around her trying to get the exact same shot with their cell phones.
I suspect there is a tourist on her right that is trying desperately to get the same photo. Some tourists bring shopping bags or small suitcase so they can change clothes in each photo. Selfie sticks cross and get in the way as people jostle for the same spot.
Ten years ago, photographers would have been lined up at this same location in Park Güell. They wanted a photo of the undulating benches made by Gaudi with the park below and Barcelona on the distance. The photographers would have stood at a distance so all the elements were in the frame. Traveling companions would have wandered around the huge square looking at the scene and exploring.
Group gathered around one of the famous fountains at Park Guell in Barcelona.
Today, everyone is a photographer and everyone has a camera. Today, everyone with a cell phone has to sit or stand in “the spot” to get a selfie. Then they get up, let their friend sit down and take a selfie, then both pose for a selfie, then they change clothes, sit down again to pose, then change pose . . . you get the picture.
In October I led a photo tour to Spain. We visited Seville, Cordoba, Granada, and Barcelona. The photo opportunities were amazing and we had so much fun.
Me on one of the benches at the Park Guell
I never got a photo of the lovely undulating benches at Park Güell because the benches were lined with tourists taking selfies. People were not photographing the benches made by Gaudi in the 1900s. People were photographing themselves sitting on the benches made by Gaudi.
Scroll up and look at the Pinterest photo of the lady standing on the Parasol in Seville. Such an amazing public art installation in the heart of Seville. Thanks to photos like the one you see above, the place where that lady stands is now “the spot.” Tourists will line-up to stand in that exact location, mug for the camera, smile, duck-lips, peace signs with the hands, change clothes, stand with their friends, etc.
I’ve seen these same thing happen all over the world. At Machu Picchu it is nearly impossible to get the iconic photo of the ruins because people are lined up taking selfies with the ruins in the background. A group of 10-15 friends arrive and then stand in the same location for a half hour while each is photographed individually, then in small groups, then in larger groups, then with another camera.
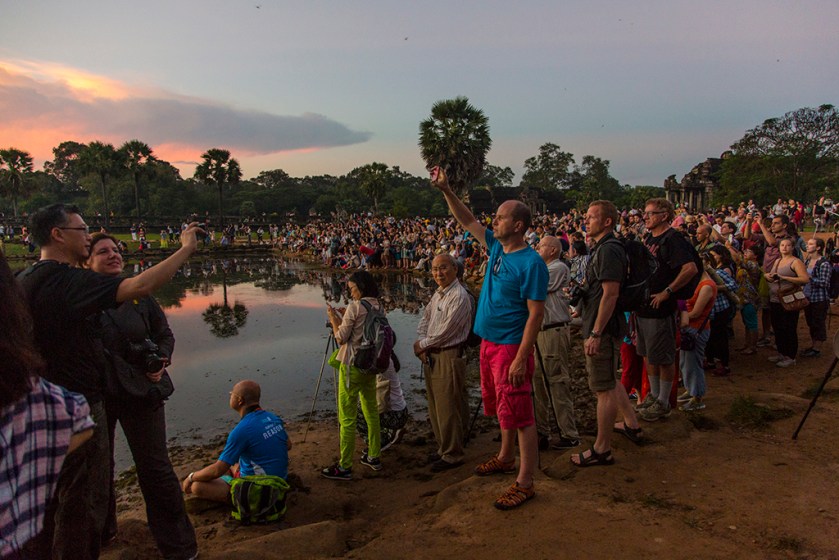
Tourists perched on a wall taking selfies at Angkor Watt in Cambodia
Two ladies taking selfies in a courtyard at Angkor Watt in Cambodia
At Angkor Watt in Cambodia people stand around the lovely courtyards to take selfies. Then they change clothes, rearrange the group, change cameras, etc. The more people move into the courtyards and repeat the process for the next 15 or 20 minutes. They are not viewing the magnificent ancient architecture — they are photographing themselves in the ancient structure.
Crowd gathered to view the sunrise at Angkor Watt in Cambodia. The pushing and shoving is something to experience. People will push in front of you unless you are standing right along the water.
The views of lovely blue domed churches in Santorini have been blocked by the hordes of tourists. People perch on white walls and angle to get their selfie with the blue domes in the background. Then they hand their camera to their friend and the friend tries to get “the shot.” Twenty minutes later that group moves and another gets into position.
Photography changes and it has changed now that everyone has a camera. I do miss the days, though, when people were more interested in the location than themselves in the location.
Two ladies mug for the camera in front of La Segrada Familia in Barcelona.
Several young ladies take selfies on the streets of Burano, Italy
I attended three, I believe, of your photography classes in 2015 or 2016. However, even now, sometimes I feel like I’m still in the pre-beginner phase.
I’m ready to think about buying and using an external flash. I have on my to-do list taking one of the Basic Intro Flash classes that you have listed for February 2018.
The purpose of this email is to ask if you can recommend a flash that is beginner-friendly, not terribly expensive, and easy-to-use for the technology challenged.
I read an article that was written in 2013. That article recommended these five flashes:
Neewer TT560 – (but it’s not an E-TTL)
Canon 270 EX II – (probably the more expensive of the five)
Yongnuo YN-560 II
Precision Design DSLR 300
Neewer NW680/TT680 (this one is the E-TTL version).
Do you have any thoughts on any of these, or is there another that you might recommend?
My Reply:
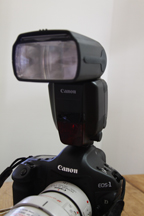
Canon 600 flash is top-of-the-lineCanon 430 EX II Control Panel
Get a Canon flash for your Canon camera. Same with Nikon users should buy Nikon flashes, Pentax should buy Pentax flashes, etc.
I worked with the Yongnuo and the Precision recently in class. The Yongnuo is like working with a “knock-off”. It looks like a Canon flash or a Nikon flash (both were in class) but it doesn’t feel like a Canon or Nikon. The head is hard to turn. The buttons on the back are clunky and clumsy. The flash exposure was erratic and not precise as it would have been with a Canon or Nikon flash.
The Precision flash was not even wroth considering. It way over-exposed during most of our classroom exercises.
I recommend the Canon 430 EX or Canon 430 EXII. The 430EX III-RT is loaded with features and a bit complicated. It’s about $250. Look around and see if you can find a 430EX II. You might be able to find one used for $150. It’s my favorite and so simple to use.
You’ll love it for years.
Take a look at some of my butterfly images on this page. All of the butterflies were photographed with a flash but none look like they were flashed. The flash should be subtle and natural. In my opinion, you only get that with a good flash.
I’ve taken a couple classes from you and have enjoyed them both. I’m still very much a beginner and still learning about my camera.
I use a Nikon d5000 and my question is, if you were going to add a lens to my kit lens which I have, would it be a 50mm (nifty fifty)? I take pictures mainly of my 4 year old daughter and have been reading about different lenses.
Any suggestions on lenses or where to buy would be greatly appreciated.
M.W.
My answer:
It’s good to hear from you. Personally, I’d buy the 70-300mm or 70-200mm before I’d buy the 50mm.
Shooting with the 50mm means your daughter has to be somewhat still and you have to be close to her to fill the frame. Use the 70-300mm or the 70-210mm and she can be running around the playground while you’re sitting on a bench and photographing her. There’s distance between you and the subject. You don’t have to be right in her face all the time.
The 50mm is a great lens for studio work. It’s not the greatest for outdoor or shooting in the living room. I know a lot of people promote it on the internet but you can get the same results with the other lenses.
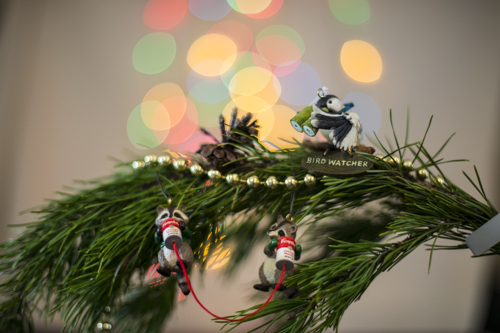
I have the 50mm and I always grab my 70-200mm first. Here’s an example why:
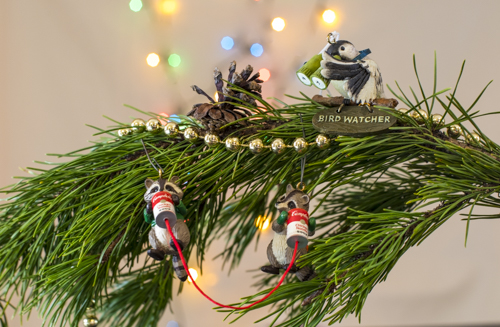
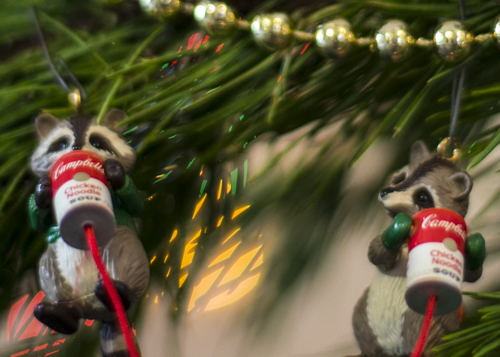
Here’s a photo of ornaments against a background with lights. This was taken with a Canon 70-200mm lens at f/7.1.The above photo is enlarged to 100%. Notice that both of the little ornaments are in focus.Same little ornament scene but this time photographed with a 50mm lens. I had to move the camera closer to the scene with the camera and tripod. The lights in the background have the great bokeh that makes people want when they use the 50mm lens.The above photo was enlarged to 100%. I used a 50mm lens set at f/1.4. Notice that both little raccoons are soft. My focus point is the little raccoon on the left. Its eyes are in focus but the soup can is soft. The raccoon on the right is totally soft.
Recapping, the 50mm f/1.4 lens gives a great bokeh or blown-out-background. Yet, if you shoot it at f/1.4 the depth-of-field is super shallow. The lens should be used at an f/stop appropriate for the subject. You’ll also need to get closer to the subject than with the 70-200mm lens.
Hope that helps. I’d let you borrow my 50mm if you used a Canon. It doesn’t get much use.
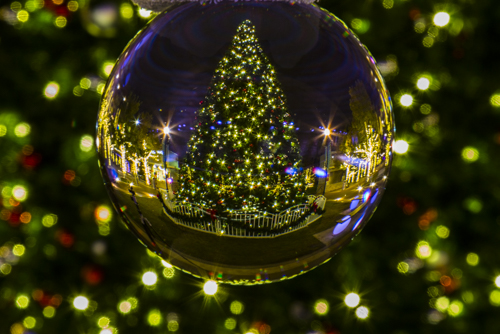
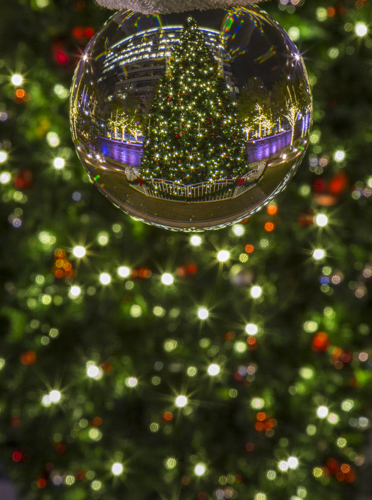
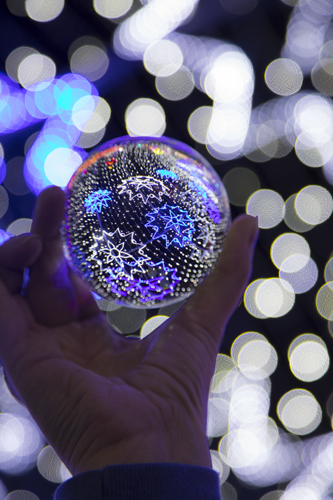
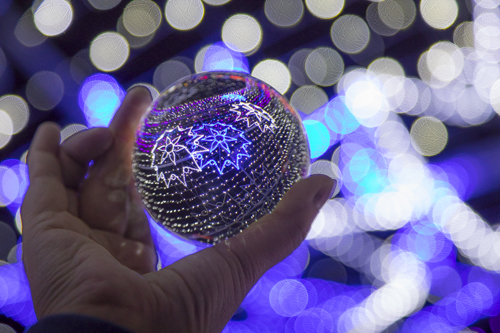
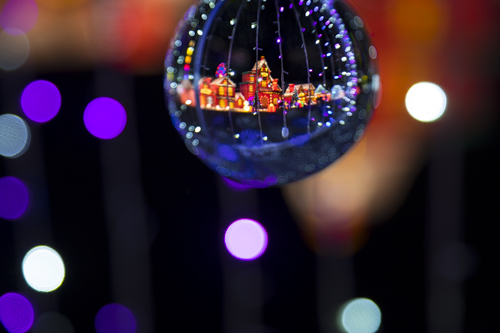
Holiday lights reflected in a 4.2-inch crystal ball. The ball is placed on a tripod. The photo is flipped in Adobe Camera Raw.The same 4.2-inch crystal ball held in a hand. No need to flip the photo.Shallow f/stop, f/4.5, to soften the lights in the background.
F/stop at 4.5
F/stop at 22
F/stop from 4.5 to 22 to change the background.
Where do you get a crystal ball? Amazon, of course.
My friend, Patti Edens, and I spent the evening at Magical Winter Lights in LaMarque, Texas, last week.
The lighted displays were a lot of fun to photograph. As you see from the slideshow below, there were huge and amazing lighted objects to photograph. We had our cameras on a tripod and used an f/22 most of the time.
This slideshow requires JavaScript.
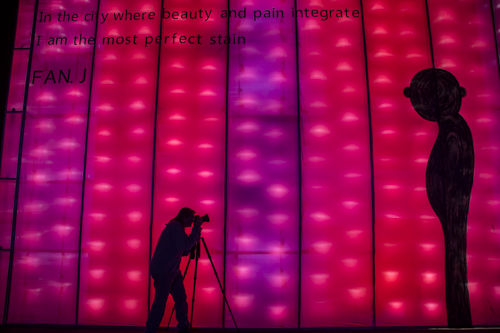
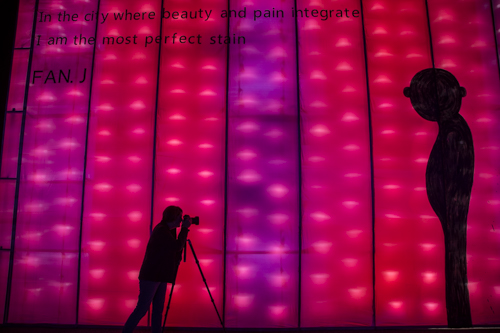
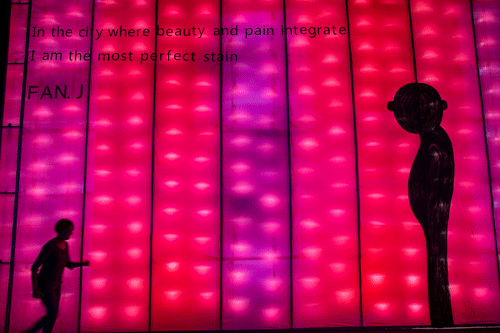
A different display was a lighted cube. It was pink, red, and purple outside but filled with disorienting colors inside.
Outside the cube was a huge silhouette of a potbellied man. The words “In the city where beauty and pain integrate, I am the most perfect stain,” by Fan J.
How funny to see a huge pink cube in the middle of a lighted holiday display. Yet the cube captivated our eyes.
Patti silhouetted against the pink wall.Me against the giant pink wall.
Camera settings were pretty basic. Camera on a tripod, set at Aperture Priority, f/22, and ISO in a moderate range like 400 or 500. For the silhouette photos, we just stood pretty still.
For this GIF, though, we used a fast enough shutter speed to freeze the walking. That meant changing the f/stop to a f/4.5 giving a shutter speed of 1/40th. The shutter speed gave us a bit of blur but not too much.
Fun playing with lights and our cameras.
(Instructions how to make a GIF are in December 6, 2017 blog post on this site.)
A lot of holiday light displays are using lights that simulate motion. I visited the Magical Winter Lights display in LaMarque Texas with my friend Patti Edens. We found lots of fun lights to photograph but also a lot of light that could make GIFs.
If you shoot RAW, then make JPGs from the images you want to use in your GIF.
Here’s how to do it:
Open Photoshop and click on Files>Scripts>Load Files Into Stack….
Select Browse and select the photos for your GIF. Then click OK. Photoshop will open the images in a series of layers.
Click on Window>Timeline. The Timeline window opens along the bottom of your screen.
In the Timeline window, select Create Frame Animation. One photo appears on the left side of the Timeline window.
Click Select>All Layers
Click the little, tiny dropdown menu at the top right of the Timeline window. (It’s really tiny. Look for it in the corner.) Select Create New Layer For Each New Frame.
Click the same menu again and select Make Frames From Layers
Under each frame select how long you want that frame to be visible.
At the bottom of the toolbar, you can select how many times you want to the GIF to loop. The options are once, three times, or forever.
Push the play button to preview the GIF. The play button is a sideways triangle.
When ready, click File>Export>Save for Web (Legecy)
Your save options include dithered GIF. That prevents banding in solid colors.
Then upload your GIF to the web or use in a Powerpoint presentation.
Be sure to load our photos in the right sequence. These photos were loaded backwards.