Photographing Fireworks

Fireworks, Kemah Boardwalk, Kemah, Texas, Amusement park.Do you have your spot staked out? Do you know where you’re going to be 90-minutes or two-hours before the fireworks start?

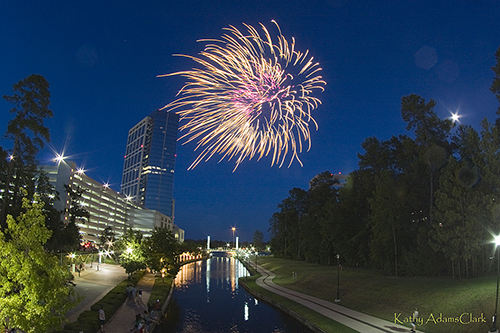
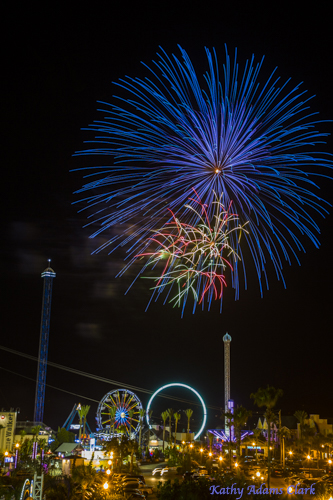
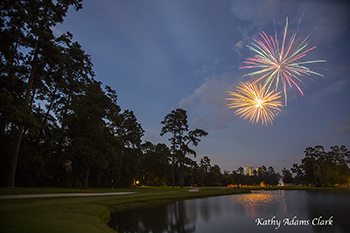
Wonderful photos of fireworks come when you’ve thought about your vantage point. Then you’re there and ready to go when the display starts.

Equipment: Tripod, camera, and optional cable release. Camera set on Aperture Priority with the aperture set at 4.5 or 5.6. That gives you a lot of light. Then ISO at about 400. No need for too high of an ISO because then the color and grain are sacrificed.

Once the fireworks begin, check your photos periodically on the back of the camera. Long shutter speed means lots of streaks, or draping, in the fireworks burst. Shot shutter speed means dots of light in the sky versus streaks.

Fireworks, Galveston Bay, Kemah Boardwalk, Kemah, Texas.
Want more streaks in your fireworks? Use a longer shutter speed.  I shoot in Aperture Priority, so that means I move my f/stop to f/8 or f/10 to get a longer shutter speed.

Want more shutter speed? Move the aperture to f/8. (Watch the shutter speed increase as the sky fills with a fireworks burst. The shutter speed goes down when there are no bursts in the sky.)

Avoid clicking the shutter when there are no fireworks in the sky.  Hit the shutter when  the burst begins. This gives your photos a better exposure since the light meter is set for light in the sky versus a dark sky.

Take most of your photos early in the display. Smoke fills the sky toward the end of the display and doesn’t look as good.

Have fun. Enjoy yourself! Take good pictures!!

Fireworks: Stakeout Your Location

Fireworks in The Woodlands, Texas, on the 4th of July.  Fourth of JulyThe 4th of July is coming up in the United States.  That means fireworks displays all over the country.

Now is the time to figure out where you’re going to stand so you can get magnificent photos of your local display.

I suggest you start doing your research now.  Figure out the launching location.  This is usually published in the local newspaper or municipal website.   Then figure out where you’re going to stand so there’s an interesting foreground.

If possible, scout the area ahead of time.  I know that sounds crazy and obsessive but there are a lot of photographers out there.  I guarantee five other photographers have found the same location.

(I found my spot and scouted the area during my morning walk.  I have my prime location and two other contingency locations.)

Fireworks KAC9844 croppedConsider getting into location early.  That might mean two-hours ahead of time in super crowded locations.  Maybe only thirty minutes for a small town display.   Go ahead and break it to your family that you need to be on location ahead of time.  Get everyone prepared.

Fireworks over The Woodlands


Vacation Photography — Remove All Those Tourists — Well, maybe

Some say that HDR, or high-dynamic range, is a great way to remove tourists from our photos taken in busy vacation locations.  Well, maybe sometimes.

First some explanations.  HDR is high-dynamic range photography.  Our eye sees 22-stops of light but the camera can capture about 5-stops.  HDR images allow us to photograph details in the shadows while still maintaining details in the highlights.

To create a HDR photo, we take 2 or more photos from the same location and vary the exposure.  The examples below have been created from seven photos.  The exposures range from balanced light meter to -3-stops all the way to +3-stops.

HDR software has an option to deghost or remove people.  Deghosting removes people from the final photo if those people didn’t appear in the same spot in all the photos.  There’s usually a scale so we can vary the intensity of deghosting.  I’ve set the deghosting to maximum on each image.

You see that people are still in my photo of the busy street in San Gimignano, Italy.  The only person who stood still through all seven photos was the man in the gray windbreaker on the left.  Everyone else moved.  The lady in the orange coat walked straight at the camera through all seven photos.  The man with the umbrella walked across the scene from right to left.

In conclusion, the crowded street is still crowded with people.  The different software, though, handled processing in a variety of ways.


San Gimignano Italy KAC5699_HDR_aurora
This is an HDR image created with Macphun’s Aurora HDR software.
San Gimignano Italy KAC5699_HDR_nik
This is an HDR image created from the same files but processed with Nik’s  HDR Efex software.  Notice that there’s a half person on the left and two half people on the right.  We call these “ghosts.”  All of the HDR software offer a deghosting option.
San Gimignano Italy KAC5699-HDR_PS
Same files processed in Photoshop’s Adobe Camera Raw HDR feature.  Notice there is no ghosting.  The man with the umbrella in the center of the photo doesn’t appear in that location in any of the other examples.

Here are the seven photos used to build these HDR photos.

This slideshow requires JavaScript.

Vacation Photography — Remove All Those Tourist

We’ve all encountered vacation locations crowded with other tourists.  A clear shot of the amazing location is impossible because people keep walking through the scene.  Our irritation grows as each opportunity for a great photo is messed-up by one more human walking through the scene.

It is possible to get rid of all those pesky tourists.  Capture the scene is the right way and then ask Photoshop to come to the rescue!

At the location — Put your camera on a tripod.  Compose your amazing photo.  Focus on one spot so the focus point in your scene does not change.  Then take a series of photos as people move through the scene.  Space the time between photos.  You don’t want anyone to be in the same spot in all of the photos.

Later on the computer — Open Photoshop.  Click File>Scripts>Statistics.  A dialogue box will open.  Select “Median” from the drop-down menu.  Then select the photos you took at the crowded tourist location.

Screen Shot 2017-06-10 at 11.42.27 AM
Screen capture with all the photos selected

Here are all the photos I took at the location.

Press the OK button and Photoshop will go to work.  In a few seconds or minutes, your final photo will be presented on the screen.

Landry Kemah Boardwalk KAC9306_12 stack
This is the composite of the seven image I showed above. Notice that there’s a bit of a smudgy area on the right.
Landry Kemah Boardwalk KAC9306_12 stackfixed
I took the image back into Adobe Camera Raw and did a bit of work on the smudgy area on the right using the healing brush.  A bit more work and all of the smudge could be erased.

Notice that the people on the bench were in all the photos.  That means they will stay in the finished photo.  There’s no way around that.

Enjoy this technique as you visit crowded tourist locations during your travels.

Nature Photography Day — June 15


A reminder that June 15th is Nature Photography Day.  That’s a day to celebrate and spread the word about nature photography.

The North American Nature Photography Association is holding a photo contest to celebrate Nature Photography Day.  There are some nice prizes.

Check out the contest and enter your best image.  We can post one photo a day.  Great way to see and share great photographs of our natural world.


Two Bad Words in Photography — Crop & High ISO

Back in 2002 and 2003, at the dawn of digital photography with SLR cameras, there were two bad words.  Crop and High ISO.  No photographer wanted to crop a photo and no photographer wanted to use high ISO.

Why?  The photos produced by a Canon 10D or Nikon D100 were only 8MB.  They were 12-bit and 240 pixels-per-inch on the longest side.  Yet, they really weren’t much bigger than the photos we get today from a high-end cell phone camera.

Our photos from the Canon 10D or Nikon D100 were good enough for a magazine cover or full-page photo inside.  We didn’t want to crop, though, unless absolutely necessary.

Today we have DSLR camera that take 24MB files and higher.  We can crop without worrying that the files aren’t big enough to appear in a magazine or that the files aren’t big enough for a nice print.

Least sandpiper KAC7711_1

We can crop our photos thanks for cameras that produce large files.

Avoiding high ISO is also a thing of the past.  Back in the dark ages of digital photography it was really hard to get rid of noise due to using a high ISO.  ISO 400 was acceptable but ISO 800 or ISO 1600 was only for the newspaper photographers.  Newspaper reproduction quality was nothing like the quality we needed for glossy magazines.

That all changed when Adobe gave us noise reduction.  Each generation of Adobe Camera Raw and Lightroom does a better and better job of reducing those noisy pixels.

“High ISO?  No problem.  I’ll take that out in Photoshop or Lightroom later on.”

How nice it is to push the boundaries of photography today knowing we can crop and use high ISO.

This slideshow requires JavaScript.

The three images in this slide show were shot at high ISO and then cropped.

I still try to crop in the camera when possible — that means I get closer and move to eliminate distractions.  I sometimes use a shorter lenses because I can crop versus lugging the 500mm everywhere to photograph birds.

High ISO has become a friend.  It’s so nice to know I can raise the ISO and never miss an opportunity.  I might miss the shot but at least I didn’t miss the opportunity.

Digital photography is evolving fast.  Thanks to great innovations in camera technology and software development we benefit and can leave two bad words behind.


%d bloggers like this: