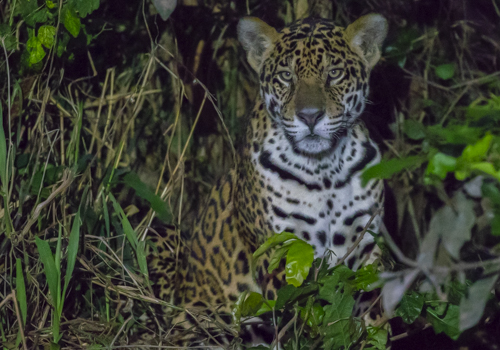
At sunset in July we were cruising down the Rio Piquiri in the Pantanal of Brazil. Junior, the boat driver, killed the motor and pointed to a pair of jaguars sitting on the riverbank.
Jaguar photographed at 51,200 ISO with the aid of a flashlight. Canon 1Dx, f/8, 1/160th shutter speed.
There were 10 people in the boat and all were squirming to get their cameras and find the jaguars. The boat was bobbing in the water. There was a lot of movement to try to photograph something after sunset.
I pushed the ISO button on my camera and rolled the dial all the way to 51,200. I could only get a 50th of a second shutter speed. No way the photos were going to work with a shutter speed like that!
Raul, our guide, had been bragging about this high-powered flashlight that he’d received as a gift from a previous guest. His little flashlight was nearly a spotlight.
“Raul, point that flashlight at the jaguars!” I yelled. It was magic! The light was enough light to give us shutter speeds in the 1/160th or 1/200th of a second range.
A modern high-power flashlight and modern cameras with high ISO gave us the ability to photograph a jaguar in the dark. I love it!
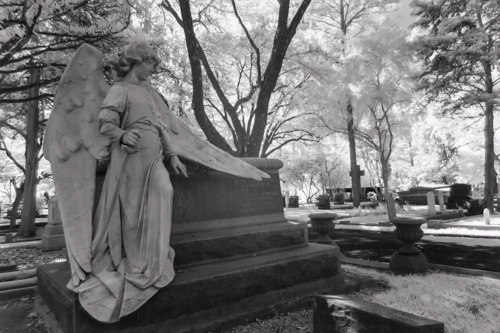
I love infrared photos but somehow I never seemed to get around to having an old camera converted to infrared. So earlier this year I got an email ad from Singh-Ray Filters advertising their infrared filter. My hand grabbed my computer mouse without my will and order the filter. Before I knew it, Singh-Ray’s IR 690 filter was heading to my doorstep.
Photo out of the camera with IR 690 filter
The filter arrived, I read some articles online, and then went out to give it a try. The photos came out RED. Yep, they were red but they were supposed to be red.
The articles I read said that the photos out of the camera would be red. I was then supposed to process with method #1, method #2, or method #3 to get an infrared image.
I tried all the methods and simply had a black-and-white image. No snowy-white grass or grass that look so great in infrared photos. I could never get anything that even remotely looked like infrared.
The above photo processed is just a black-and-white photo.
Out of frustration, I sent an email to the folks at Singh-Ray Filters. I got an immediate response and they put me in touch with one of their experts. That man and I exchanged photos and emails for the next two weeks. I shot photos with the filter, processed them per his instructions, but nothing worked. He paid for me to ship my filter to him so he could use it on his camera.
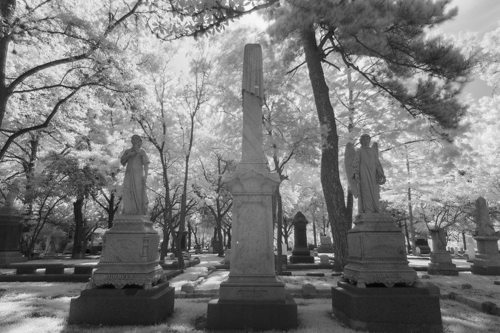
In the end, we found that my Canon 5D Mark IV and my Canon Rebel need a Singh-Ray 830 Infrared filter. The IR 690 filter only yields a black-and-white image after processing.
Mystery solved. Singh-Ray Filters immediately shipped me an 830 Infrared Filter and issued a credit for my 690 IR filter once they received it.
Processed images using the 830 Infrared Filter from Singh-Ray Filters. Notice the white tree leaves.Processed images using the 830 Infrared Filter from Singh-Ray Filters. Notice the white tree leaves in the center and white grass on the ground.
Thanks to the great customer service at Singh-Ray Filters I’m now shooting infrared photos and loving my 830 Infrared filter.
By the way, the IR 690 filter works fine on Nikon camera. We found this situation only applies to Canon cameras.
Here’s how to take a photo with the 830 Infrared Filter:
Set the camera to the Bulb exposure mode and decide which f/stop you’ll use.
Frame the shot and focus the lens.
Turn off auto-focus on the lens.
Screw the filter on the lens without moving the focus ring.
You can’t see through the IR filters.
With the camera in Bulb
Take the photo with the shutter open for about 4-minute.
Adjust based on the histogram. A bit less time if the photo is too bright or a bit more time if the photo is too dark.
Here’s my method for processing photos taken with the 830 Infrared Filter:
Open in Adobe Camera Raw or Lightroom
Open Hue Saturation Luminance
Move the red Luminance slider all the way to the right
Move the red Saturation slider all the way to the left
This gets rid of the red cast to the photo
Go back to the Basic Tab
Move the Exposure slider so the histogram hits the right corner
Move the Black slider so the histogram hits the left corner
Add some Contrast
Continue processing to taste
I’ve just begun shooting in infrared and processing those photos. Stay tuned. More discoveries in store.