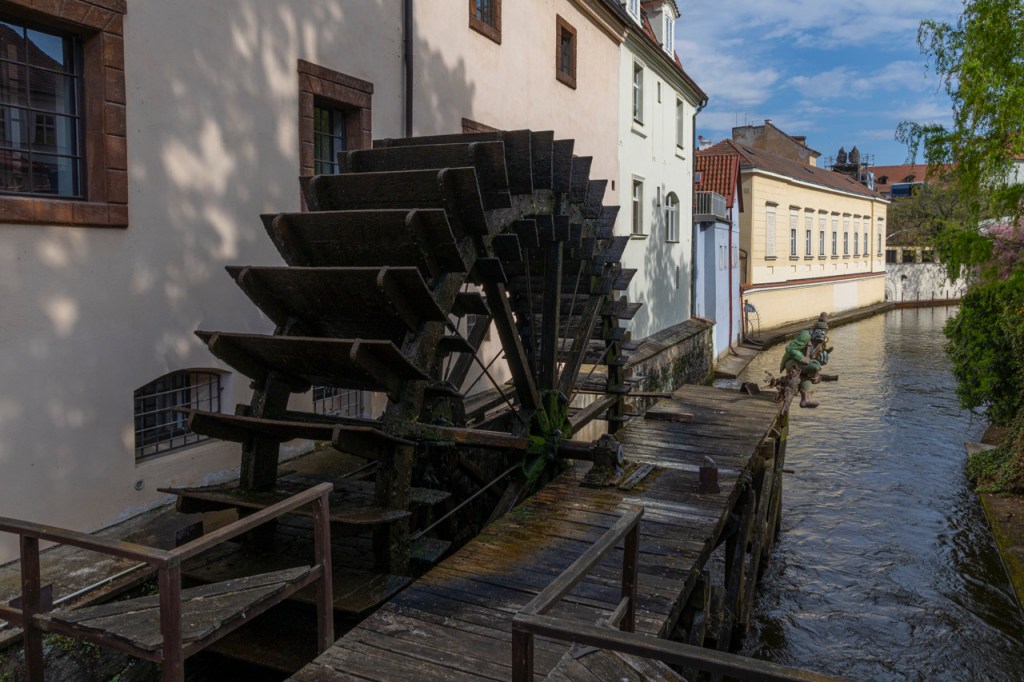
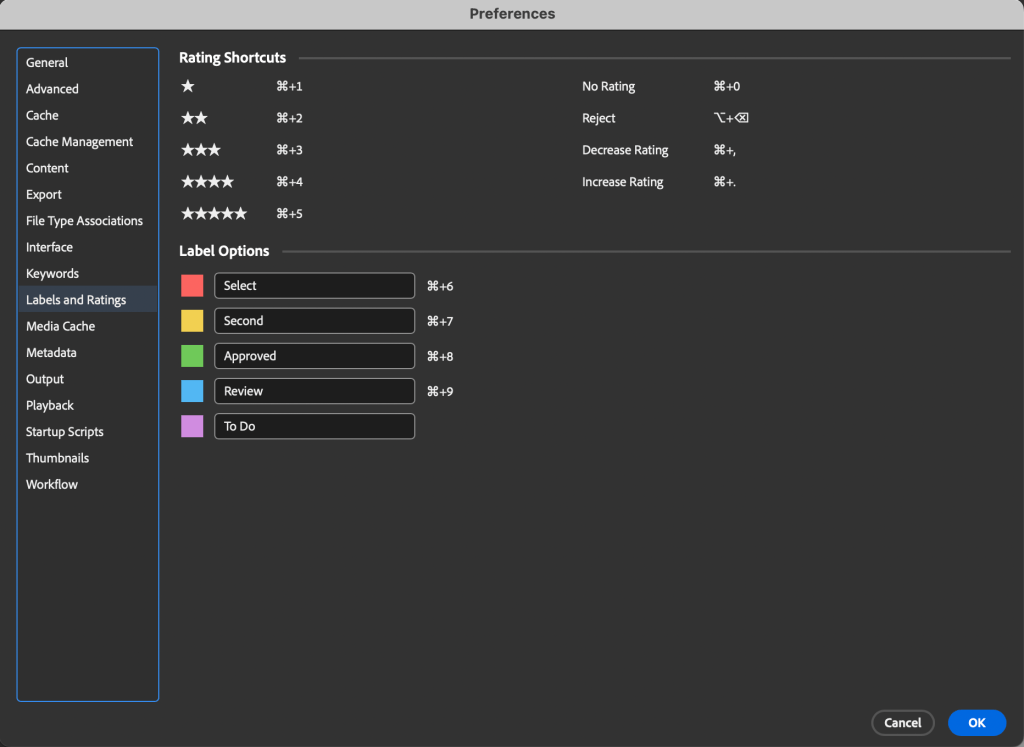
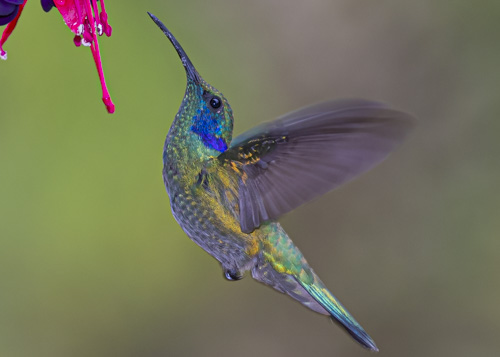
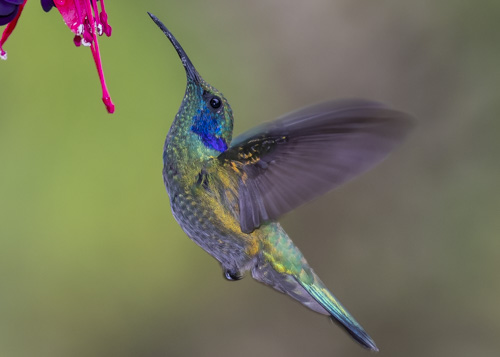
Image straight out of the camera on the left. On the right is my processing. Shadow slider to the right, highlight slider of the left, 20-30 each on Saturation, Vibrance, and Texture in Lightroom or Adobe Camera Raw.
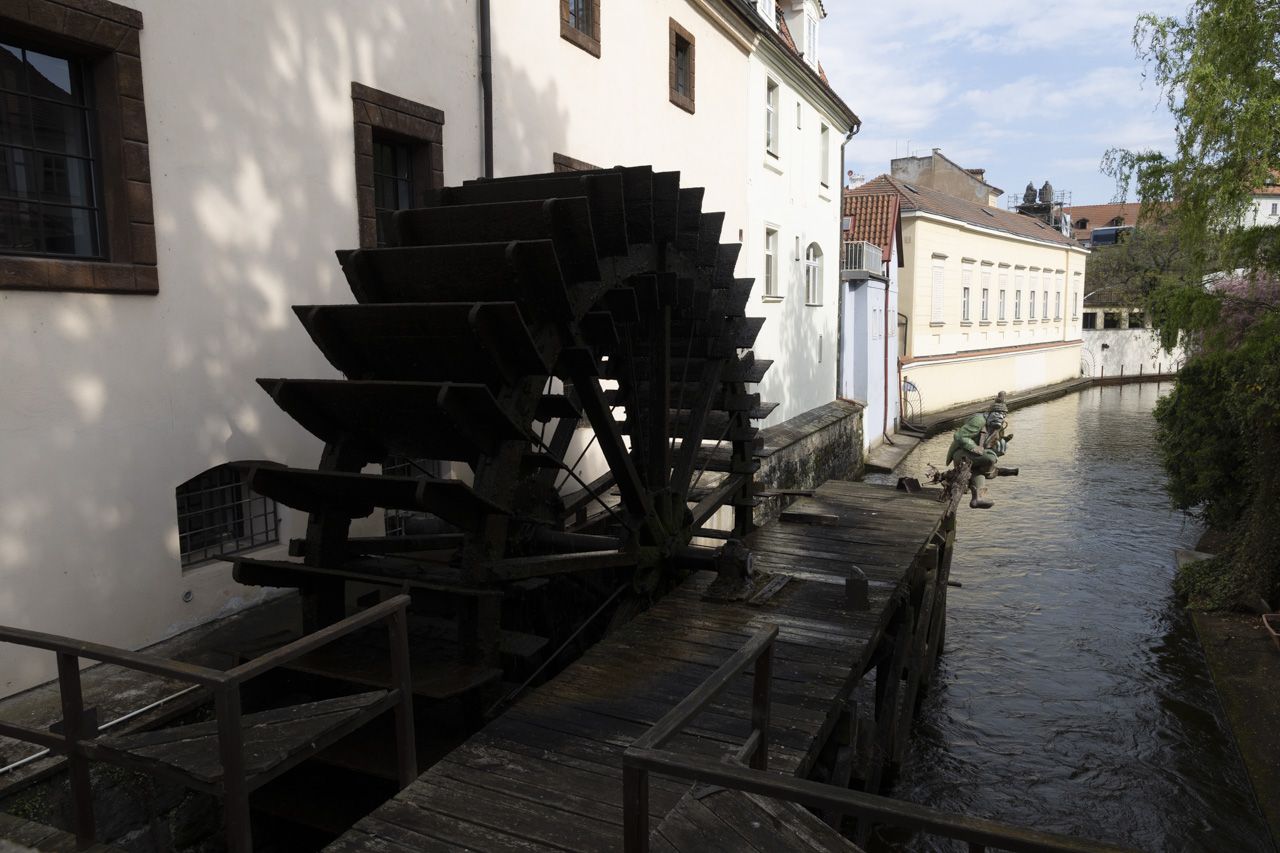
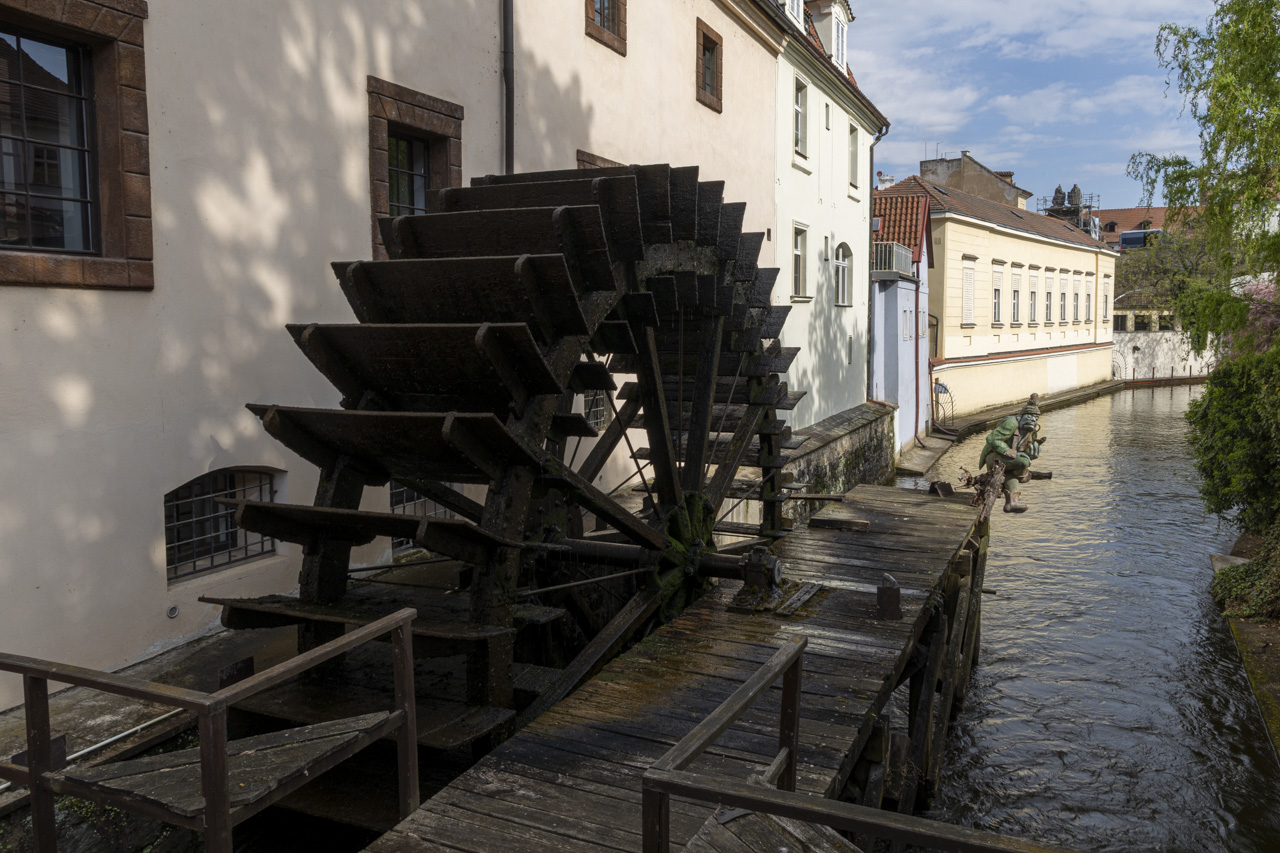
Auto processing on the left. Adaptive Color on the right. Both buttons found in Lightroom or Adobe Camera Raw.
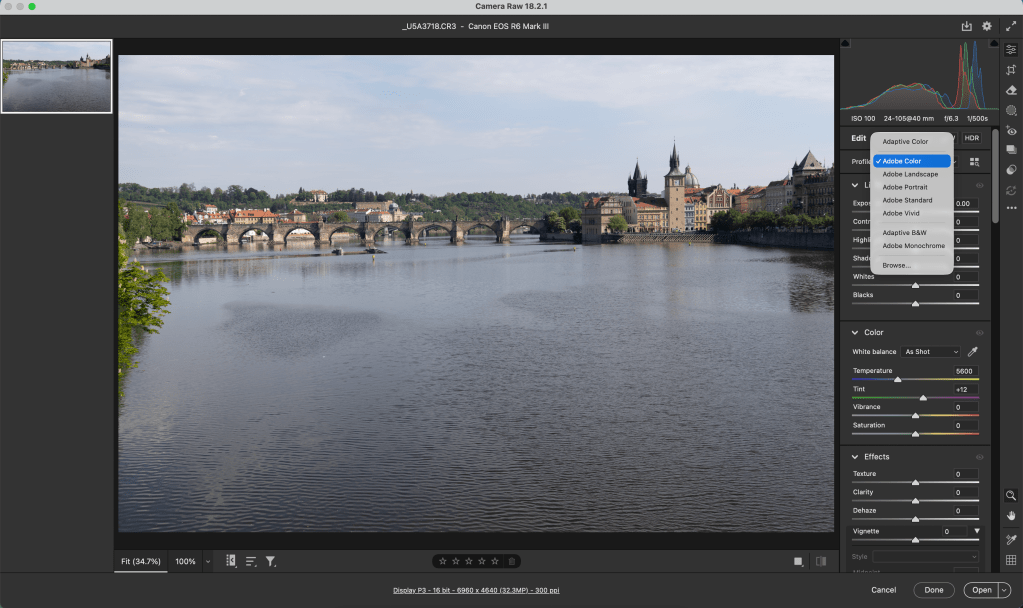
Just in case you’re not familiar with Auto or Adaptive Color, here’s a screen capture. These are “presets” that process your images for you. Or, maybe give you a starting point.
Do you see a preference? The differences are subtle. Let me know your thoughts.
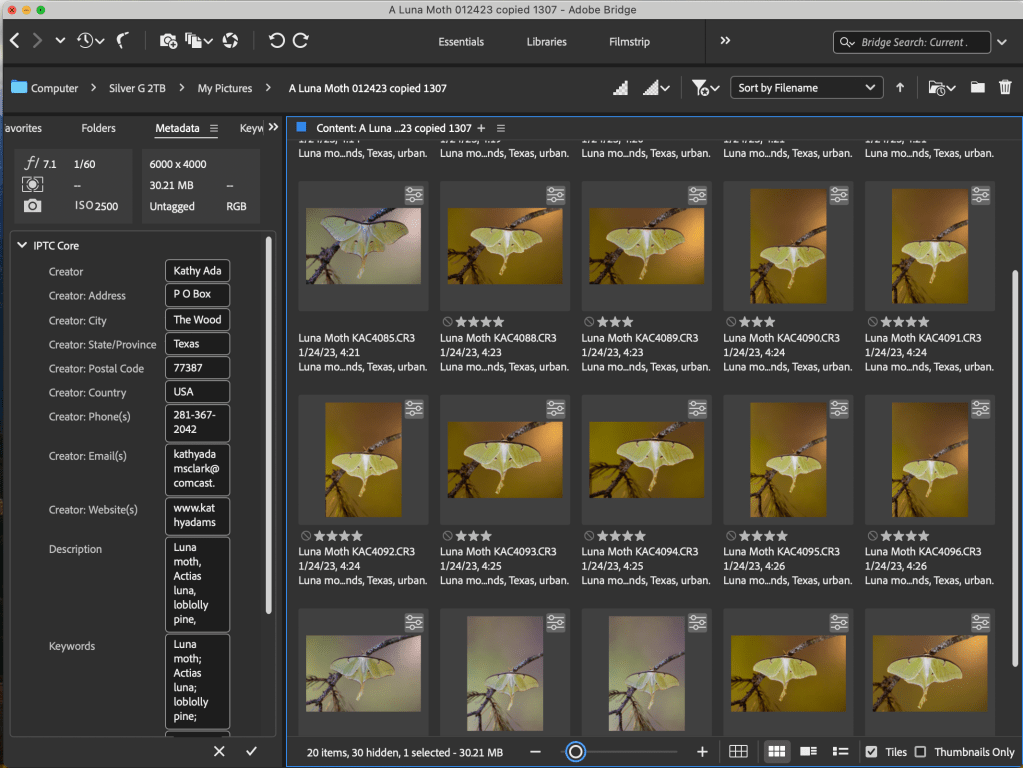
My friend Will wrote to ask me why the word “reject” was showing under his photo in Bridge.
Will wrote that he was using Adobe Bridge to edit photos from a recent shoot. The red “reject” was under some photos for an unknown reason.
Solution
I’ve used Bridge since it came out in 2005 and I’ve never seen the “reject.” I remember, though, hearing Lightroom users talk about rejecting photos versus just deleting them.
I checked the Settings in Bridge and found there was an option to “reject” when labeling images. See the screen capture below. Option + Delete key gives “reject.”
My Method
I don’t use the reject option when editing images. While editing a batch of images in Adobe Camera Raw, I enlarge each image to 100% and give it a rating. 5 stars is an amazing, great image; 4 stars is a really strong image; 3 stars is average and what’s expected; 2 stars is slightly blurred but maybe worth keeping; 1 star is not worth keeping; no stars is a delete.
Below is a screen capture of Bridge after I’ve edited all of the images as a batch in Adobe Camera Raw and rated them.
I’ll keep the images with 5, 4, or 3 stars. The images with less than three stars will be deleted. There’s no need to keep lesser quality images in the catalogue.
The star system also helps me select the best image later when I’m searching images in the Lightroom catalogue or Library. I can immediately go to the 5 or 4 star images versus looking at each image in a series again.
Great question from Will. It was fun finding the answer to his problem. I hope the answer and other information might help others.
October 2022 gave us the annual grande-sized upgrade to our Adobe products. When I logged on to my Adobe Cloud and clicked the Update tab on the left, I saw that my Photoshop, Adobe Camera Raw, Bridge, and Lightroom all had updates.
The annual updates are historically big. Adobe sends the little stuff throughout the year and then WHAM! we get hit with the big stuff in October.
Warning! Update when you have time to review the changes. I wouldn’t suggest you push the Update tab when you have a big photo deadline looming. Things you use everyday might get moved, renamed, or combined. Yet, we also get some great new tools.
Here are the big things I really like in the 2022 Update
Bridge has a Workflow tab at the top. You can save workflows that you do on a regular basis. For example, your camera club wants monthly submissions at a specific ppi and size on the longest side of the photo. You can now do that workflow once and save it as a preset. Learn how to build a workflow by clicking the Learn More tab at the bottom of the Workflow screen. Or click this Workflow Builder tutorial from Adobe.
Bridge users who’ve attended my classes might notice that Bridge looks a bit different the first time you open it. Don’t freak out! Click the “Workspace 1” tab at the top. That’s the workspace I helped you build and it’s still there.
Adobe Camera Raw has changes too! Double-click a RAW file in Bridge and Adobe Camera Raw opens automatically. (Readers learned how to do this in my classes and via my YouTube videos.)
Lightroom’s Develop Module and Adobe Camera Raw do the same things so I’ll introduce all the new features together.
Masking has combined the old adjustment brush, radial filter, and graduated filter.
The tools behind this tab are HUGE! You can now click Select Subject and the software creates a mask around the subject. It does a pretty good job, too. Hover your cursor over the subject and you’ll see sliders on the right. Now you can process just for the subject.
Click Select Sky and the sky is selected. Hover your cursor over the sky and sliders appear. Now you can process just the sky.
Play around and you’ll see that you can enlarge, shrink, or fine-tune the mask.
Luminance Range allows you to only select a luminance range. Color Range allows you to select just certain colors. Then you can adjust that color only. Anyone for a bit more yellow in autumn leaves? A bit more turquoise in a cormorant’s eye?
Want to only adjust the shadows to change their tone? Here’s your way to do it.
Lightroom Users! This is a game changer for you. You now have layers.
Layers Resisters! This is a way for you to start using layers without having to really know all the technicals of Photoshop layers.
Adobe offers a great tutorial when you click on the Masking icon the first time. Read the instructions — they are super simple — and learn how to use this great new too.
Photoshop has some great new tools, too.
The toolbar now has Object Selection Tool. Click the icon and then watch the little circular arrows at the top. When the arrows stop turning, you know the software has selected an object. Nudge the software along if nothing happens by clicking on one of the subjects in the photo.
Once an object is selected, click the Adjustments palette on the right. Choose one type of Adjustment and a layer mask appears. (If you don’t see either of these, click Windows and be sure Layer is checked.) Those of you who know layers will find yourself right at home at this stage.
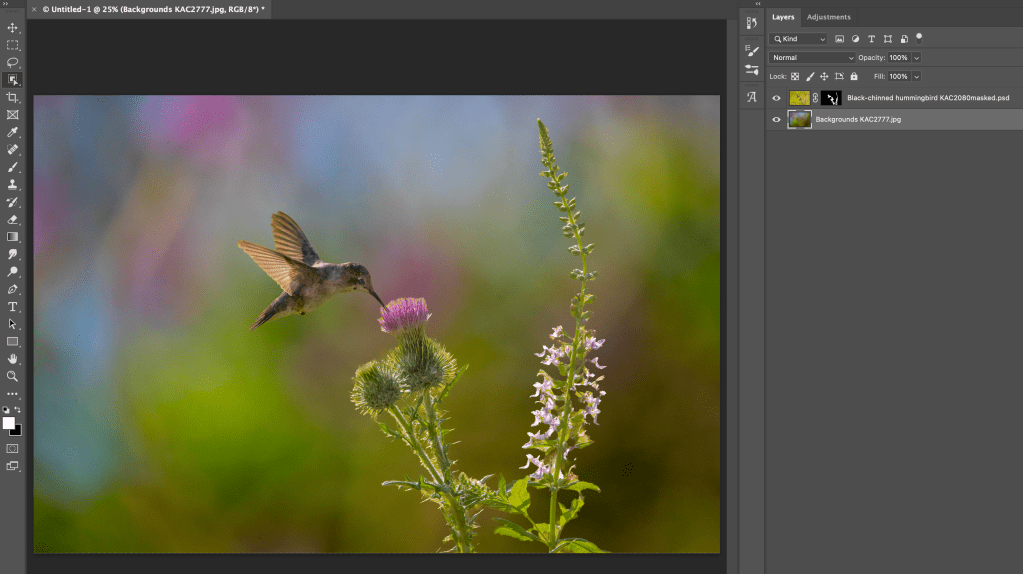
Another new thing is called Harmonization. Sometimes when we work with different photos in layers, we get colors that don’t really go together. This is especially true when we’re working with Textures.
This is a good example of two photos stacked into a layer that aren’t exactly in color harmony.
Harmonization to the Rescue!
Click Filters>Neural Filters>Harmonization. A new pop-out panel will appear. (Click the download button to download the filter the first time.)
Wait, wait, wait!!! The process bar at the bottom of the photo shows you the software is working.
Notice the tiny blue bar under the big photo. The software is still working so be patient.
Once Harmonization is finished working, you can use the sliders to fine tune the color harmony. Click OK and a new layer is created in your layer stack. Now you can go in the layer masks, use black or white brushes, and clean-up the image.
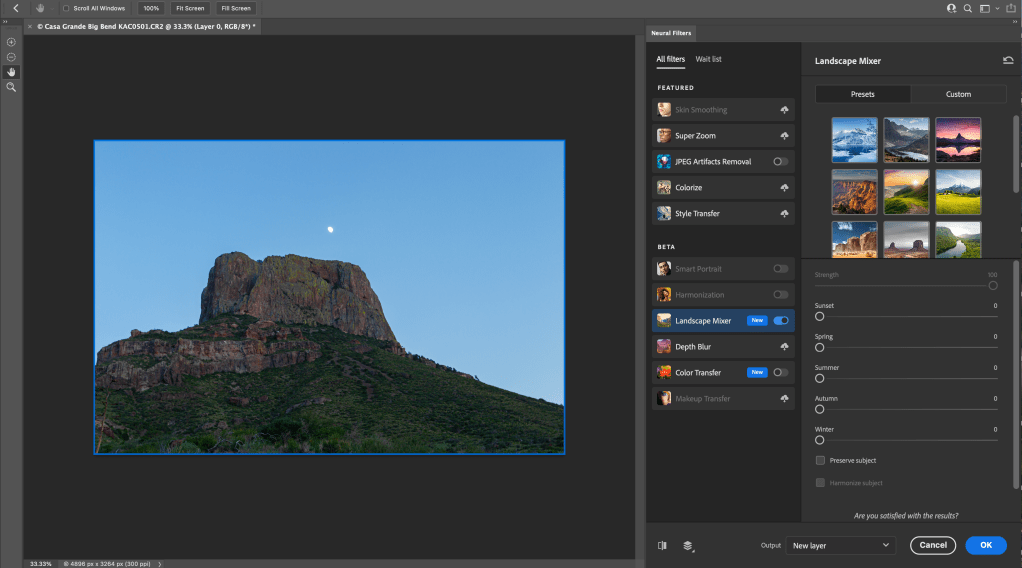
Landscape Mixer is another interesting Neural Filter. Open a landscape photo in Photoshop. Click Filter>Neural Filters>Landscape Mixer. The Landscape Mixer shows up. (Click the Download button to get the filter the first time.)
Open an image in Photoshop, click Filter>Neural Filters>Landscape Mixer to get this screen.
Notice you have sliders for Sunset, Spring, Summer, Autumn and Winter. I’ll move the Winter slider almost all the way to the right. Wait, wait, wait and watch the blue bar move slowly along its path.
The end product is Casa Grande in Big Bend National Park in the snow at twilight! The trees are green but that’s a minor problem. Notice that there are other option to choose from. I’ve given an extreme example but I can see how this tool might be useful to some photographers.
I hope you’ve enjoyed this brief overview. Adobe has given us some nice new tools. The tutorials provided by Adobe are simple and easy to understand. Update your software when you have some time to play. We’ve got a lot of new toys tools.
Comments? Did I miss any new features that you like? Post below.
Photoshop came first from Adobe. Everything that any creative person needed in one place.
The Photoshop program is becoming less and less needed. At one time, all the tools were in Photoshop.
Then Bridge and Adobe Camera Raw came along. Organization and sliders in Adobe Camera Raw to process our photos.
Then Adobe made Adobe Camera Raw (ACR) and moved Photoshop’s photography tools into sliders. We had everything we needed to process our photos in one place. Adobe gave us Bridge as a “light table” where we could layout all our photos and work with them.
Then Adobe made Elements and put photography tools into sliders.
Then Lightroom came along from Adobe
Then Adobe made Lightroom and put those same photography tools into sliders. Lightroom took the Bridge concept to a new level. Lightroom’s Library is a database so you can layout lots of photos from different folders onto a “light table” and work with them.
Lightroom’s Library is super-powerful and super-complicated. I recommend the Scott Kelby book to learn and understand Library. Life gets complicated when you update computers, work on two external hard drives, merge or split catalogues, etc. Sometimes you have to call in an expert because the Library is a mess.
Thanks to Adobe we have three programs to process our photos.
· Bridge/Adobe Camera Raw,
· Elements, or
· Lightroom.
The one you choose is up to you. Bridge/Adobe Camera Raw and Lightroom do exactly the same thing when it comes to processing. The difference is interface.
Bridge/Adobe Camera Raw lets you file your photos the way you want.
Lightroom files your photos for you and you need to understand what it’s doing. Hence the need for Scott Kelby’s book, lots of online videos, The Lightroom Queen, etc. I tell people on my workshops “I will not help you find your lost photos in Lightroom. I will help you process your photos in Lightroom.” If you use Lightroom, take time to understand the Library feature. In my experience, this happens in only 25% of Lightroom users.
Personally, I find the Bridge/Adobe Camera Raw combination easier to use. I copy my pictures from my card to a folder under My Pictures, open Bridge, go to that folder, start processing. Simple and easy. The 25% who understand Lightroom’s Library say the same thing about Lightroom. (The Lightroom versus Adobe Camera Raw argument is amazing among photographers. More powerful than Mac vs. PC or Canon vs. Nikon.)
But what about Photoshop? Photoshop has Layers and we still occasionally need layers. There are still photographers who use layers to make vignettes even though we have a slider for vignette in Lightroom and Adobe Camera Raw. There are still photographers who use Layers to open shadows despite the great shadow slider in Adobe Camera Raw and Lightroom.
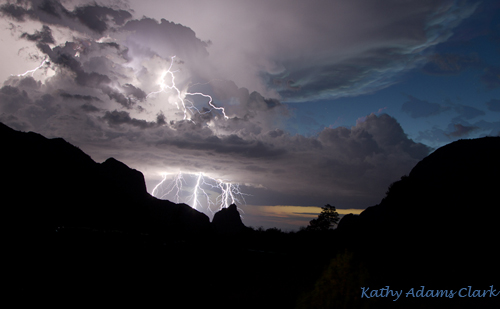
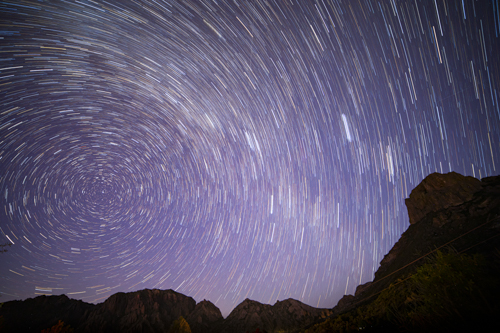
Layers in Photoshop are needed for a lot of advanced processing. Merging star trails, for example. Merging lightning strikes for a more dramatic photo, for example. Photos with light painting need layers. We can make a mat for our photos in Layers. Good stuff happens in Layers and we can only get that in Photoshop.
We need Photoshop Layers to blend multiple photos like this lightning storm or star trails.
At one time, we could only get panoramas with Layers. Now we have a feature in Lightroom and Adobe Camera Raw for that.
I’ll offer a Photoshop Layers class in the coming weeks. Layers is a powerful tool but has a steep learning curve. I’m not a master but know how to get what I need – most of the time.
The photography world is awash with presets. Companies like Luminar and Nik offer great presets. I’m a big fan and use presets from both companies.
Yet, I think photographers need to learn how to use presets.
Just because you can use a preset, doesn’t mean you should use a preset. We used to say the same about the saturation slider, by the way. Just because the slider goes all the way to the right, doesn’t mean you should move it all the way to the right.
What’s a preset? Presets are “pre-made” formulas for processing an image. The various sliders in a software are “pre-set” to give a specific look. Presets are a bit like using the Auto mode on your camera. Auto mode is okay but it’s better when you really learn how to use the camera.
I’ve used presets for years to process HDR image. It was simple to scroll through the presets in Photomatix back in the old days to get the HDR look I wanted. Critics were screaming “HDR looks so fake!” because photographers were overdoing the presets in Photomatix.
HDR looked great, though, if the processing was in moderation. A photo editor once asked me to send “more of those dreamy-looking photos” for a project. Those “dreamy photos” were HDR images with moderate processing.
Today we have presets from big companies, small companies, and individuals. A photographer recently told me that he only uses Pentax presets because that’s how Pentax files are designed to be processed. Turns out someone has made presets and is marketing them to Pentax users.
I recently watched a photographer accept gushing praise for an image that I know was processed with a preset. The processing wasn’t that great. To the uneducated eye, though, the photographer appeared to be on location at the exact right magical moment when the light was perfect. Nope! The magic came from a preset.
Photos entered in a recent contest were passed over by the judges because the presets were so exaggerated. These were possible winning images but the processing was too much. The photographer needs to learn where, when, and how to use presets.
I’m not suggesting that presets go away. I’m suggesting photographers learn how to process. We should understand what’s going on with the software and use it when and where it’s needed. Exaggerate all you want but tone it down when it’s appropriate.
Below I’ll show you my photos that are reasonably processed and then exaggerated with presets.
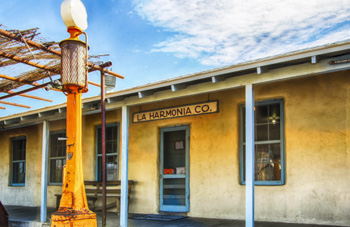
La Harmonia Store, Big Bend National Park, processed with presets in Nik HDR Efex
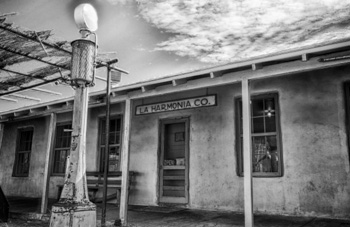
La Harmonia Store, Big Bend National Park, processed with another preset in Nik HDR Efex
La Harmonia Store, Big Bend National Park, processed with a different preset in Nik HDR Efex
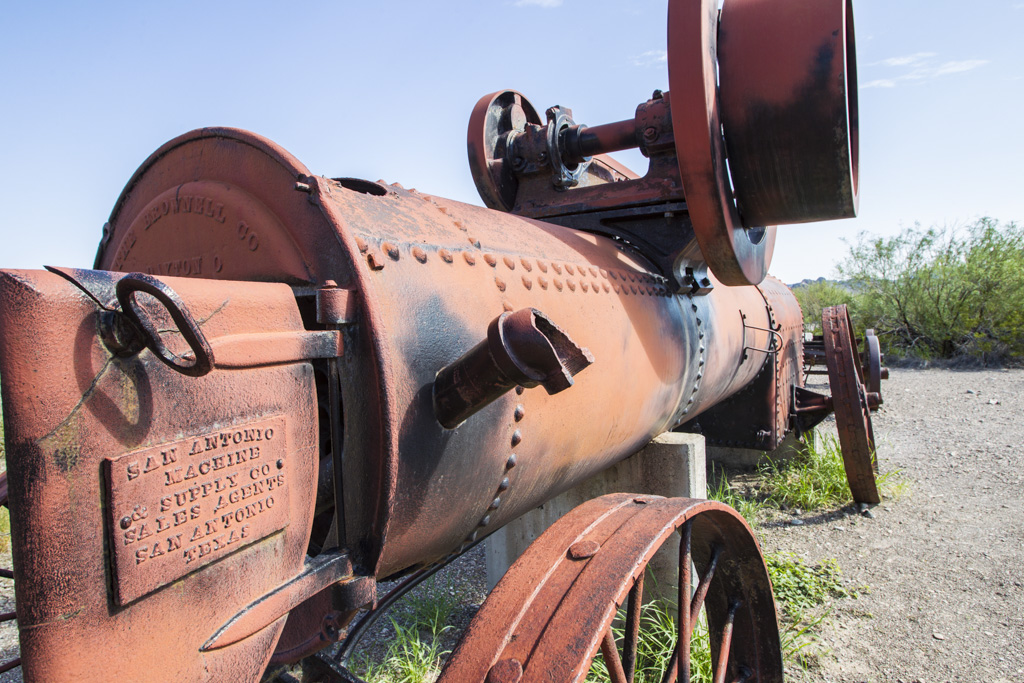
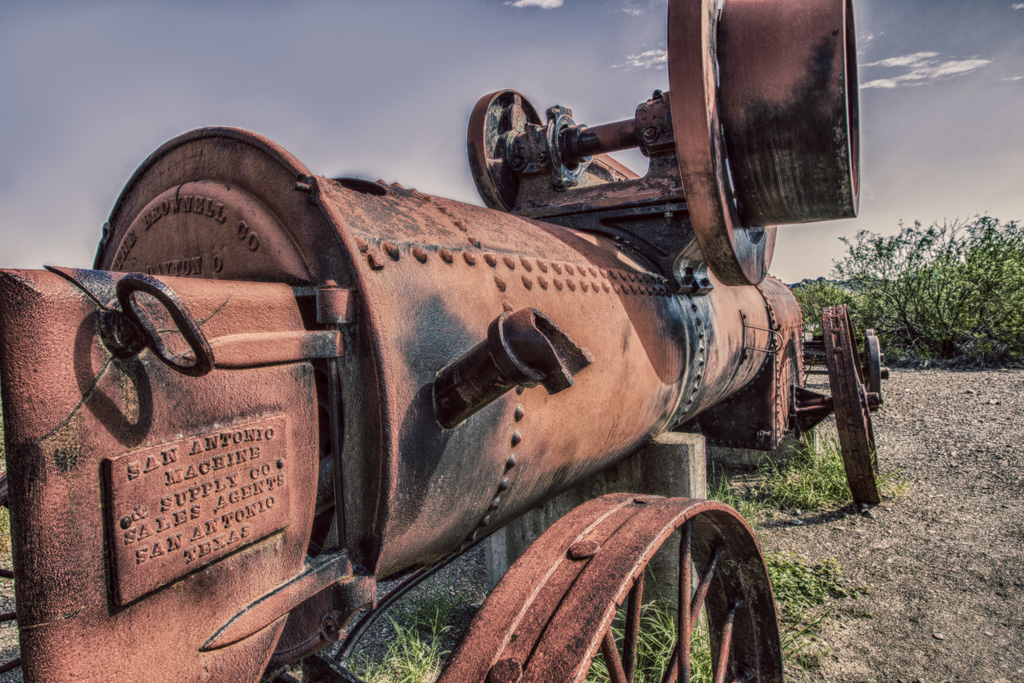
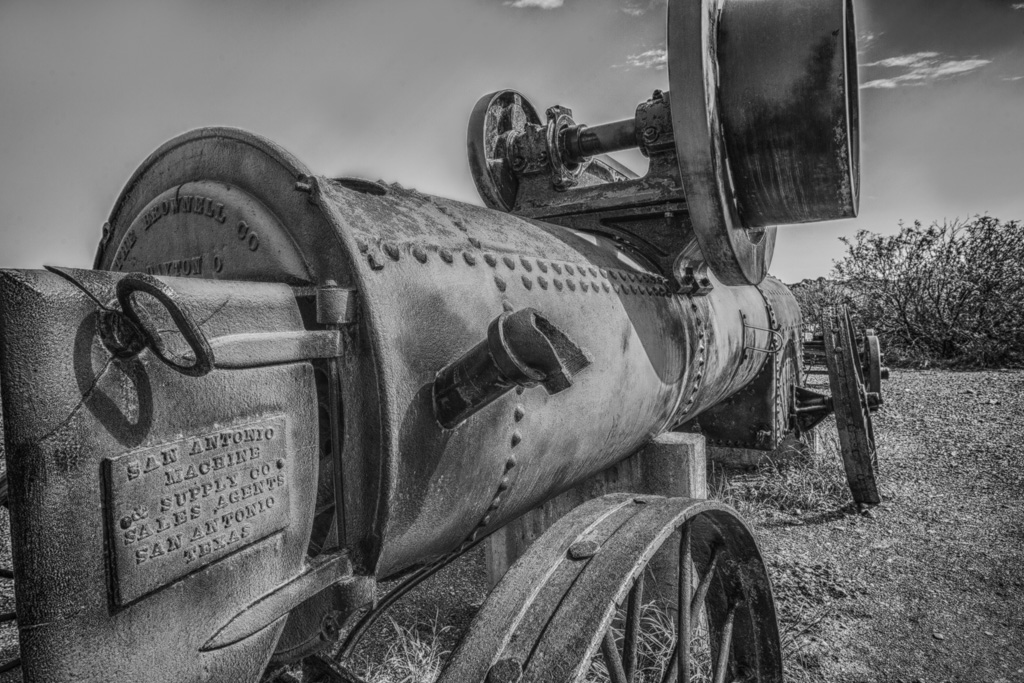
Old equipment in Big Bend National Park simply processed in Adobe Camera Raw
Old equipment in Big Bend National Park processed in Nik HDR Efex
Old equipment in Big Bend National Park processed in Nik Silver Efex
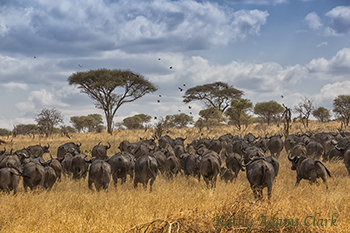
Cape Buffalo, Tanzania, processed with Nik Color Efex Detail Extractor to bring out the clouds
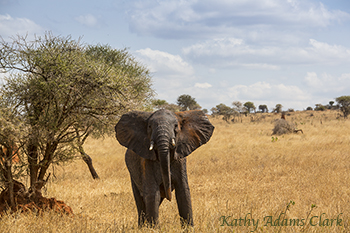
African elephant, Tanzania, processed with Adobe Camera Raw.
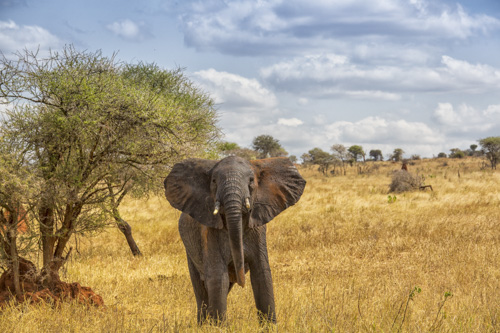
African elephant, Tanzania, processed with Nik Color Efex Detail Extractor to bring out the clouds
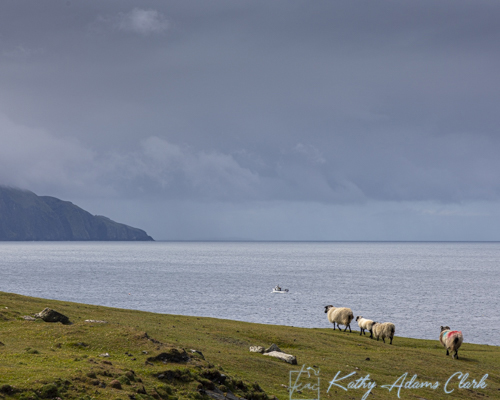
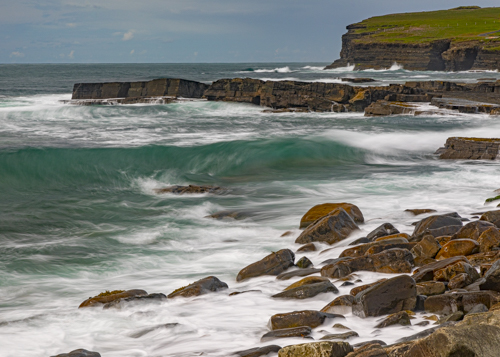
Achill Island, Ireland, processed with Nik Color Efex Detail Extractor to bring out the clouds
Achill Island, Ireland, processed with Adobe Camera Raw.
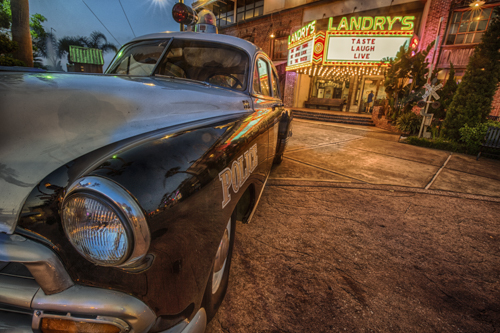
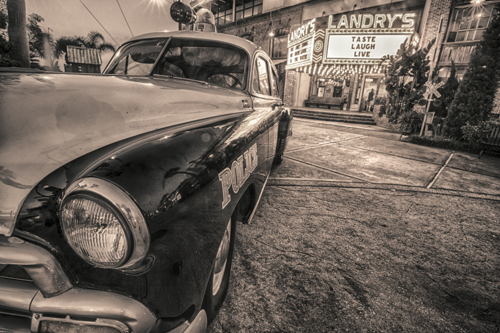
1952 Chevy at Kemah Boardwalk processed with Nik HDR Efex
1952 Chevy at Kemah Boardwalk processed with Nik Silver Efex
Yes, I use presets to enhance my creativity. I use presets sometimes to show me the potential of an image. Presets can support our creative vision as well as ruin it.
Below are some images that I processed with presets — and was thankful for the power of presets.
Great companies like Luminar and Nik make presets. Photographers should learn where, when, and how to use use them.
In May of this year, Adobe gave us the Texture slider. You can find this in Adobe’s Lightroom Classic or Adobe Camera Raw.
The Texture slider enhances or reduces texture in a photo. Texture would be bird feathers, animal fur, tree bark, alligator skin, stucco, etc. The Texture slider does not enhance details in our nice blurry backgrounds. The Texture slider is a game changer on certain photos.
I’ve been a real champion of the Clarity slider since that tool was introduced by Adobe. Almost all my processing began with Clarity slider to 20, Vibrance to 20, and Saturation to 20. “Go to CVS first” was the line we used in class.
The Clarity slider, though, worked on details and textures throughout the image. Minor details in the blurry background were often enhanced.
Texture slider only works on textures. It’s a pretty smart tool that can really bring out key details in our photos.
The Texture slider is also available under the Adjustment Brush tool. This allows us to enhance or reduce the texture in one area of a photo.
Pretty neat tool. Give it a try. I’m sure you will like it and find many uses for the Texture slider.
Green violetear or Lesser violetear with the Texture slider blown up to 100%Same photo as above with the Clarity slider blown up to 100%. Notice how the background at top right has more detail. Not as soft as the image processed with the Texture slider. Same as above with no Clarify or Texture slider. Nice soft background thanks to a shallow f/stop. We don’t want to mess with that background during processing.
Texture on the left image. Clarity on the right image.
I used to hear photographers say they didn’t like the look of HDR (high dynamic range) photos. Software progressed and it got to where an HDR photo was perfectly natural. We got a photo that looked like what we saw with our eyes versus a cartoonish image.
Things continue to progress in the photo processing world. Today, the Shadow and Highlight sliders in Adobe Camera Raw and Lightroom are doing what HDR used to do.
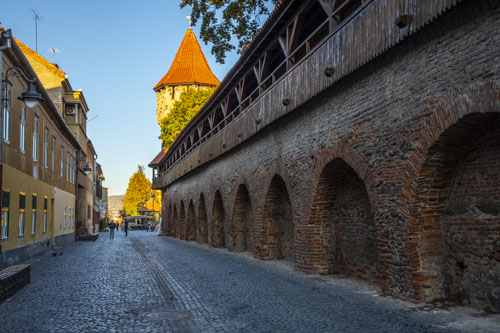
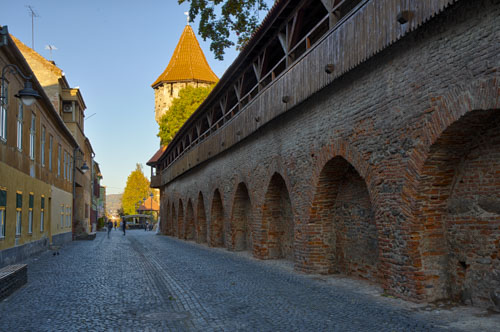
Below you see two images taken in the historic district of Sibiu, Romania. One is HDR — a blend of seven images using Nik by DxO. The other is straight out of the camera with the highlights properly exposed. Can you see any difference?
This is the HDR image. Seven exposures blended together in Nik HDR Efex Pro by DxO.
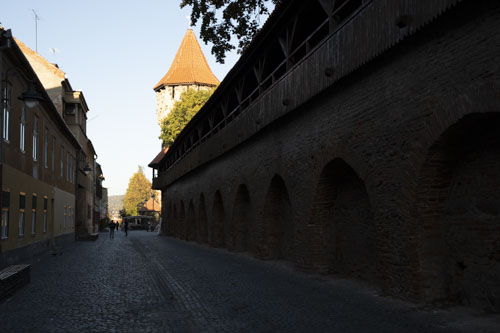
This image was captured in the camera. The exposure was set for the bright area at the top or 2-stops under-exposed.
Here’s the above image before processing. Two-stops under-exposed so the highlight were fine but the shadows appear to be worthless.
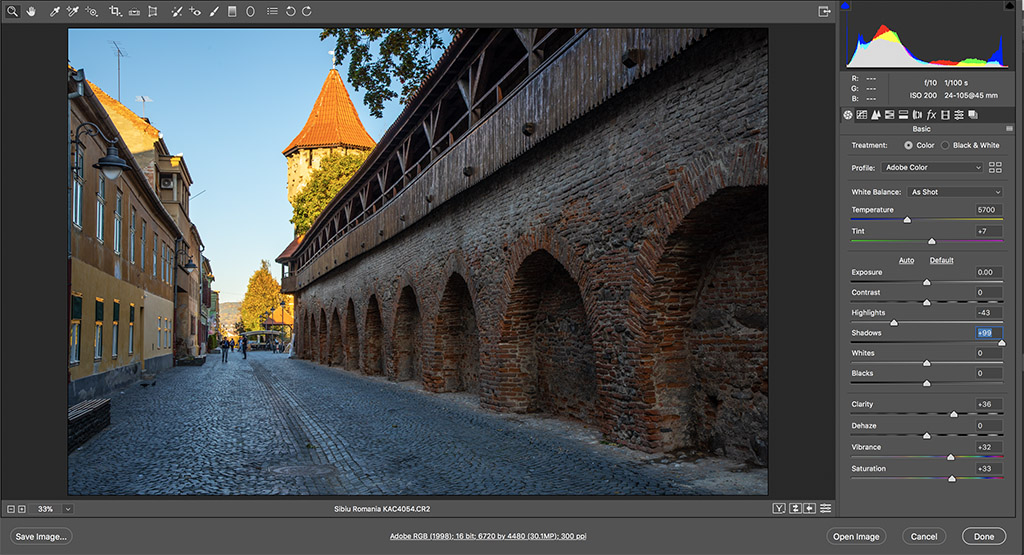
This is a screen grab of the image being processed. Notice that the Highlight slider is moved to the left to tone down the tower and sky. The Shadow slider is moved all the way to the right to bring out the details in the shadows. I’m using HDR less and less thanks to these great tools in Adobe Camera Raw or Lightroom.
Sibiu, Romania, historic center.
Sibiu, Romania, historic center.
HDR made from seven images processing as above
HDR made from seven exposures
Straight processing as above
HDR made from seven images processing as above
Give this concept a try next time you find yourself photographing a contrasty scene. Get the highlights perfectly exposed. Then bring out the shadows later with the Shadow slider in Adobe Camera Raw or Lightroom.
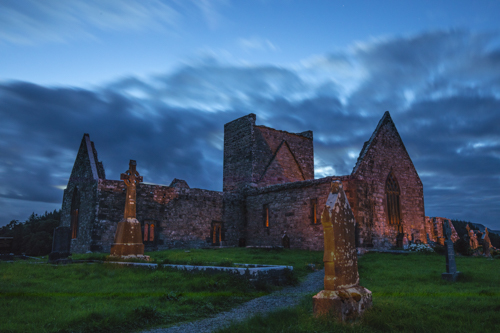
I was in Ireland recently leading a photo tour. A favorite location of mine for light painting at night is Burrishoole Abbey in County Mayo.
We set our cameras on tripods, composed the shot, focused, and then set our exposures for 30 seconds. Then I “Painted” the outside of the building with an amber flashlight. In one 30-second exposure I might cover half the building. We reminded the group that they would use layers in Photoshop to get a photo of the entire building illuminated in amber light.
A Photoshop blend of 21 photos of Burrishoole Abbey being painted with an amber flashlight. Masking to have a uniform sky.
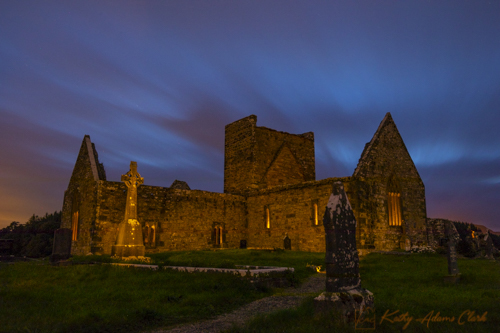
Toward the end of our shoot at Burrishoole, I decided to make a change. I told the group to leave their f/stops at 22, change the ISO to 800, and take a 4-minute exposure using Bulb. We took one photo to check exposure. Personally, I needed to change my f/stop to f/9.
Then we clicked the shutters and left them open for 4-minutes. During that time, I painted the building one more time with the amber flashlight. Notice I had enough time to go inside and paint the window openings.
Burrishoole Abbey painted with an amber flashlight during a 4-minute exposure. Minor adjustments to the photo in Adobe Camera Raw. No layers.
Each photo is a bit different but the last was much easier to make. Many photographers don’t like Photoshop layers or don’t want to learn layers. Personally, I think layers is a super powerful tool but do understand the learning curve can be steep.
Next time you do light painting, consider using a very long exposure as an alternative to layers.
I love infrared photos but somehow I never seemed to get around to having an old camera converted to infrared. So earlier this year I got an email ad from Singh-Ray Filters advertising their infrared filter. My hand grabbed my computer mouse without my will and order the filter. Before I knew it, Singh-Ray’s IR 690 filter was heading to my doorstep.
Photo out of the camera with IR 690 filter
The filter arrived, I read some articles online, and then went out to give it a try. The photos came out RED. Yep, they were red but they were supposed to be red.
The articles I read said that the photos out of the camera would be red. I was then supposed to process with method #1, method #2, or method #3 to get an infrared image.
I tried all the methods and simply had a black-and-white image. No snowy-white grass or grass that look so great in infrared photos. I could never get anything that even remotely looked like infrared.
The above photo processed is just a black-and-white photo.
Out of frustration, I sent an email to the folks at Singh-Ray Filters. I got an immediate response and they put me in touch with one of their experts. That man and I exchanged photos and emails for the next two weeks. I shot photos with the filter, processed them per his instructions, but nothing worked. He paid for me to ship my filter to him so he could use it on his camera.
In the end, we found that my Canon 5D Mark IV and my Canon Rebel need a Singh-Ray 830 Infrared filter. The IR 690 filter only yields a black-and-white image after processing.
Mystery solved. Singh-Ray Filters immediately shipped me an 830 Infrared Filter and issued a credit for my 690 IR filter once they received it.
Processed images using the 830 Infrared Filter from Singh-Ray Filters. Notice the white tree leaves.
Processed images using the 830 Infrared Filter from Singh-Ray Filters. Notice the white tree leaves in the center and white grass on the ground.
Thanks to the great customer service at Singh-Ray Filters I’m now shooting infrared photos and loving my 830 Infrared filter.
By the way, the IR 690 filter works fine on Nikon camera. We found this situation only applies to Canon cameras.
Here’s how to take a photo with the 830 Infrared Filter:
Set the camera to the Bulb exposure mode and decide which f/stop you’ll use.
Frame the shot and focus the lens.
Turn off auto-focus on the lens.
Screw the filter on the lens without moving the focus ring.
You can’t see through the IR filters.
With the camera in Bulb
Take the photo with the shutter open for about 4-minute.
Adjust based on the histogram. A bit less time if the photo is too bright or a bit more time if the photo is too dark.
Here’s my method for processing photos taken with the 830 Infrared Filter:
Open in Adobe Camera Raw or Lightroom
Open Hue Saturation Luminance
Move the red Luminance slider all the way to the right
Move the red Saturation slider all the way to the left
This gets rid of the red cast to the photo
Go back to the Basic Tab
Move the Exposure slider so the histogram hits the right corner
Move the Black slider so the histogram hits the left corner
Add some Contrast
Continue processing to taste
I’ve just begun shooting in infrared and processing those photos. Stay tuned. More discoveries in store.