I used to hear photographers say they didn’t like the look of HDR (high dynamic range) photos. Software progressed and it got to where an HDR photo was perfectly natural. We got a photo that looked like what we saw with our eyes versus a cartoonish image.
Things continue to progress in the photo processing world. Today, the Shadow and Highlight sliders in Adobe Camera Raw and Lightroom are doing what HDR used to do.
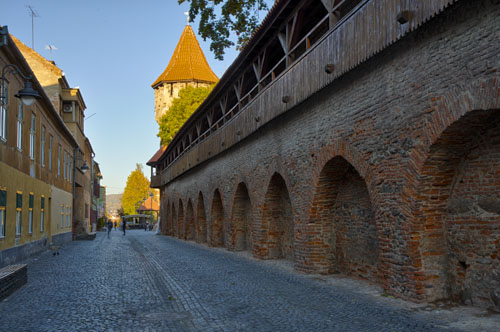
Below you see two images taken in the historic district of Sibiu, Romania. One is HDR — a blend of seven images using Nik by DxO. The other is straight out of the camera with the highlights properly exposed. Can you see any difference?
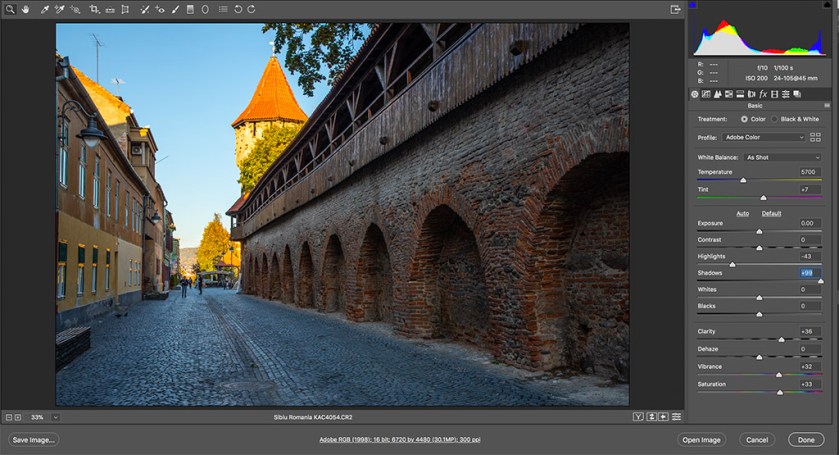
This is the HDR image. Seven exposures blended together in Nik HDR Efex Pro by DxO.This image was captured in the camera. The exposure was set for the bright area at the top or 2-stops under-exposed. Here’s the above image before processing. Two-stops under-exposed so the highlight were fine but the shadows appear to be worthless.This is a screen grab of the image being processed. Notice that the Highlight slider is moved to the left to tone down the tower and sky. The Shadow slider is moved all the way to the right to bring out the details in the shadows. I’m using HDR less and less thanks to these great tools in Adobe Camera Raw or Lightroom.
Sibiu, Romania, historic center.
Sibiu, Romania, historic center.
HDR made from seven images processing as above
HDR made from seven exposures
Straight processing as above
HDR made from seven images processing as above
Give this concept a try next time you find yourself photographing a contrasty scene. Get the highlights perfectly exposed. Then bring out the shadows later with the Shadow slider in Adobe Camera Raw or Lightroom.
Professional photographer leading workshops and tours. I use Canon cameras but I'm familiar with all the other brands. Love photography birds and nature. Love talking about photography and gear.
View all posts by kathyadamsclark
6 thoughts on “HDR or Use the Shadow & Highlight Slider”
Yep, since I discovered it, that’s what I’ve been doing … works like a charm!
Glad it works for you, Kristina. Long ago, the shadow slider was not as powerful. Adobe has given us a powerful tool in recent years. Thanks for the comment.
With you Kathy. Why stuff about with half a dozen images when one works well? BTW: Interested to hear you say to expose for the highlights, with which I heartily concur. I’ve read several times comments by pros to the effect that one should over expose if anything, and I’ve never ‘got’ this. Blown out highlights look utterly unnatural and jarring, while black shadows are much easier to live with if one has to live with one or the other.
So agree with you, Hugh. I think the key is exposing for the highlights or making sure the bright areas are perfectly exposed. We can’t recover those blown-out bright areas later in software. We can mask it but not recover the details. Technically called “gamma encoding”. Making sure the light areas of the picture are properly exposed. Your photos are magic so glad to know you agree with me.


Yep, since I discovered it, that’s what I’ve been doing … works like a charm!
LikeLike
Glad it works for you, Kristina. Long ago, the shadow slider was not as powerful. Adobe has given us a powerful tool in recent years. Thanks for the comment.
LikeLike
With you Kathy. Why stuff about with half a dozen images when one works well? BTW: Interested to hear you say to expose for the highlights, with which I heartily concur. I’ve read several times comments by pros to the effect that one should over expose if anything, and I’ve never ‘got’ this. Blown out highlights look utterly unnatural and jarring, while black shadows are much easier to live with if one has to live with one or the other.
LikeLike
So agree with you, Hugh. I think the key is exposing for the highlights or making sure the bright areas are perfectly exposed. We can’t recover those blown-out bright areas later in software. We can mask it but not recover the details. Technically called “gamma encoding”. Making sure the light areas of the picture are properly exposed. Your photos are magic so glad to know you agree with me.
LikeLike
I’m finding the same thing, Kathy. Less HDR app versus using the camera raw controls on a single image.
LikeLike
Great news, John. Thanks.
LikeLike