Firmware Update for Mirrorless Cameras

I have to admit that historically I didn’t worry about updating the firmware in my digital SLR cameras. The cameras worked and they always worked. So why update the firmware?!

Mirrorless cameras, on the other hand, have a lot more electronics and keeping the firmware up-to-date is a good idea.

There have been three firmware updates for my Canon R5 since it was introduced. One in August, another in September, and another in November 2020. Canon wouldn’t issue these updates if they weren’t necessary. These updates fix a “bug” or tweak a setting.

Get the firmware updates from the Canon site. Sony, Olympus, and Fuji users will find the firmware updates on their camera manufacturer’s site.

Download the firmware to your computer. Then double-click to open the folder. You’ll find instructions and an EOSR5110.FIR file. The name might change with the update but the file extension remains the same.

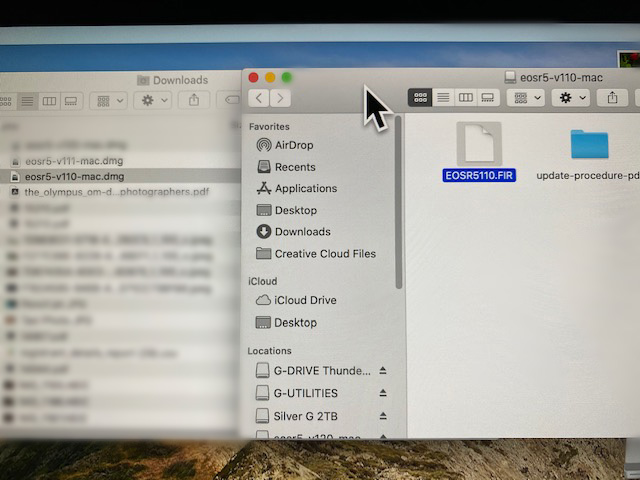
Copy or move the EOSR5110.FIR file to an SD card. (I do this with a card reader.) Plug the card reader into your computer. Open the card reader on your computer, open the firmware update in another window, then click and drag the xxxxxx.FIR file to the SD card.

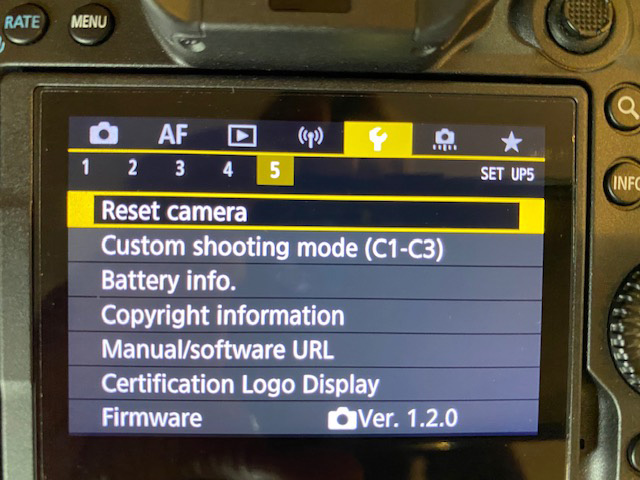
Put the SD card in the Canon R5. Turn the camera on and go to the wrench menu 5. Scroll down to Firmware Update. If you’ve done everything right, the camera will find the file and show the screen blow.

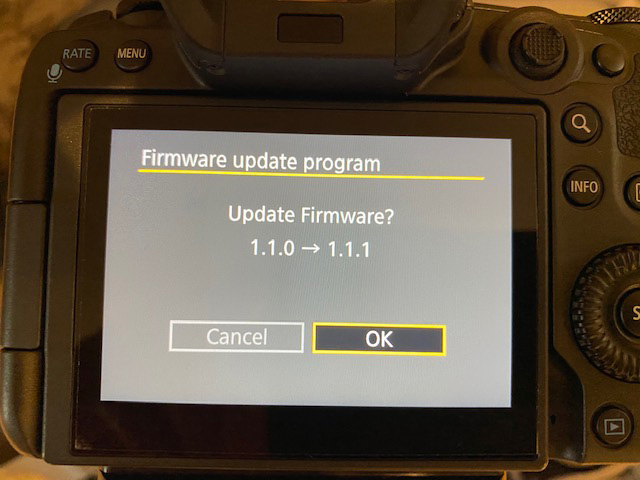
Click the OK button and you’ll see the screen below.

It’s a pretty simple process and worth doing to keep your camera in tip-top shape.

Hope this helps!

Reset Button to the Rescue

There comes a point with all good things when “too much is too much.”

Yep, same applies with camera settings. I’ve seen camera settings get tangled over the years and the only resort is to reset the camera.

This might sound like a drastic measure but it’s really not. The reset button returns the camera to factory settings. Everything is cleared out and we can start from the beginning.

Recently two friends complained that their Canon R5 had simply stopped taking good pictures. EB complained that his R5 was producing soft images. PE complained that her R5 was giving soft and noisy images.

EB called Canon and the technician suggested pushing the Reset button. After EB pushed the Reset button, the camera was back to producing lovely images.

When PE complained about her soft and noisy images I told her about EB’s experience. I also sent an email to Canon Professional Services to see what they thought about the Reset option.

“The EOS R5 does have a lot of features built into it to where the user is able to customize it for their own shooting needs. There may be some features which may change the way the camera takes pictures and sometimes if the wrong setting is set on the camera, the results may not be what some photographers are looking for. At least clearing the settings will restore the camera’s settings back to default, allowing the photographer to begin with a clean slate to customize the camera for their shooting needs.”

Canon Professional Services

I’ve seen the Reset button used over the years with great success. RE had pushed so many buttons on his Canon 600 flash that reset was the only way to make it work again. Students in class have had to resort to the Reset button when a hodge-podge of features had been set on their camera by “helpful” friends or spouses.

Nikon DSLR cameras have green buttons that reset the camera.

Our new mirrorless cameras come with settings, menu options, and features that we never dreamed of 20 years ago. It’s tempting to select everything when we first get the camera based on blog posts, friend’s advice, and YouTube videos. Yep, been there and done that.

The Reset button might be the solution when things get tangled and the camera stops producing great results.

Olympus puts their Reset button under the camera menu. Sony puts their Reset under the tool box menu.

I pass along my experiences so you’ll have a great time with your camera. Cheers!

Face Tracking Auto Focus vs. Large Zone

Continuing this exploration of auto focus features in the Canon R5 and R6. Today, the difference between Face Tracking with Animal Eye selected and Large Zone Auto Focus with Animal Eye selected.

This is a video of the R5 focusing on a small pine siskin. The camera is set to Large Zone AF. The camera is also set to Servo AF Case 1 Versatile Multi Purpose (AF Menu 3) and Subject To Detect Animal (AF Menu 1). Notice that the camera focuses on any part of the bird.
Same settings in the camera as above but the Auto Focus Method is Face Tracking. Notice how the camera narrows in on the eye of the pine siskin.
Same settings as above. Another view of how the R5’s auto focus narrows down to the eye of the bird.

The successful results are a combination of settings on the R5 or R6.

Let me know if you have questions. Thoughts?

Auto Focus Method Explained

The new mirrorless cameras give us so many options. I’m using the Canon R5 but the following will apply to Nikon, Sony, Olympus, and Fuji. The key is to experiment and learn from your mistakes and triumphs.

I used 1-point AF on my DSLR cameras most of the time. I’d move that one point around the screen with lightening speed — a skill I developed over many years of practice.

1-point AF has its place in our photography toolkit.

After working with the R5 for four months, I’ve found that the 1-point AF has its place.

Eye tracking is amazing. We’ve had this technology on cheap point-and-shoot cameras for years and even on cellphone cameras. The engineers at Canon have really hit a homerun with Animal Eye tracking. I hear Olympus has done well in this arena, too.

Use your Menu setting to tell the camera to look for human eyes or animals eyes, by the way. Canon puts this in the pink menus.

The Animal Eye AF will get confused, though. The camera kept trying to focus on the berries versus the bird.

Large Zone AF: Horizontal has been great for flying birds.

Large Zone AF helped me stay with this immature bald eagle as it lifted off out of the marsh.

I’ve worked with Canon R5 for several months under a variety of different situations. I’m changing Focus Methods now depending on the circumstances. My old skill at moving one focus point around on my DSLR has now morphed into changing my Focus Method.

  1. Approaching a bird with a defined eye in clutter — switch to Animal Eye AF
  2. Approaching a duck that’s about to take off — switch to Large Zone AF
  3. Trying to photograph a small bird in the brush — switch to 1-point AF
  4. Flying hawk overhead — switch to a small cluster

These focus options give us lots more tools in the toolbox. Take some time to practice and develop your skills.

Questions? Feel free to post below. Thanks for reading.

Christmas Star is Simply a Pinpoint Star

Photographing the December 21st “Christmas Star” or conjunction of Jupiter and Saturn is simple pinpoint star photography. Settings on your camera are the same as you’d use when photographing any pinpoint stars.

I’m planning on the 24-105mm lens at 105mm because I’d like a little foreground but enough magnification to get the .  I’ll have my bigger lens just in case.  That would be my 100-500mm. 

I’ll use a wide open aperture of f/4 or f/2.8.  At 105mm the shutter speed would be 4 seconds.    At 400mm it would be a 1 second shutter speed. 

Compose the scene and focus on infinity or the planets if your camera will do that. Turn off auto focus and image stabilization.

Put the camera in the manual exposure mode. Set f/stop to wide open, set shutter speed based on the formula below, and raise the ISO to balance the light meter.

The shutter speed depends on the lens you use.  The formula is  500/mm of the lens.  Cropped sensor is 500/(mm of lens X crop factor).  Do the math but remember to do the math inside the parentheses first.

Camera has to be on a tripod, of course. A shutter release helps get a steady shot.

Venus, Mars, and Jupiter over Angkor Wat in Cambodia at sunrise.

Canon R5 Mirrorless — Noise

The previous post ended with a question from Patti asking about noise when using high ISO and shadow recovery.

I can honestly say that the noise is not that bad.

Here’s a before and after photo. (On Left) ISO 500 and very unexposed. (On Right) Basic processing with shadow slider moved to +88 and exposure slider moved to +1.25.

Below the photo is enlarged to 100% and cropped. I moved the exposure slider a bit more and then hit it with a bit of noise reduction in Adobe Camera Raw.

The noise doesn’t look too bad despite high ISO and pulling the exposure.

The Canon R5 files are pretty amazing.