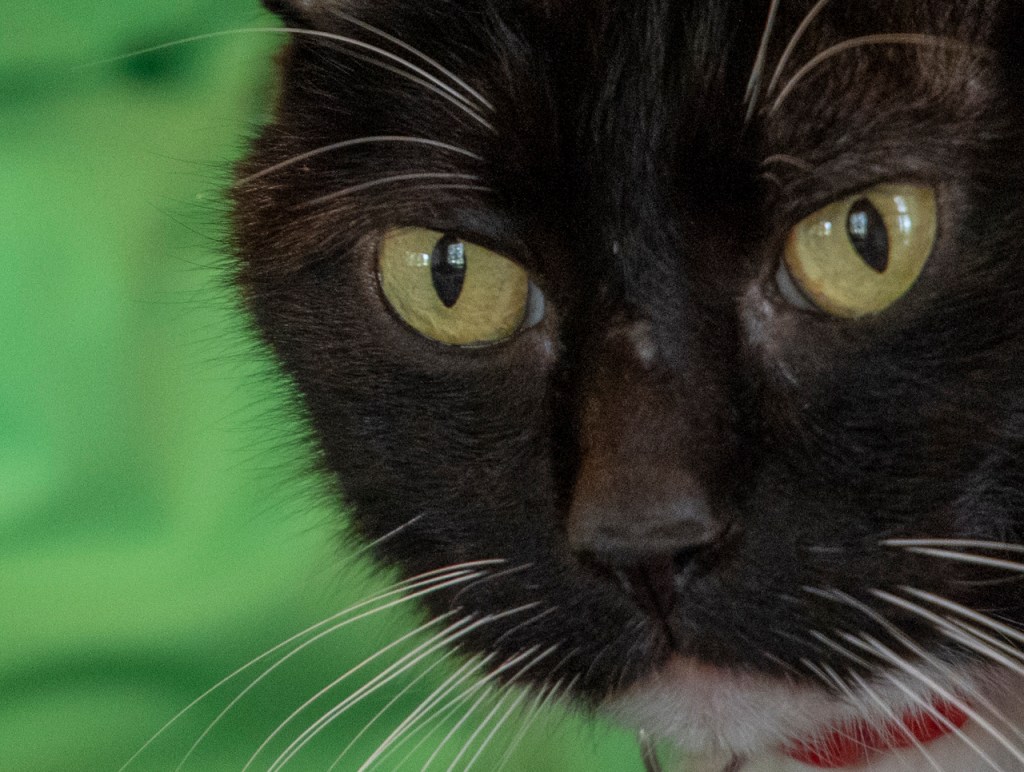
If I have it on autofocus and it looks clear in the view but comes out completely blurry, is that the autofocus not working, or is it just me? I have a Canon Rebel T1i.
Alysia
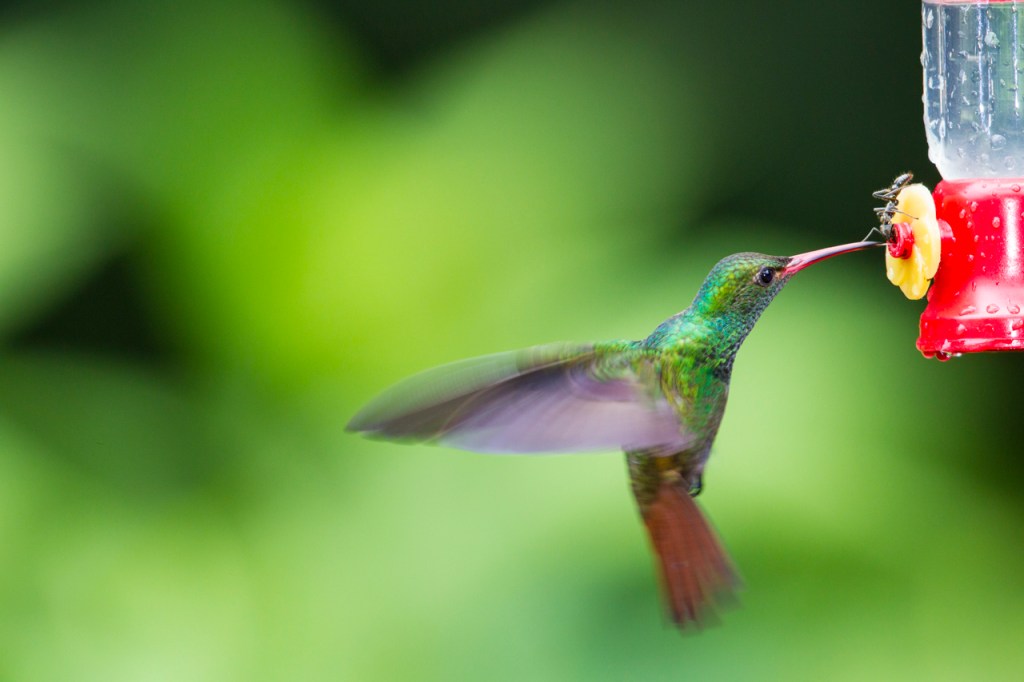
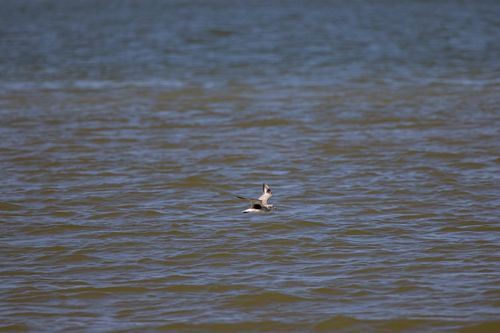
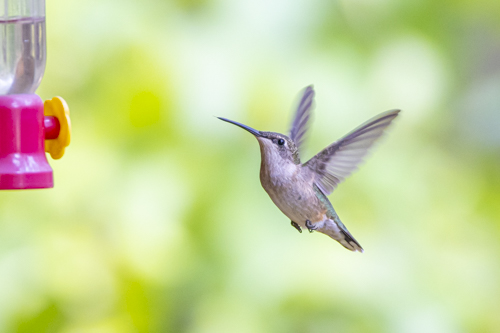
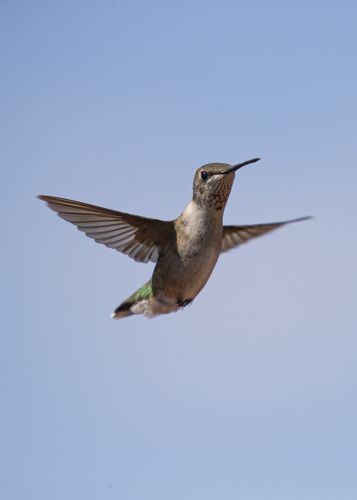
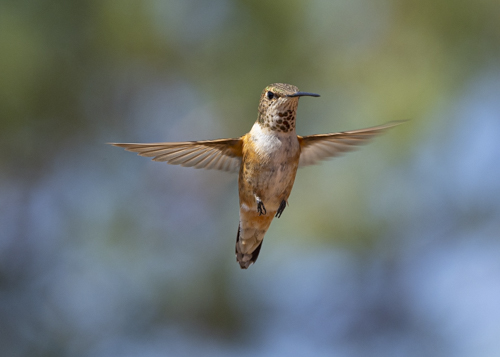
The rufous-tailed hummingbird is in focus but the wings and tail are blurred. The camera was set to 1/300th of a second shutter speed. Focus confirmation on the head. Wings and tail are blurred because the shutter speed was not fast enough.
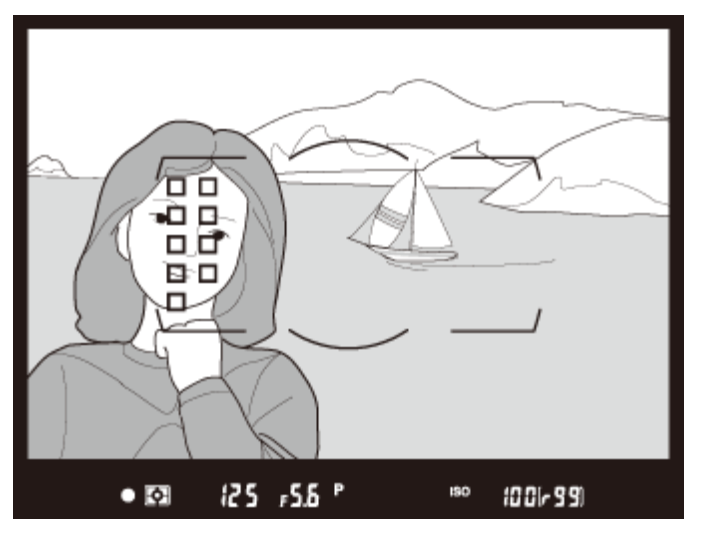
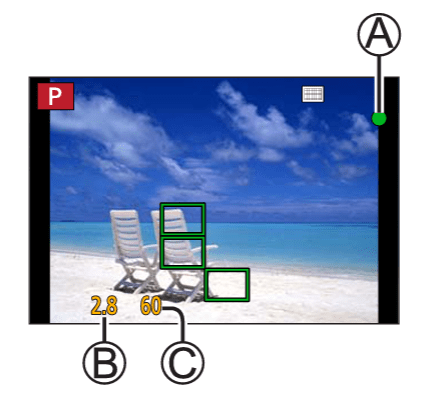
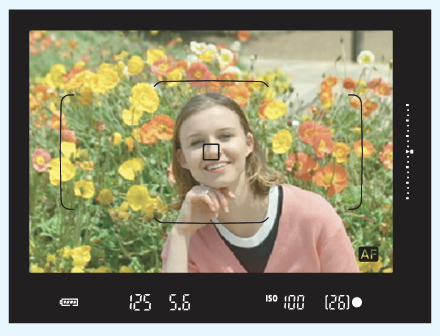
My Answer: Good question. When you look through the viewfinder and focus – there’s a green dot in the lower right or left of the viewfinder. That green dot flickers if you’re on AF-C and it’s solid if you’re on AF-S. That’s the focus confirmation. Your camera is focusing on something.
BUT, if the shutter speed is too slow then you won’t stop the action. Shutter speed too slow and the subject will be blurry.
Here are some screen grabs from various camera manuals to illustrate:
Nikon D850 — dot on leftLumix FZ80 — dot at topCanon 7D Mark II — dot on rightCanon Rebel T1i — dot on the right
Reminder that shutter speed stops action. The shutter speed (that’s the 125 above) needs to be fast enough to freeze the action.
Shutter speeds to keep in mind when shooting:
1/8th of a second blurs water (that’s 8 in the view finder) if camera is on a tripd
1/15th of a second is needed if camera’s on a tripod but the subject is gently moving
1/60th of a second is needed for living subjects standing still
1/250th of a second is needed to stop fast walking or slow running
1/500th of a second is needed to stop running
1/4000th of a second is needed to stop a duck in flight
I finally got a chance to sit on the beach and play with the Canon R5’s autofocus. At heart, I’m a bird photographer. How would this new camera function on fast moving birds? My DSLR is a Canon 1Dx. I hoped the new mirrorless had autofocus equal to or better than that camera.
I saw this small whitish bird flying over the water so I simply aimed and shot. To my eye, the bird was too far away to identify. I’m just shooting.
The bird is a Black-bellied plover when I enlarged the photo to 100%
This is the black-bellied plover when I enlarge the photo to 200%. Simple “grab shot” but the Canon R5’s autofocus found the small bird and locked-on it.
White phase Reddish egret “dancing” as it fishes for food. The autofocus is set for “animal eye” so it stays on the eye of the bird. My job is to keep the camera on the bird.
Another shot from the series of the reddish egret fishing. The autofocus is set to stay on the eye of the bird. ISO 3200, 1/8000 shutter speed, f/10, spot meter, 100-500mm lens, 1.4x extender.
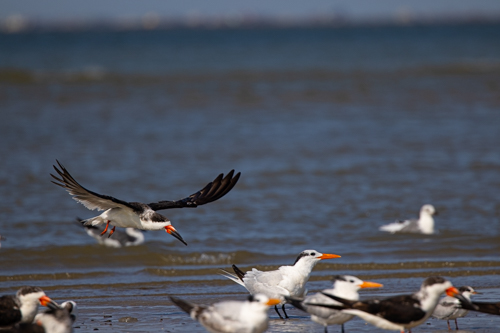
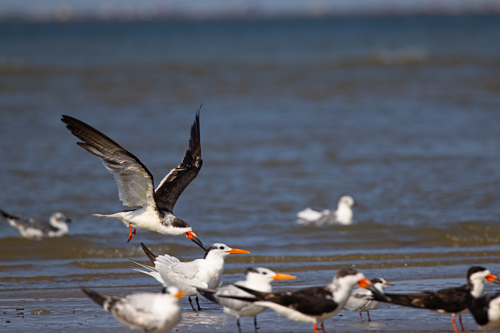
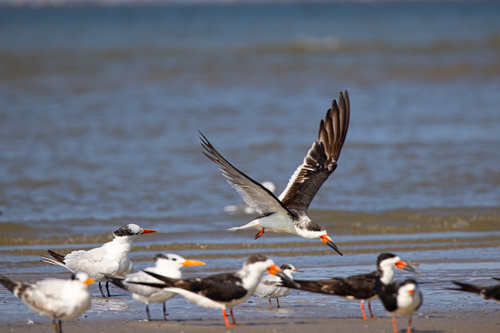
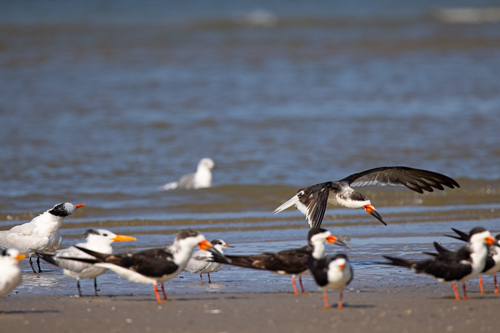
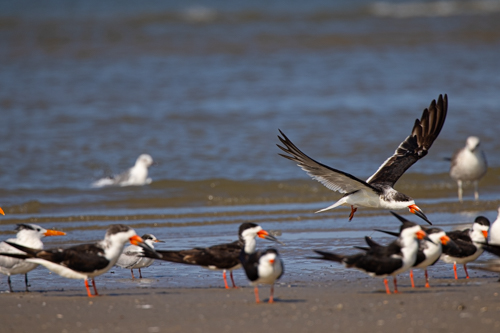
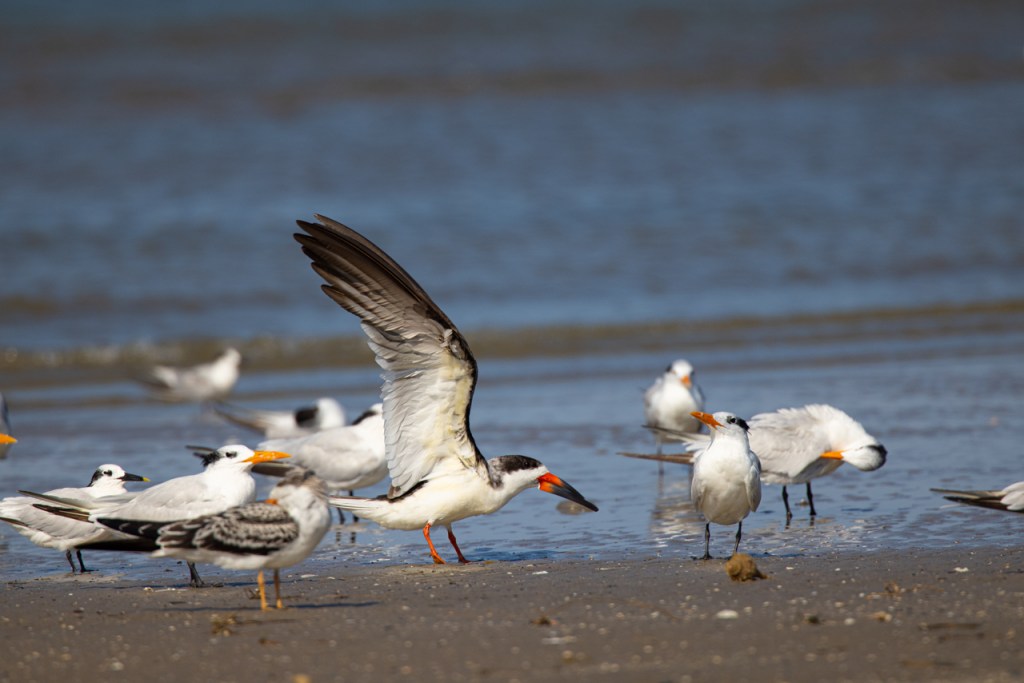
Can the autofocus on the Canon R5 separate one bird flying from a flock of birds? I took 14 frames of this black skimmer flying into a group of birds roosting on the beach. Below you can see the first seven frames plus bloopers.
Shot #1 — Black skimmer approaching a flock of roosting birds on East Beach in Galveston, Texas.
Shot #2 — Black skimmer approaching a flock of roosting birds on East Beach in Galveston, Texas.
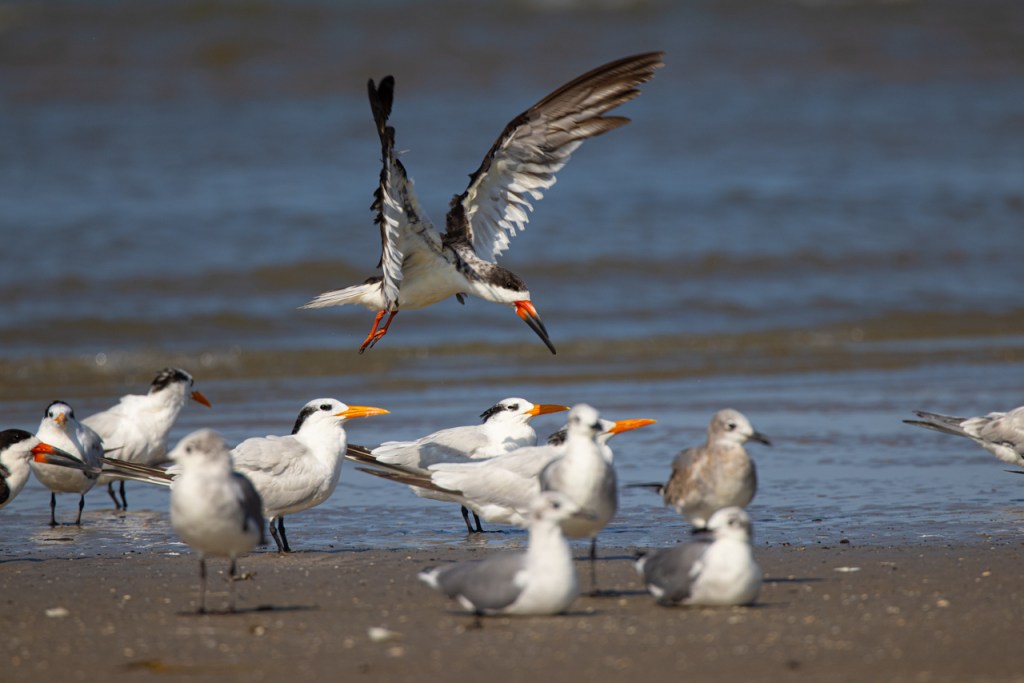
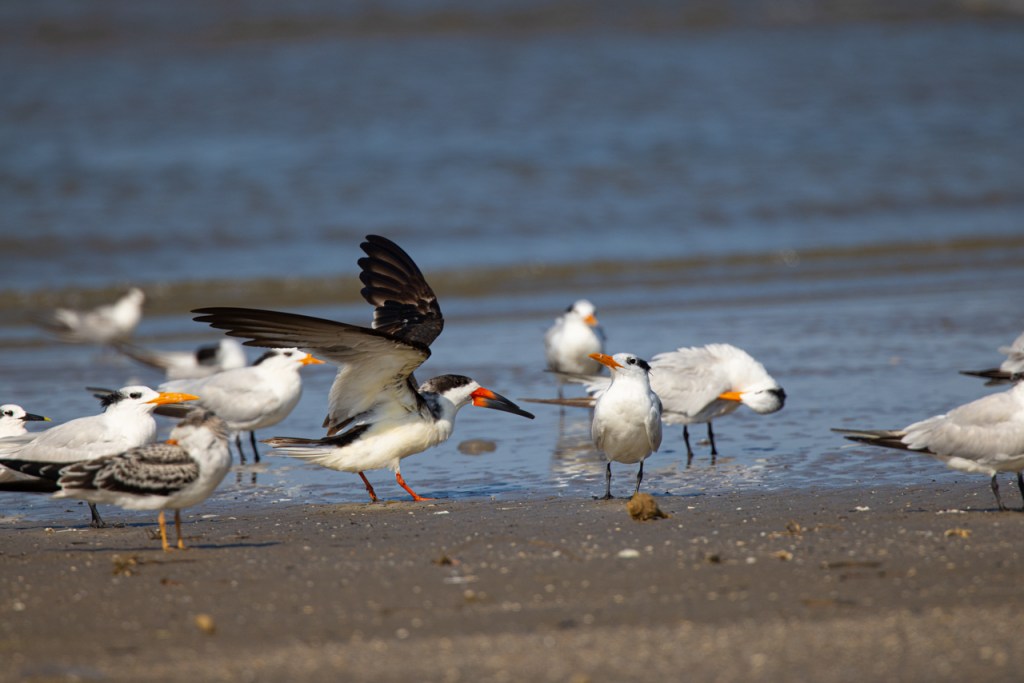
Shot #3 — Black skimmer crosses in front of the royal tern. Danger!
Shot #4 — Autofocus shifts away from the black skimmer to the royal tern.
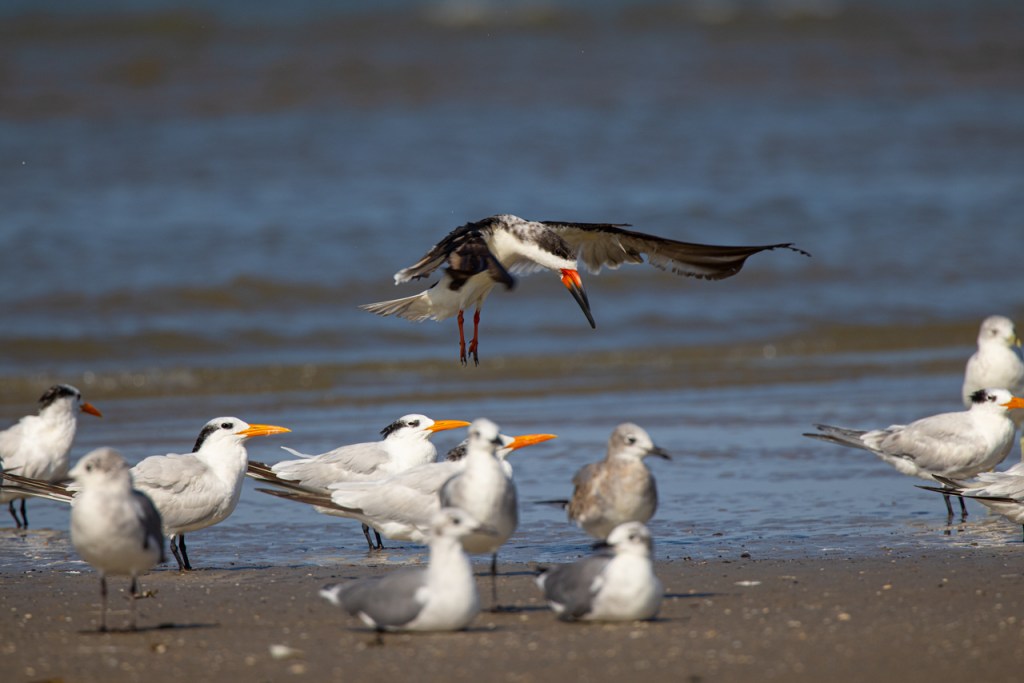
Shot #5 — Autofocus shifts back to the black skimmer as I keep the camera on the bird I want to photograph.
Shot #6 — Black skimmer is slightly out of focus as the R5’s autofocus tries to lock-on the subject. I’ve made this harder for the camera by not keeping the subject in the center of the frame.
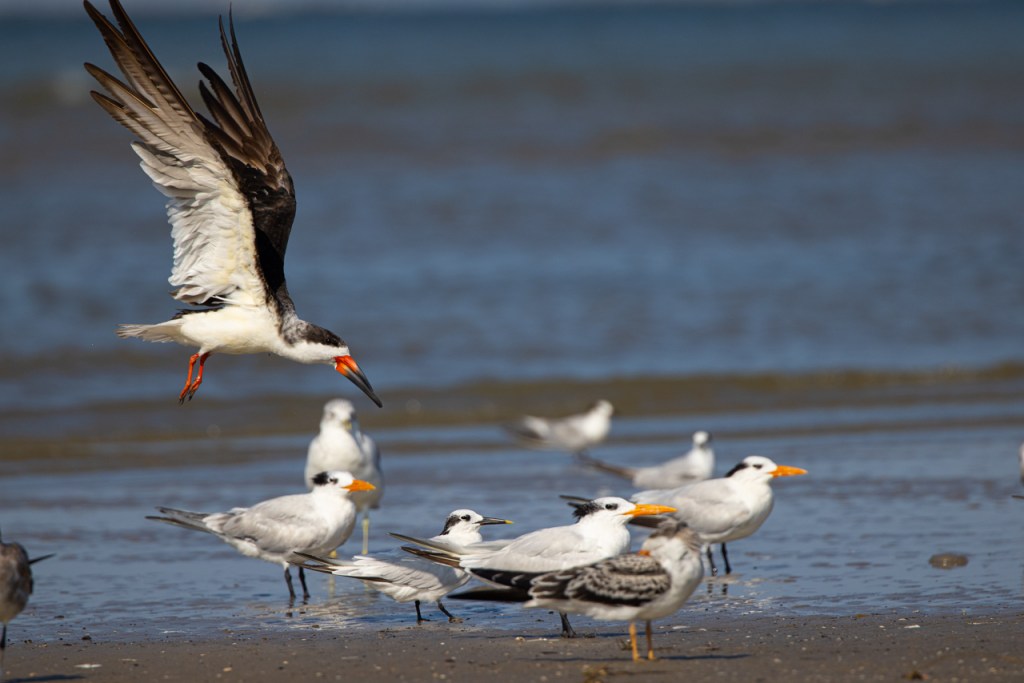
Shot #7 — Autofocus back on the black skimmer but photographer not doing her job.
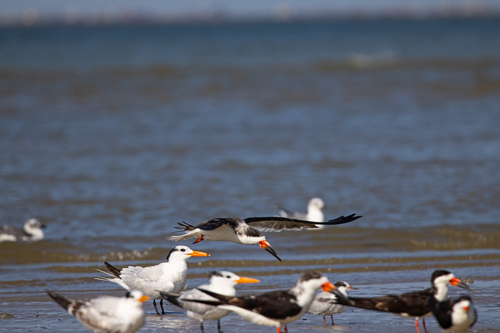
The R5 fires 14 frames a second so the above is only 1/2-second of shooting. What happens next?
Shot #1 but really #8 in the series — I get the camera back on the black skimmer. The R5’s autofocus shifts away from the royal tern roosting on the ground and back to the flying skimmer.
Shot #2 — R5s autofocus is back on the skimmer now that I have my act together.
Shot #3 — Black skimmer is in focus and I’m doing my job.
Shot #4 — I get ahead of the bird but the R5 is still in focus because I have the wide focus area set.
Shot #5 — Black skimmer lands and the autofocus is still right on the target.
Shot #6 — Black skimmer wraps-up the approach and bird is still in focus.
Settings on the above: Aperture Priority, ISO 640, Shutter speed 2000, f/10, spot meter, Servo, Large Zone AF Horizontal, AF-2, 100-500mm lens at 500mm with 1.4x teleconverter.
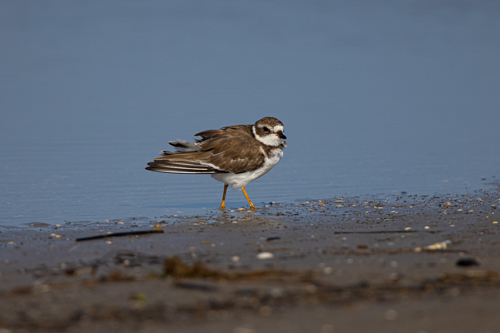
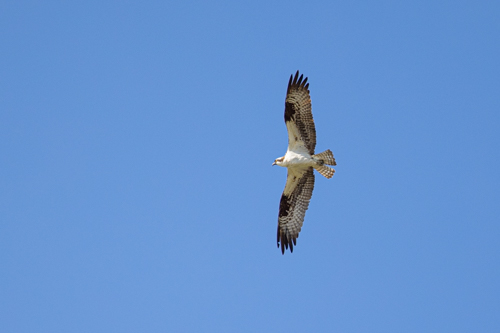
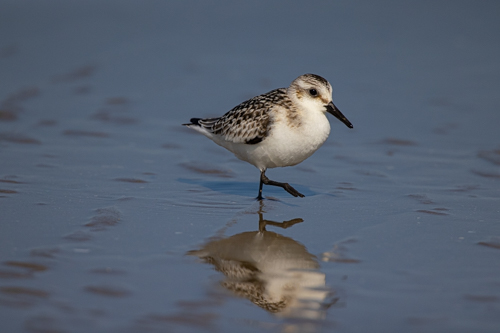
On small birds like this semipalmated plover, the R5’s autofocus was spot on.Flying osprey and the R5’s autofocus was right on target.Quick and tiny sanderling was no match for the Canon R5’s autofocus. Got the shot!
Conclusion — the Canon R5’s autofocus system is equal to – if not better – than the Canon D1x’s system.
What’s been your experience with the R5? I’d love to hear your thoughts.
Below you’ll see photographs taken with the Canon R5 mirrorless and the 100-500mm lens with the 1.4x attached. That’s 700mm hand-held.
I thought it would be interesting to photographed at different ISO settings.
ISO 3200
Ruby-throated hummingbird at ISO 3200 enlarged 200%+
Ruby-throated hummingbird shot at ISO 3200 and cropped
The above photos at ISO 3200 are perfectly acceptable. The first photo is cropped to 100%. The second image is enlarged to show detail. Probably enlarged to 200%+.
ISO 5000
Ruby-throated hummingbird photographed at ISO 5000 and cropped
Ruby-throated hummingbird at ISO 5000 and enlarged to 200%+
Above is an image from the same session. The first photo is enlarged to 100% and shot at ISO 5000. The second is highly enlarged to show the grain and quality.
ISO 32000
Ruby-throated hummingbird photographed at ISO 32,000 and enlarged past 100%
Ruby-throated hummingbird photographed at ISO 32,000 and enlarged to 100%
I decided to really push the R5. I raised the ISO to 32,000. The first photo is cropped to 100%. The second photo is enlarged even more to show the grain.
At ISO 32,000 we finally start to see unacceptable grain. Still nice but grain is obvious.
All photos have been processed in Adobe Camera Raw. I used a bit of Noise Reduction. The slider was moved to 25 in the first two images and 50 in the last image.
I headed out with the Canon R5 in hand attached to the new 100-500mm lens and 1.4x extender. This would be my first time to try action photography with the R5 and first outing for the 100-500mm.
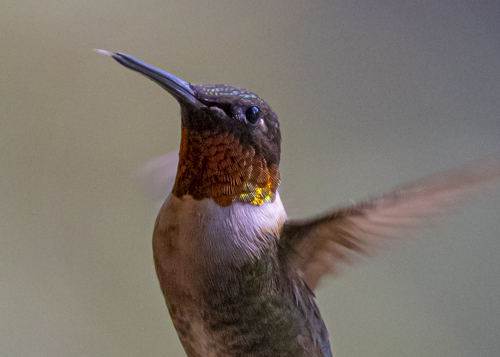
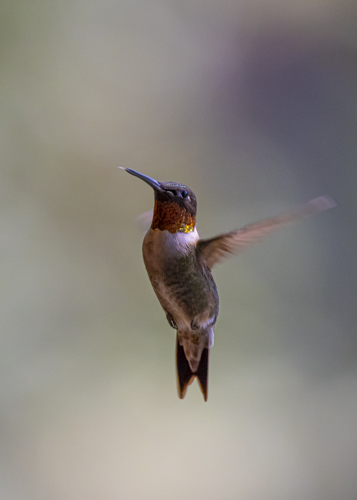
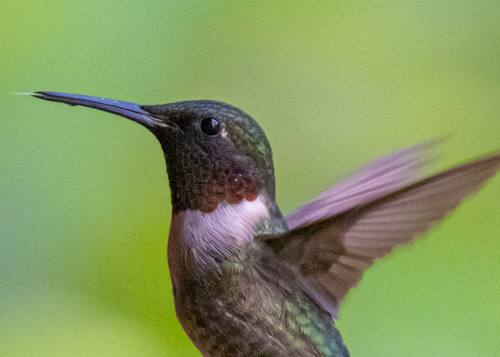
Ruby-throated hummingbird; photographed with the Canon R5 and 100-500mm lens
I decided to work with hummingbirds. These little gems are a challenge for any action photographer. Right now, we’re in the middle of hummingbird migration on the Upper Texas Coast so I knew there would be plenty of subject.
Kleb Woods Nature Park in Tomball, Texas, has 15+ hummingbird feeders this time of year and usually attracts lots of hummers. I wasn’t disappointed. From 12:30 to 2:30 pm on a warm Saturday afternoon I shot 1326 photos. After basic editing in Adobe, I had 494 keepers. I was super happy with 110 of my photos. Not bad for two hours of work.
Overall, I was very pleased with the R5 and 100-500mm lens.
In one feeding series, I shot 49 images as a ruby-throated hummingbird flew in and out to the feeder. The ruby-throat flew in, took a drink from the feeder, hovered, took another drink, hovered, took a drink, hovered , drank, hovered, drank, hovered, drank. Six sips of nectar with hovering in-between. I kept 39 photos out of that session. 39 out of 49, or 80%, is not a bad success rate with hummingbirds.
In another series, I took 90 photos as a hummer visited the feeder. That group had 23 shots that were worth keeping because they were sharp and in focus. That 25.5% or a quarter keepers.
Within about an hour, I figured out settings with the new camera and got into the groove of photographing hummingbirds in flight. I’ve photographed hummingbirds like this hundreds of times, but this was the first time I let the camera take the lead.
I set the R5’s auto-focus and then I let it do the work.
I found the greatest success with (1) Servo, (2) Subject to Detect: Animals, (3) Servo AF 2, (4) Large Zone Horizontal AF. Yes, this last one is a big change for me. (I’ve always been a single-point autofocus person.)
An hour into the shoot, I fired off 22 shots of a male ruby-throated hummingbird during one feeding session. That series lasted less than a minute and I threw away two. Keeper ratio 22 out of 24.
An auto-focus system should be able to do a pretty good job when there are only two objects in a frame: feeder and hummingbird. What happens when the hummingbird is at a bush with foliage in every direction?
I stepped over to a hamelia bush to continue testing the Canon R5’s autofocus capabilities. When a hummingbird flew down to a flower, I took 36 shots and kept 6. That’s only 16% keepers but several of those were tossed in the trash because the bird had its back to the camera.
When a hummer came in to feed on the hamelia and there was a clean background, my keeper rate was 100%. The Canon R5 kept the bird in focus the entire time it visited the flower — and I kept the camera on the bird.
What happened when there were several items in the frame?
In one series of photos, I had a feeder with three hummers hovering around the feeder. The Canon R5 kept focus on the hummer in the center of the frame. It’s autofocus system didn’t get distracted by the hummer on the right edge of the frame or the one on the left.
Through the viewfinder of the R5, we see tiny blue dots flashing on the subject to let us know that the camera’s found the subject and is in focus. These dots are similar to the red dots we see on the Canon 5D Mark IV or the D1X. Nice confirmations to let us know the camera is doing its job.
Canon R5 photo taken at 1/40 of a second shutter speed, f/4, ISO 1600, hand held. See below for 100% enlargement.
A RAW file that is a whooping 51MB to 54MB! That’s huge.
Let Me Concentrate on the Body:
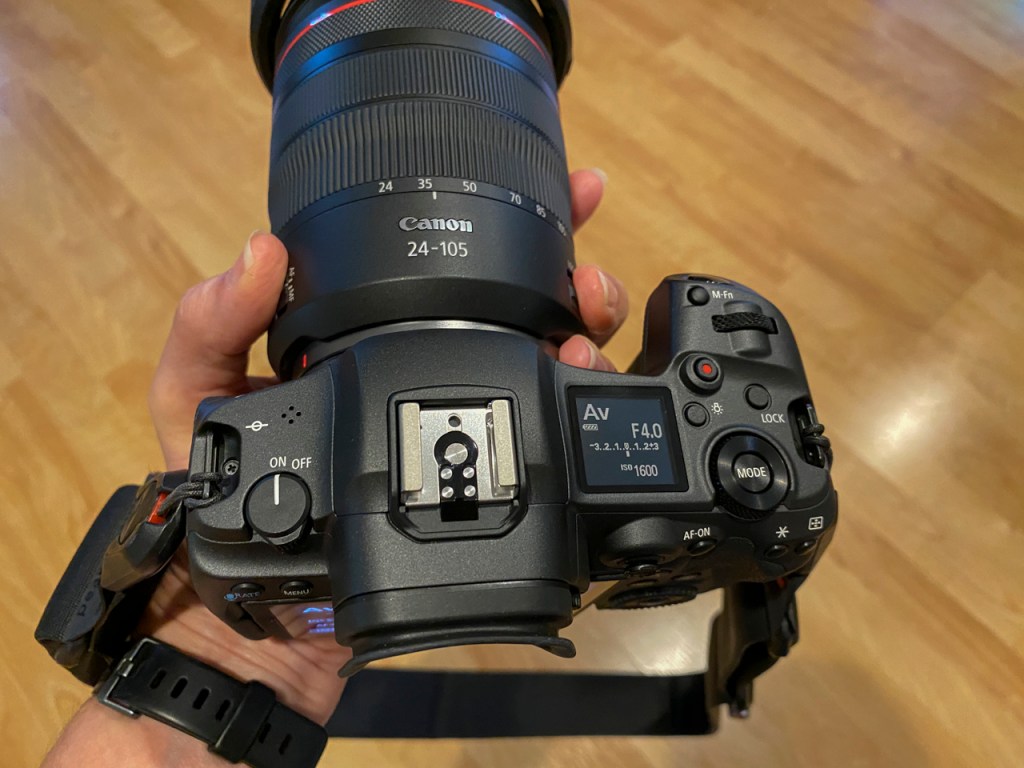
On/Off switch is on the top left. Perfect placement for left thumb activation.
View finder is incredibly bright.
With meter balanced, I love that the viewfinder lightens and darkens as the camera is pointed at lighter and darker areas.
If you are too close to focus on your subject, there are tiny, thin orange lines along each corner of the viewfinder. Those lines turn white when the subject is close enough to focus on.
Focus indicator boxes are blue in Servo and green when the camera is set to One Shot. I don’t often shoot in One Shot but this is a nice visual reminder for those who move between the two auto focus modes.
The icons for front dial or back dial are visible through the viewfinder. These are visible as well on the back of the camera if using live view.
M-Fn button on the top right front just like in the 5D Mark IV. Push the M-Fn button, and you can quickly change ISO, white balance, drive, focus, or exposure compensation. Click the M-Fn button with the tip of your finger, lean the finger over, and rotate the quick dial on the front. Simple to change often used items. All this can be seen through the viewfinder without taking your eye off the subject.
M-Fn button and other controls on the top of the Canon R5.
ISO is also adjustable with the back Quick Control Dial 2. I loved the ISO button on the 5D Mark IV and the 1DX. It was so easy to access. The adjustment via the Quick Control Dial 2 looks just as easy. Remember, we can also change ISO with M-Fn button.
Menu layout is exactly the same as we’ve seen on Canon cameras from the Rebel to the 5D Mark IV to the D1X. There are 30 menu items plus the green My Menu favorite.
Multi-controller button (little toggle joy stick) on the back is like the one on other Canon cameras. Lots of functions depending on what you’re doing with the camera. Convenient for my thumb on the back of the camera.
The rear focus button is right next to the multi-controller. Ergonomically, this is the right position for my hand.
The top display panel has basic information when shooting. Mode, battery level, f/stop, ISO, shutter speed, ISO are all there on top. Press the Illumination Button, though, and lots of icons appear. One glance and I can see AF mode, drive mode, white balance, release mode, meter mode, picture style, and recording card. Icons, of course, because the space is small but everything I need to know when shooting.
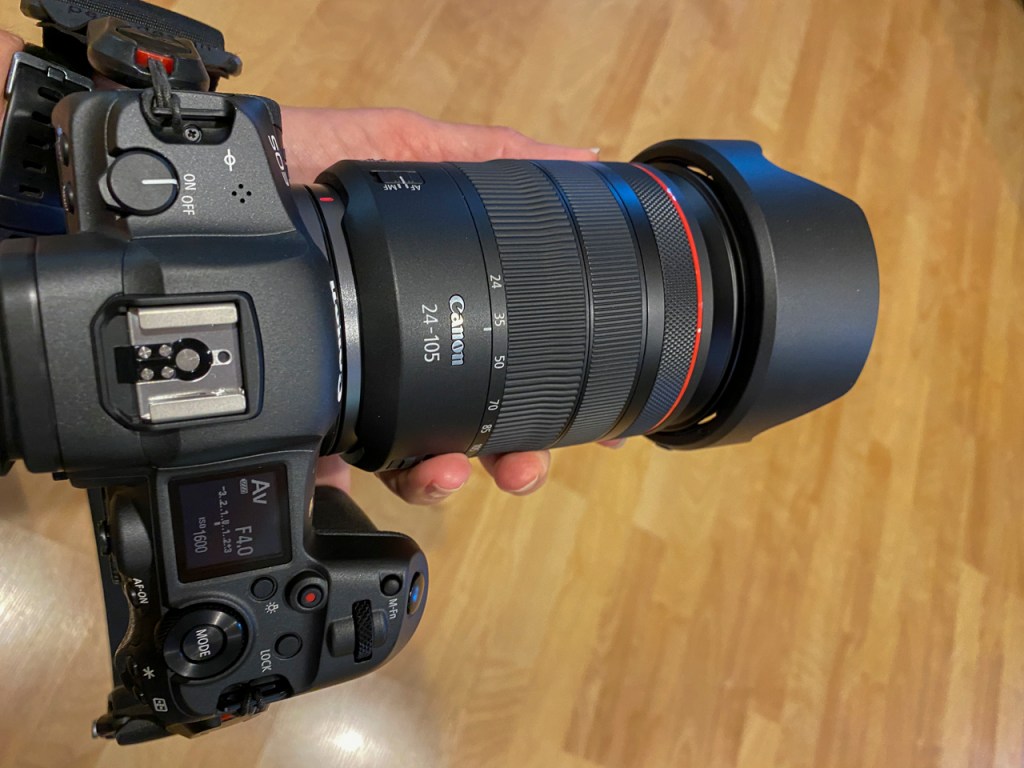
There’s a new “Control Ring” on the front of RF lenses. Rotate it and nothing happens. Rotate it while holding the shutter button half-way down and I can change the exposure compensation. Of course, the Control Ring is customizable.
Control ring on the front of the 24-105mm RF lens
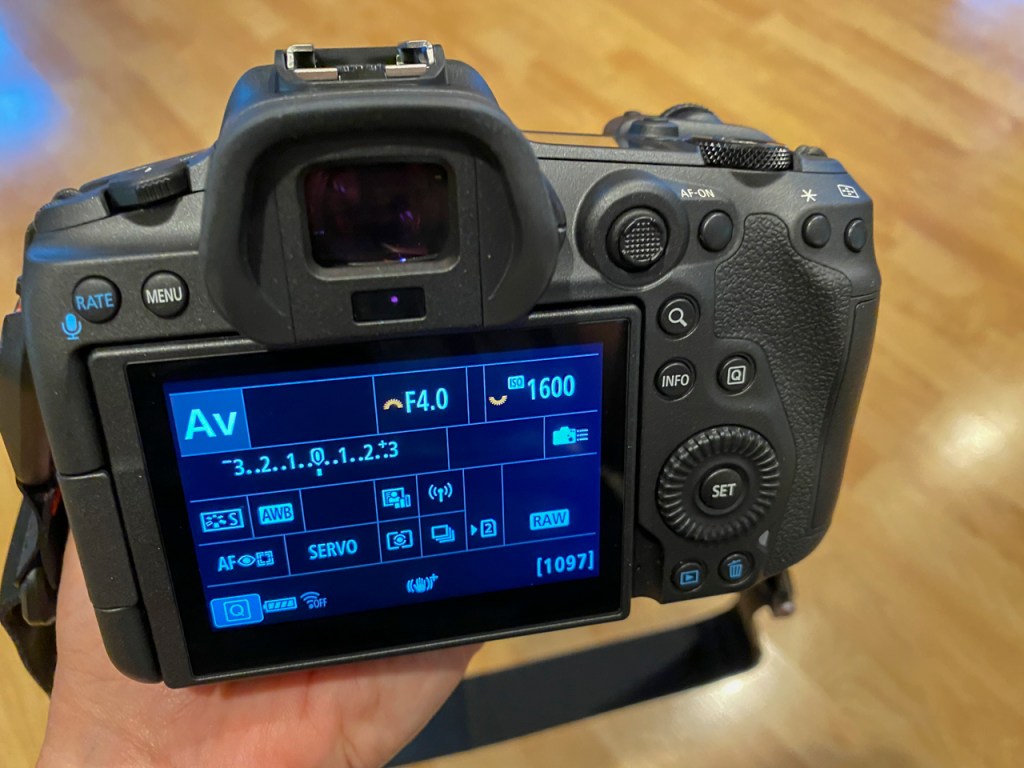
The INFO button on the back of the camera has moved to the right of the rear display screen. Easy to access with your right thumb. Press the INFO button once for classic display screen, press again for live-view screen, press again for live-view with icons, press again for live-view with level and histogram, press again for uncluttered clean screen for live-view.
Classic display screen that’s familiar to those using Canon Rebel, 7D, 5D, and 1D models.
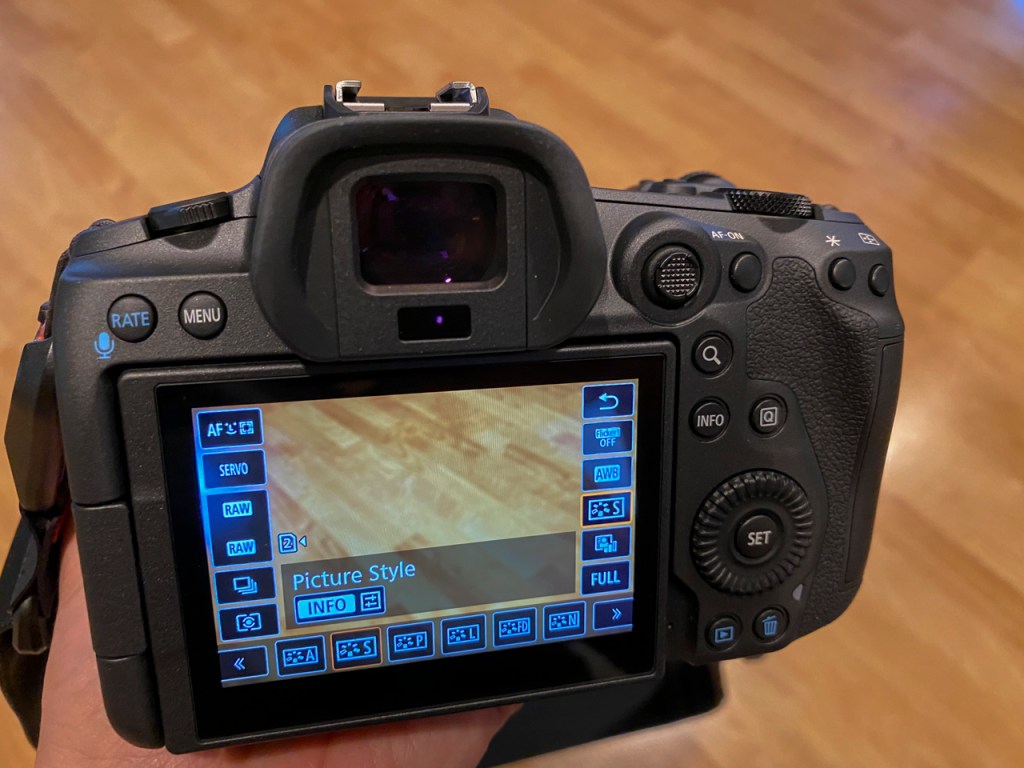
In one of those live-view screens, press the Q button and all the common icons show on the back of the camera for easy changing.
Live view screen with icons accessible by the Q button.
Touch screen on the back of the camera is activated with the Q button, too.
Video is activated with the touch of a button. Push the red button with your shutter finger and video is on. This is a great improvement over the twist lever and push on the Canon 1Dx and the Canon 5D Mark IV.
The R5 has in-body image stabilization. We’ve seen this in other mirrorless cameras but it’s a first most Canon cameras. This means we can hand-hold the camera and shot at lower shutter speeds. See below — I enlarge the file to 100% using 1/40th of a second shutter speed and ISO 1600.
100% enlargement at ISO 1600 and 1/40 shutter speed hand held. Should be grainy and blurry but it’s not.
Thanks to Hunt’s Photo & Video for getting this camera and lens to me. I know equipment is in short supply so my sincere thanks.
Thanks to the nice folks at Olympus and Hunt’s Photo & Video I got to test the Olympus OM-D E-M1 Mark II and a 300mm lens with a 1.4x extender. My regular camera is a Canon 1DX with the Canon 300mm f/4 and a 1.4x extender.
So what would happen if I shot the cameras side-by-side?
I went to my friend Lee Hoy‘s house in Ft. Davis Texas. Lee had some hummingbird feeders that were pretty active thanks to fall migration. Hummingbirds were buzzing the feeders like crazy.
My test was to set both cameras on the most fancy fast focusing settings. Lee knows Olympus so he double-checked all my setting on that camera. I know Canon so had everything set on that camera.
Both cameras were set to f/7.1, aperture priority, at ISO 500, continuous auto-focus, and rapid release.
I picked-up one camera and fired. Then I put it down and picked-up the next camera. This went on for a little over an hour. Canon then Olympus then Canon then Olympus until I was exhausted.
In the end, I took 267 photos with the Olympus and 159 with the Canon. The Olympus has a higher frames-per-second rate so there will be more photos to edit. More opportunities to capture the precise moment of action, too. That’s the plan anyway.
Both cameras held and maintained focus on the hummingbirds. I was pleased to see that the Olympus kept-up with the Canon. Both cameras also failed to focus on a hummingbird about the same rate usually thanks to operator error.
Black-chinned hummingbird with Olympus
Black-chinned hummingbird with Canon
Ruby-throated hummingbird with Olympus
Ruby-throated hummingbird with Canon
Rufous hummingbird with Olympus
Rufous hummingbird with Canon
Winner? Not one over the other. They Olympus OM-D E-M1 Mark II held in there against the Canon 1D X Mark II. That should be good news for any bird photographers looking to buy the Olympus system.
Rufous hummingbird photographed with Olympus EM1 Mark ii with a four-thirds sensor.
A full-frame sensor camera has a sensor that is 35mm on the longest side. A cropped sensor camera (APS-C) has a sensor that is smaller. A four-thirds sensor is even smaller at 17.5mm on the longest side.
Those smaller sensors give us what is called a crop factor. An image on a full-frame camera looks the same as if the image was taken with a film camera. Take the same photo with a APS-C camera and the image would appear to be cropped. Take the same photos with a four-thirds sensor and the image would appear more cropped.
That cropping is 1.5x on a Nikon and 1.6x on a Canon camera. The cropping is 2x on an Olympus or other four-thirds sensor camera.
Using that 2x magnification, a 300mm lens is now a 600mm lens. Add a teleconverter on that 300mm lens and you have a 420mm lens. Put that lens on a four-thirds camera and it is now equal to 840mm on a full-frame sensor camera.
Below are three different cameras all with a 300mm lens with 1.4x extender for 420mm from the same location.
full frame sensor camera
1.6 cropped sensor camera
four-thirds sensor camera
The full frame is photographed with 420mm. The cropped is photographed with the same lens but because the sensor is smaller the lens is equal to a 672mm lens. The four-thirds sensor is magnified even more for a lens equal to an 840mm lens. (As was pointed out in an earlier post, all the camera set-ups weigh roughly 4.9 pounds but the view with the four-thirds is equal to a much heavier camera with lens.)
So the advantage of a four-thirds sensor camera is our subject appears bigger when using a telephoto lens with a lighter camera.
I was curious if the quality would be acceptable since the sensor was smaller.
Above is a photo of a female rufous hummingbird perched outside my kitchen window. This was photographed under horrible conditions. I’m shooting through a dirty window. I’m hand-holding the camera at ISO4000 and the image was shot in jpg versus raw. (I was cooking dinner at the time so give me a break.)
Same image as above and cropped to 100%. Notice the fine details in the feathers. No smooth, blotchy colors but actual fine details.
“Expert” opinion has been that the smaller the sensor the worse the quality. I think the fine engineering put into APS-C cameras like the Canon 7D Mark II and Nikon 500 really put an end to that thinking. My brief tests with the Olympus OM-D EM1 Mark ii shows this four-thirds sensor can stand up with the best.
As usual, give me your thoughts. It’s always fun to read your experiences. Thanks again to Hunt’s Photo and Video and the folks at Olympus for making this test possible.
A lady in class mentioned that she was taking eight camera batteries on her next vacation. Eight batteries! That’s unheard of. I own two batteries for my Canon 5D Mark IV and one for my Canon 1DX. Why would this lady need eight for one camera?!
I’ve been testing the Olympus OM-D E-Mii and the OM-D E-M1X. Thanks to my testing I understood her statement wasn’t so crazy.
The battery life on these cameras is not great. A battery gets 2-3 hours of life. That’s turning the camera off and on, looking at photos on the back, taking a group of photos, putting the camera down, picking it back up, taking some more photos, setting it down, turning it off, turning it on, taking some photos, reviewing photos, etc. Two or three hours of this type of activity and the battery warning light is flashing.
For comparison, I can use a Canon 5D Mark IV battery all day without worrying. The Canon 1DX battery will last three or four days even with heavy shooting.
The E-Mii uses one battery. The more powerful E-M1X has a battery holder that uses two batteries. Luckily, both cameras use the same battery. That’s a great move, Olympus!
Each battery charges in a little over an hour. That’s not unusual for a camera battery. I charged three Olympus batteries in an evening with no problem but I was watching the charger and switching the batteries.
In real life, though, I’m dragging in at 10:00pm after a hard day of shooting and everything needs to be charged and ready to go by 5:00am. I’d find it hard to charge three batteries while sleeping.
Luckily, the batteries for these cameras are reasonably priced. A battery is $54 so it’s possible to buy some extras. The battery recharger is $59 so a photographer could have one or two more. There’s an after-market charger that claims to charge two batteries at a time. (I’ll let someone else test that item.)
Yes, there is a power grip for the OM-D E-Mii. That add weight and bulk — a reason many are using for switching to mirrorless.
It’s inevitable that a mirrorless camera is in my future. I shot with Nikon film cameras for 15 years. Then I moved to Canon for digital SLRs and have been happy for 16 years. Will I make a brand shift when I go to mirrorless?
The nice folks at Olympus were kind enough to send me an OM-D E-M1 Mark II to test. (Thanks to Gary Farber at Hunt’s Camera & Video for your help!) This camera retails at $1,699 with a 20.4 megapixel sensor and 15 frames per second shooting. Check, check, and check on price, file size, and shooting speed.
There were some other features that were intriguing. The camera can shoot 60 frames per second is silent mode which would be amazing for birds. It has in-camera focus stacking and in-camera time lapse. Both of these are important to me.
I’ve used the Olympus OM-D E-M1 Mark II for a week and here are my initial impressions. (Check back tomorrow for more.)
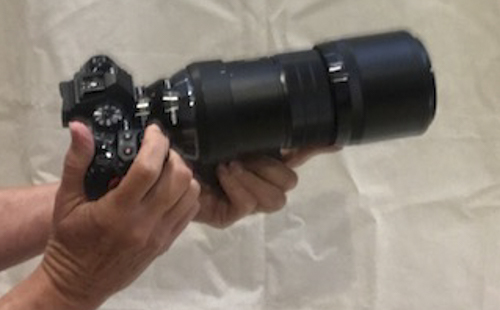
Weight — Let’s get that out of the way first. I thought there would be more difference.
4.9 lbs OM-D E-M1 Mark II with 300mm lens & 1.4x teleconverter
4.9 lbs Canon 5D Mark IV with 300mm lens & 1.4x teleconverter
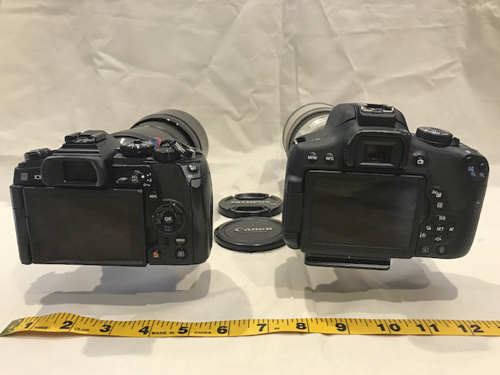
6-inches wide by 3-inches deep on the Canon 5D Mark IV
5-inches wide by 3.25-inches deep on the Canon Rebel T6i
OM-D E-M1
Canon 5D Mark IV
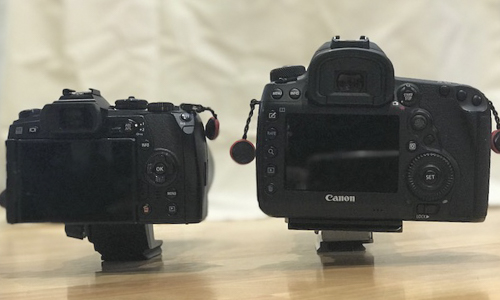
OM-D E-M1 on left and Canon 5D Mark IV on right
OM-D E-M1 on left and Canon Rebel T6i on right
Set-up — I wasn’t looking forward to this step. I’ve taught photography for 25-years and know Canon and Nikon cameras well. The Canon R was intuitive right out of the box. Sony, Olympus, and Fuji tend to put things in different places and call them by different names.
The OM-D E-M1 forced me to go to the user’s manual. I was able to get the camera set to my liking with the help of the manual. Dials and Fn buttons have to do double duty since the camera body is smaller.
Once I got the camera set-up to my liking, the features I needed were easy to reach and adjust. ISO, exposure adjustment, focus points were at my finger tips and I could shoot.
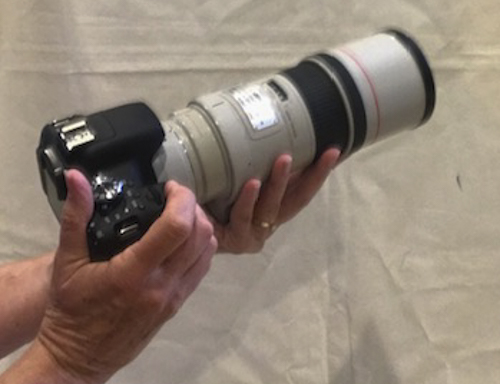
OM-D E-M1 Mark II w/ 300mm lens
Canon 5D Mark IV w/ 300mm lens
Canon Rebel T6i w/300mm lens
But — What about the picture quality? So far, I’m impressed.
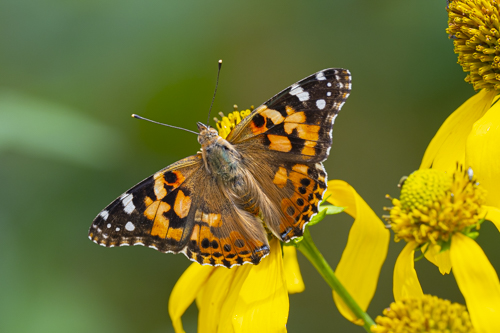
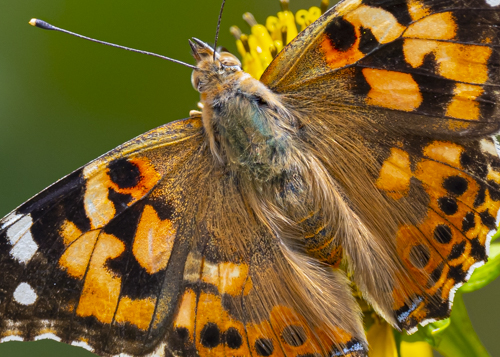
Painted lady with 300mm lens plus 1.4x extender ISO 400
Painted lady blown up to 100%. Notice the body hairs
Rufous hummingbird in flight with 300mm lens plus 1.4x extender ISO 2000
Julia & Eric’s wedding with camera on silent mode 12-200mm lens at ISO 2000
Check back tomorrow for more about this camera and the OM-D M1X. Once again, thanks to Gary Farber at Hunt’s Photo & Video for your help with this loaner.