Professional photographer leading workshops and tours. I use Canon cameras but I'm familiar with all the other brands. Love photography birds and nature. Love talking about photography and gear.
Macphun Tonality is turning out to be a great way to create black-and-white and toned images.
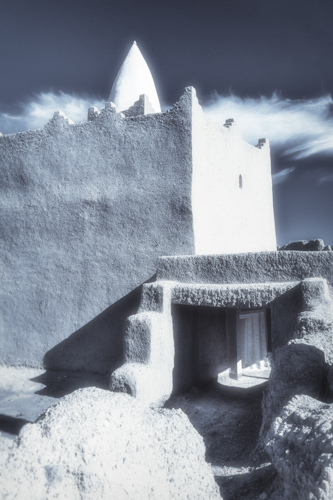
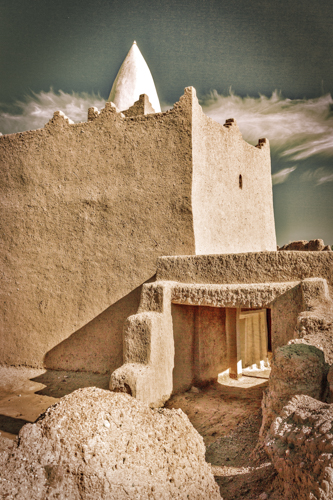
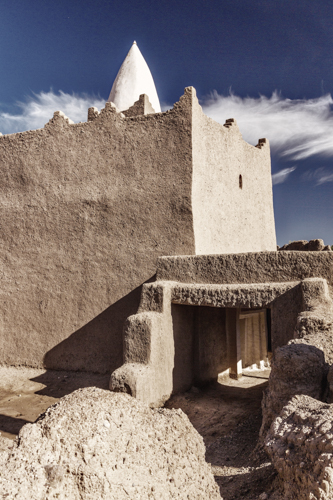
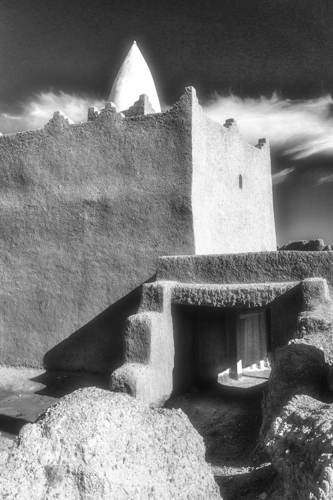
Take a look at the processing I did on my image of a shrine to a holy man in Morocco.
Here’s the image with basic processing with Adobe Camera Raw.I opened the above image in Macphun Tonality. Then I used the preset “300 bleached.” No other processing.
My first image processed in Machphun Tonality with the “Bleached Drama” preset.The first image processed with Macphun Tonality “Baby Blues” preset. Nothing hard. Just push the button and enjoy the image.The original image opened in Macphun Tonality. Then processed in “Monochrome Dreams.”
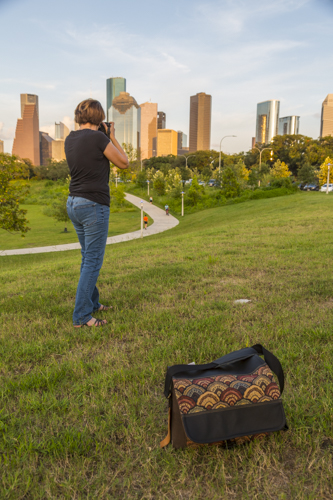
Here’s my custom designed Porteen Gear Camera Bag at Eleanor Tinsley Park in Houston. This is a great bag for carrying a small selection of equipment around the city.My Porteen Gear Camera Bag can be rugged, too. Here it is out in the Chihuahuan Desert of Big Bend National Park.
The Porteen Gear Camera Bag looks nice even in a rugged setting. Yet, it carries the equipment I need for a short outing.
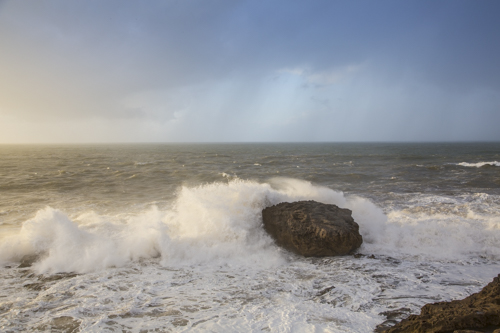
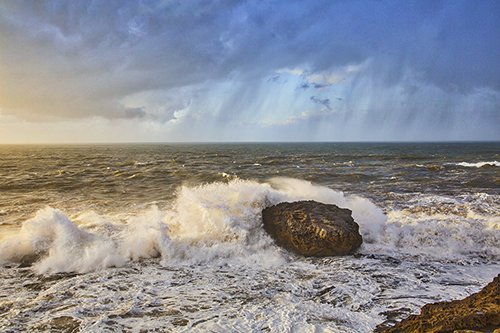
Here’s the image processed with Adobe Camera Raw.Same image as above then processed with Macphun Intensify. The clouds really pop with drama.I stared with the first image and then did a little post processing with Google’s NIK Color Efex Detail Extractor.
This comparison illustrates that Macphun Intensify can give us the great results we loves with Google’s NIK Color Efex Detail Extractor.
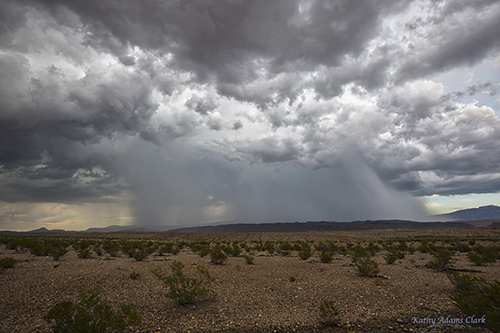
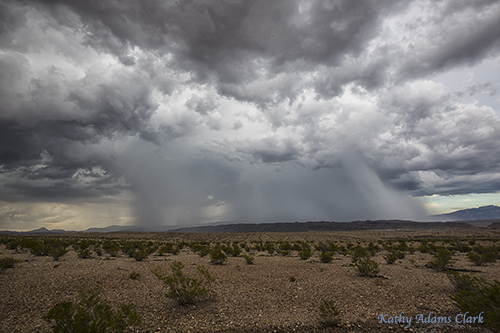
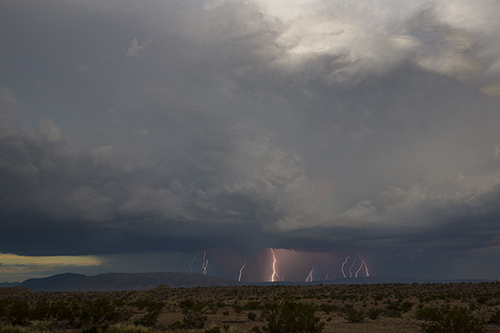
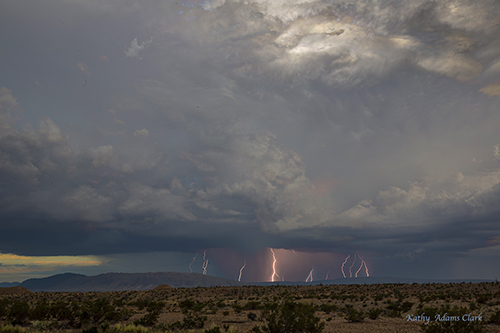
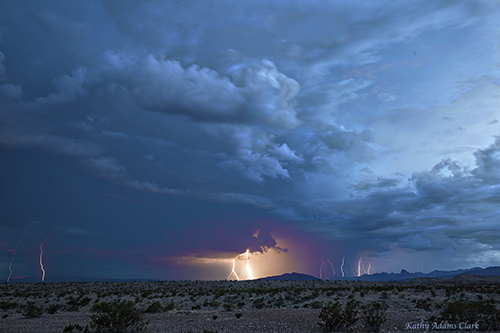
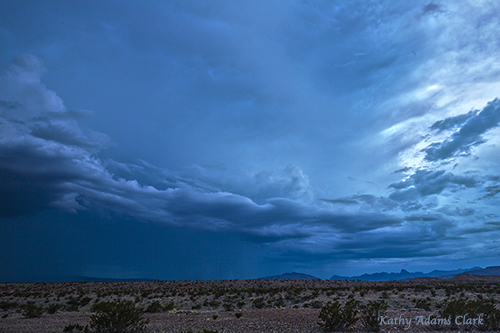
We had some great desert lightning storms during my recent workshop in Big Bend National Park. Each of the images below is a composite of several lightning strikes to make the scene more dramatic. The images have then been processed with Macphun Intensify to bring out the details in the clouds.
Composite image of lightning strikes in Big Bend National Park.Same image with a touch of intensity added thanks to Macphun IntensifyComposite image of several lightning strikes. Then processed with Macphun Intensify to enhance the clouds.Single image of magnificent storm clouds in Big Bend National Park. A touch of drama was added with Macphun Intensify.
I love what Macphun Intensify does to bring out details in a photo. Thanks to a full range of sliders, I can bring out details and drama that enhance my photos. Intensify really does “bring out the hidden beauty” of a photo.
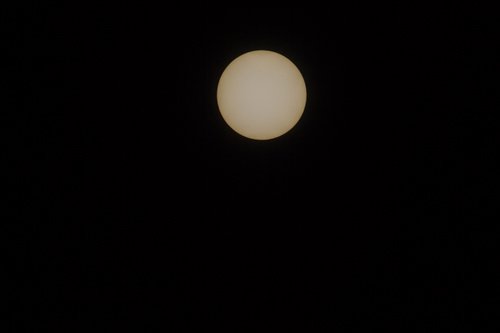
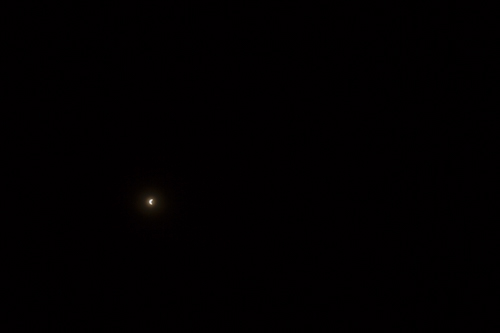
How much magnification do you need to photograph the solar eclipse on August 21, 2017?
This is the sun photographed at 10:21 in the morning, Canon 100-400mm lens with a 1.4x extender. 10-stop ND filter. 4000 shutter speed, f/4, ISO 100.
It’s going to take some magnification to photograph a big sun.
This is the solar eclipse photographed in Iceland in 2015. The lens is a 16-35mm on a full-frame camera. I used the same 10-stop ND filter as above. Notice how small the sun is in this frame. (BTW, this is the same as using a 10-22mm lens on a cropped-sensor camera.)Solar eclipse in Iceland 2015 photographed with a 24-105mm lens on a full-frame camera. I used the same 10-stop ND filter as above. (This would be the same as using a 15-85mm lens on a cropped sensor camera.)This is a stack of images shot during the Iceland 2015 eclipse with the 24-105mm lens. Then the entire image was cropped. I used the 24-105mm because I wanted to build this stack later on in Photoshop.
Think about what lens you are going to use to photograph the solar eclipse on August 21, 2017. The event will happen fast so the time to get prepared is now.
It’s interesting to compare images processed in Adobe Camera Raw then enhanced with Nik Color Efex Pro 4 versus Macphun Intensify. I’ve done pretty simple processing on each of the photos you see below. Each was processed in a minute or so — if that much.
This image was processed in Adobe Camera Raw. Clarify — 40, Vibrance — 20, Saturation — 20, Exposure — +1.05, Shadow — +52. The same image as above. Opened in Photoshop and then opened in Nik’s Color Efex Pro 4. A bit of tweaking with the detail extractor slider.Same basic processing as photo #1 in Adobe Camera Raw. Then opened in Photoshop and then opened in Macphun Intensify. I used a bit of Architectural Details and then some Balanced Tones.
Once again, simple processing on each image. Nothing complicated. No dodging, burning, layers, etc. Just some basic processing.
I was impressed with Nik but I’m really impressed with Macphun.
Use Promo code Adams to get a discount when buying Macphun Luminar or Aurora HDR.
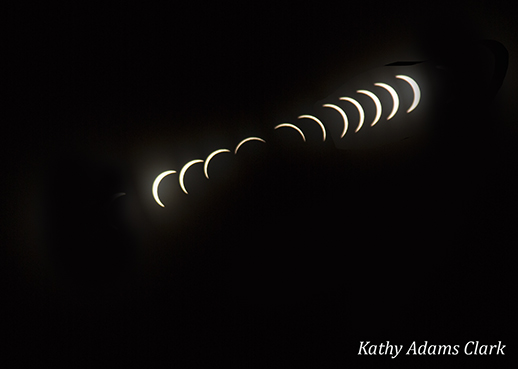
Total eclipse of the sun photographed in Iceland in 2015. This sequence was photographed with a 300mm lens fitted with a 10-stop ND filter to block the light to the sun.
August 21, 2017 there will be a total eclipse of the sun. Most people in the United States will be able to see this event. Several million lucky people will be right under the eclipse as it moves diagonally across the US from Oregon to Georgia.
Photographing the eclipse is going to be a challenge. I photographed the total eclipse of the sun that passed over Iceland in March 2015. Now is a good chance to share my experience from that event.
Repost from March 2015:
A few years ago I read a news report about a total eclipse of the sun on March 20, 2015. I’ve never had the opportunity to photograph solar eclipse. Why not build a photo tour around the eclipse?
Strabo Photo Tour Collection has coordinated my photo tours for years so I contacted the owner, Jacque Steedle, with the idea. The eclipse would go pretty close to Iceland, one of Strabo’s premiere destinations. We both liked the idea and thought it would be fun to also offer opportunities to photograph the northern lights as well as landscapes of Iceland in the winter.
Our group arrived in Iceland on March 13th and the weather leading up to March 20th was been horrible. Our flight to Iceland was cancelled due to high winds. Then we had rain, sleet, snow, and more high winds. Clouds covered the skies most of the time.
On the evening of March 19th we had clear skies for a bit. We briefly saw the aurora borealis but then the clouds moved back in. The weather forecast for the morning looked good as we headed off to bed.
March 20th dawned clear, crisp, and cold. There was not a cloud in the sky when I opened the curtains in my hotel room. The wind was still. Could the photo gods really have given us such a treasure?
The group ate breakfast and then we grouped together to review all our camera settings. Einar Matthiasson, our guide in Iceland, agreed with me that we stay on the hotel grounds and shoot from the small hill in a hay field. That hill gave us a view of Hekla, one of the most famous volcanoes in Iceland.
Einar had researched the angle of the eclipse and placed two large sticks on the ground in front of our group. Those of us shooting time lapse with wide-angle lenses used the sticks to make sure we had the entire arch of the sun in our frames.
At around 8:30 a.m. it was time to get into position. We put our eclipse glasses and started photographing.
Details and Equipment:
Planning is essential. We had all the equipment assembled and ready to go an hour before the eclipse began.
Focus on infinity and turn off auto focus.
Turn off image stabilization.
Manual exposure at f/4.5 during totality worked well. When the sun was brighter f/16 helped cut some the light.
Spot meter with a focus point on the sun gave an accurate reading most of the time.
Shutter speed stayed between 1/5000 and 1/8000 for most of the eclipse.
Exposure compensation was needed when the sun was big.
A sturdy tripod is a must.
A programmable shutter release like the Vello Shutterboss II or the Canon TC80N3 was perfect for the time lapse.
Lessons Learning the Hard Way:
Buy a 10-stop ND filter for all the cameras. I didn’t have one for my small camera shooting the time lapse or for my telephoto lens. (Stupid me!!) I had to hold the 10-stop ND in front of my telephoto lens for most of the shoot.
Don’t kick the tripod if you’re planning to layer a sequence of images.
Use a programmable shutter release to get a precise sequence of images. Shooting here and there is okay but the precision of a regular interval is better.
The sun is big in the frame if you use a telephoto lens. The sun is small in the frame if you use a wide-angle lens.
Two heads are better than one. Have a buddy who knows what they are doing. Work as a team. Temporary moments of insanity are possible during the eclipse.
Total eclipse of the sun photographed in Iceland in 2015. This sequence was photographed with a 300mm lens and 10-stop ND filter to block the light to the sun.
Here’s a time lapse of the eclipse. I did not use a 10-stop ND filter on this camera so the sun is not totally in darkness. This is a good example of what you will see with your “eclipse” glasses on.
Totality, by the way, is when the airplane circles the sun. Yes, an airplane full of people circled around the sun at totality so they were in all our photos.
Porteengear Camera Bags have me so excited. I can’t wait for my new bag to arrive.
For years I’ve used a LowePro Passport to carry my cameras and lenses when I’m out photographing the streets or an amusement park or traveling light with my equipment. My LowePro Passport carries a camera, two lenses, and flash plus wallet, cellphone, and bottle of water.
But things have changed and Porteengear is in my life. Well almost — my bag will be here in two weeks.
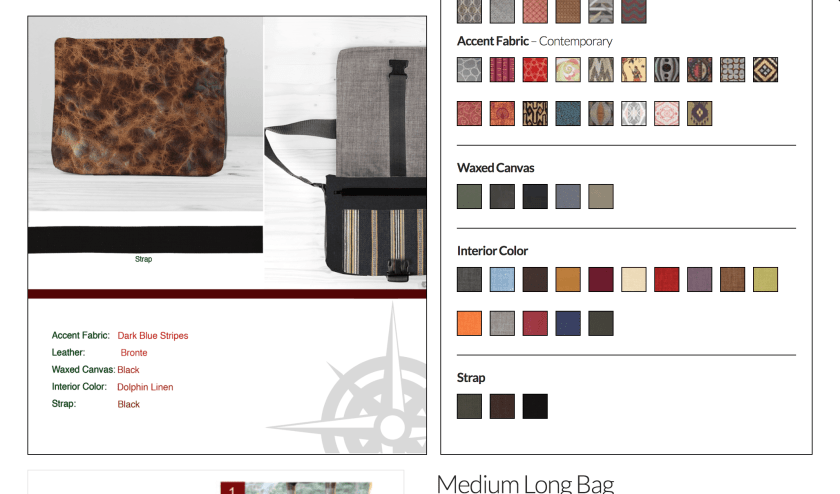
Porteengear offers camera bags that you design yourself. On the Porteengear website you enter the custom design page.
You choose the size of your camera bag from tiny bag to one that will hold your laptop.
You select the flap design. Options include a bit of accent color or fabric to a uniform color.
Then the fun beings.
You can select the overall bag covering including tooled leather, snake skin, aged leather, or even Damask. There’s a Vegan fake leather option.
Then you select your second leather color. For example, black with tooled leather. Maybe teal leather with a some subtle brocade. Maybe distressed leather with a nice tartan plaid for a more masculine look.
Next you select the color of the outer shell of the bag.
Then you can select the interior color of the camera bag. All my camera equipment is black so the last thing I want is a black-colored interior. Select a bright color or a dark color. The interior color of your camera bag is your choice.
We get to choose the color of the strap.
We get to choose antique hardware or traditional.
Then there’s an option to add a dust flap and/or luggage sleeve.
All those options are live on the screen. That means you can design several bags and then make a final decision in a couple of days — or maybe after consulting your friends.
Need help designing your bag? Head to Porteengear’s Etsy page to see bags designed by the pros. Click the Shop option on the Porteengear page and see bags already designed for you. Order one of those or use the design as a starting point.
My new Porteengear camera bag!? I’ll show you in a couple of weeks when it arrives.
I’ve been working with Macphun’s Luminar on my Mac and love it. PC users can now get a beta version of Luminar for Windows. Free!
Here’s the Press Release from Macphun:
Macphun makes free public beta of Luminar for Windows available for download
San Diego, CA – July 13, 2017 — Macphun, the California-based developer known for delivering award-winning products for Mac, today launched the free public beta of its award-winning photo editor Luminar for Windows. To download the beta, please visit macphun.com/beta.
Luminar is a powerful photo editor designed to tackle anyone’s photography needs, from correcting challenging image problems to artful stylizing. Users can choose between levels of image processing complexity based on their experience, and adapt the workspace controls to their skill level, moving up to more advanced modes as they learn. Luminar works in non-destructive fashion and aims to take “work” from photo editing “workflow” for photographers worldwide.
In April, only 5 months after its launch, Luminar for Mac won the prestigious TIPA award for Best Imaging Software 2017. This all-in-one photo editor is a cutting-edge solution for creating fascinating images without extra hassle. Luminar includes over 300 robust tools that make fixing, editing and perfecting a photo as easy as moving a slider.
“We are thrilled to release our first PC product today and give photography enthusiasts around the world the first taste of our best-selling Mac product,” said Kevin La Rue, Vice-President at Macphun. “By test-driving Luminar for Windows, beta testers can help shape our software and make the final release a perfect fit for everyone,” concluded La Rue.
The public beta is free of charge and already matches some of the most important features of Luminar, such as the newest and most advanced tool developed by Macphun’s Research and Development Lab – the Accent AIFilter, powered by artificial intelligence technology. The filter allows anyone to create stunning images with a single slider, substituting for dozens of traditional controls like shadows, highlights, contrast, tone, saturation, exposure, details and many others.
Admittedly, several features from the Mac version of Luminar remain in development for the Windows platform, among them workspaces, plug-in integration, object removal, noise reduction, and more. As these are completed, the public beta will be updated regularly leading to a full cross-platform release late in 2017.
Key features of the Luminar for Windows public beta:
Adaptive user interface – Exactly matching the Mac version, the software adapts to the skill level and preferences of the photographer.
One-click presets – Over 50 pre-defined styles for every photography style.
Photo Editing Filters – Over 40 custom filters, each with built-in visual tips and a unique set of easy-to-use controls for correcting, enhancing and stylizing images.
RAW file conversion – Support for the latest RAW file libraries.
Non-destructive workflow – Edit without fear.
Recommended System Requirements – Windows 10, Core i5 2.2 or better, 8GB RAM, 1GB GPU RAM, SSD with 20+GB free space.