Frequently people ask me how to move their photos from the SD card to their hard drive. Variations include “how to copy photos from memory stick to computer”, “how to move photos from CF card to hard drive”, etc. The basic idea is taking the photos off the camera’s card and putting them on the computer’s hard drive.
Step 1: Plug your card into the computer using a card reader or the slot in your computer. SUGGESTION: Buy a card reader that plugs into your computer. Different cameras use different cards. A card reader might have five slots for different types of cards. These gadgets are always handy to have.
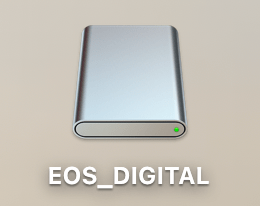
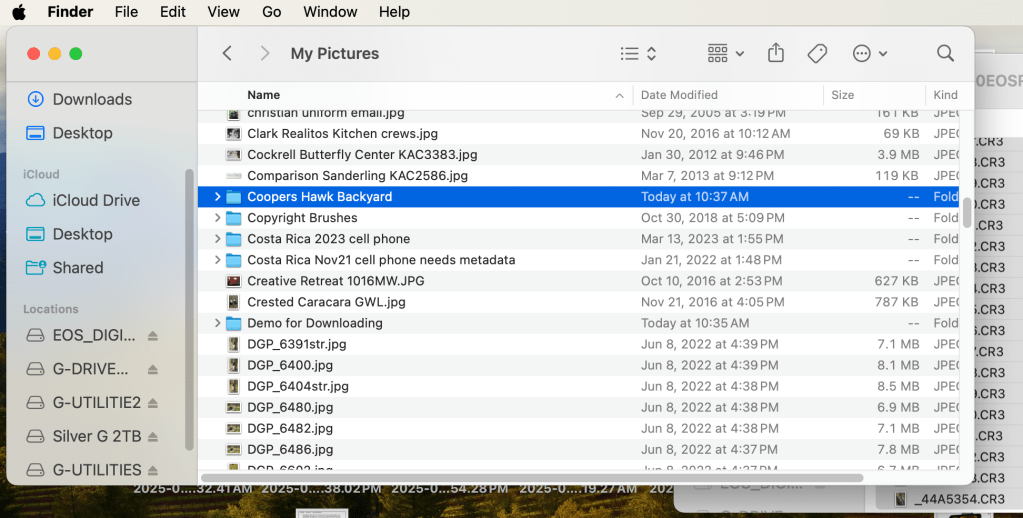
Step 2: Once your card is plugged into your computer you’ll get an icon that looks like this on your desktop.
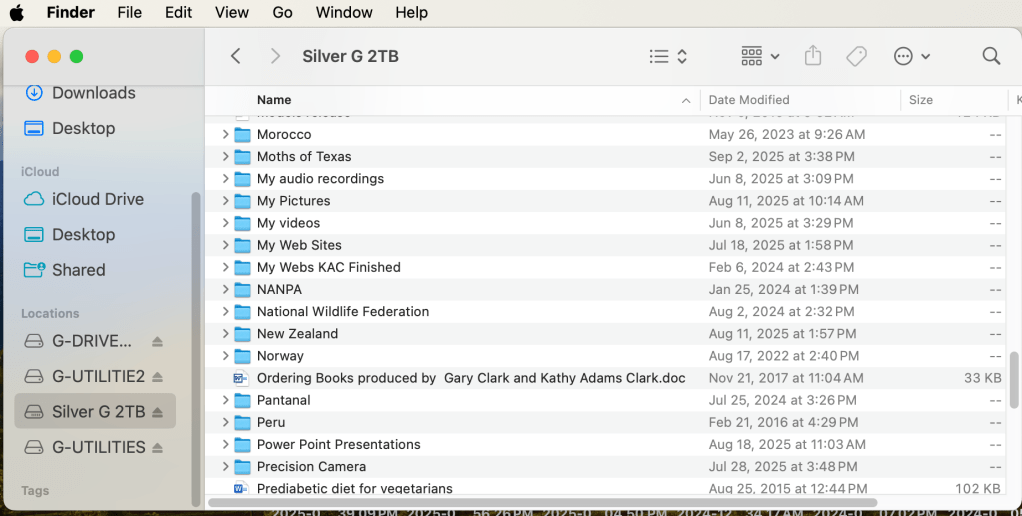
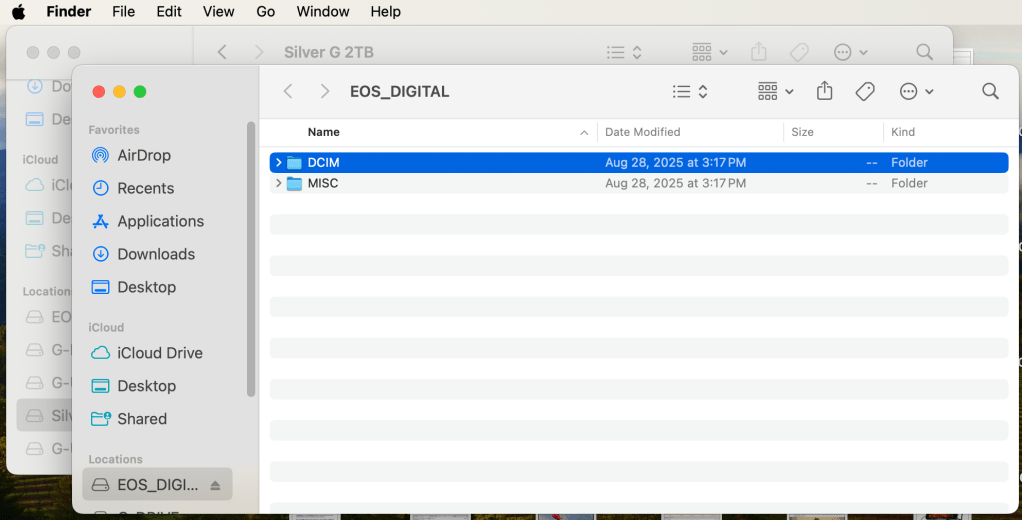
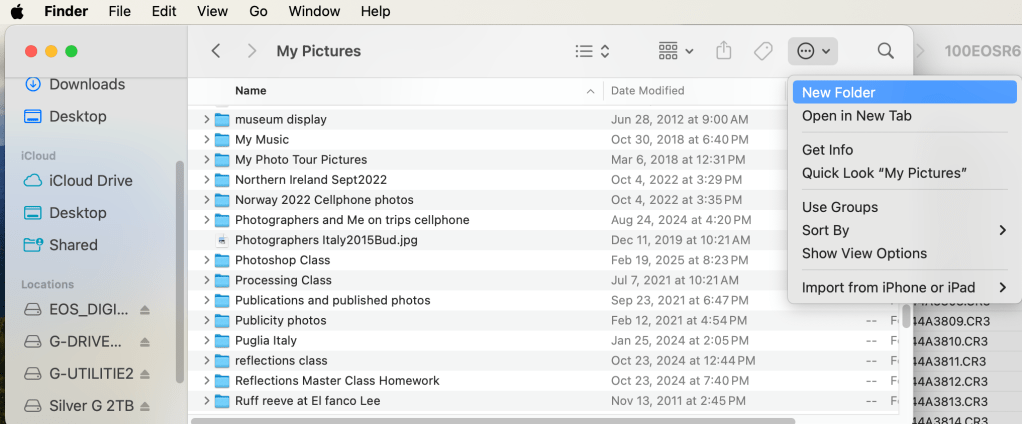
Open a Finder window. Click on the Hard Drive destination for the photos. I have a folder called “My Picture” on my Hard Drive. That’s where I put all my pictures.Open a second Finder window. (Right click on Finder and select “New Finder Window”.) Double click on the EOS_Digital and you’ll see a DCIM folder. Nikon, Sony, Fuji, Olympus will call the card something else but everyone has a DCIM folder. Double click on the DCIM folder to open it. Double click on the folder containing your photos. In the example above, Canon calls the folder 100EOSR6. You’ll see your photos. The example above is in List view. Notice the date I took the photo is under Date Modified. A correct date and time in your camera will give the correct information here. Select the photos you’d like to move or copy. They will be highlighted in blue. (Note shown here)Click on your first Finder window. (Click up by the words My Pictures to do this.) Click the icon show above and select New Folder. We’re going to make a new folder for your photos. Name the folder something that makes sense to you. Use the date, location, subject, etc. Once you’ve made the folder, double click to open it.
Click on the folder you made for the photos. With the folder open, click on the second Finder window. The photos you selected earlier will turn blue. Click and drag the photos into the new folder. If click and drag is hard for you, use copy and paste. Those are found in the Edit menu at the top left.
I hope this helps. Post any questions below. Yes, I know there are other ways to do this. This blog illustrates my method.
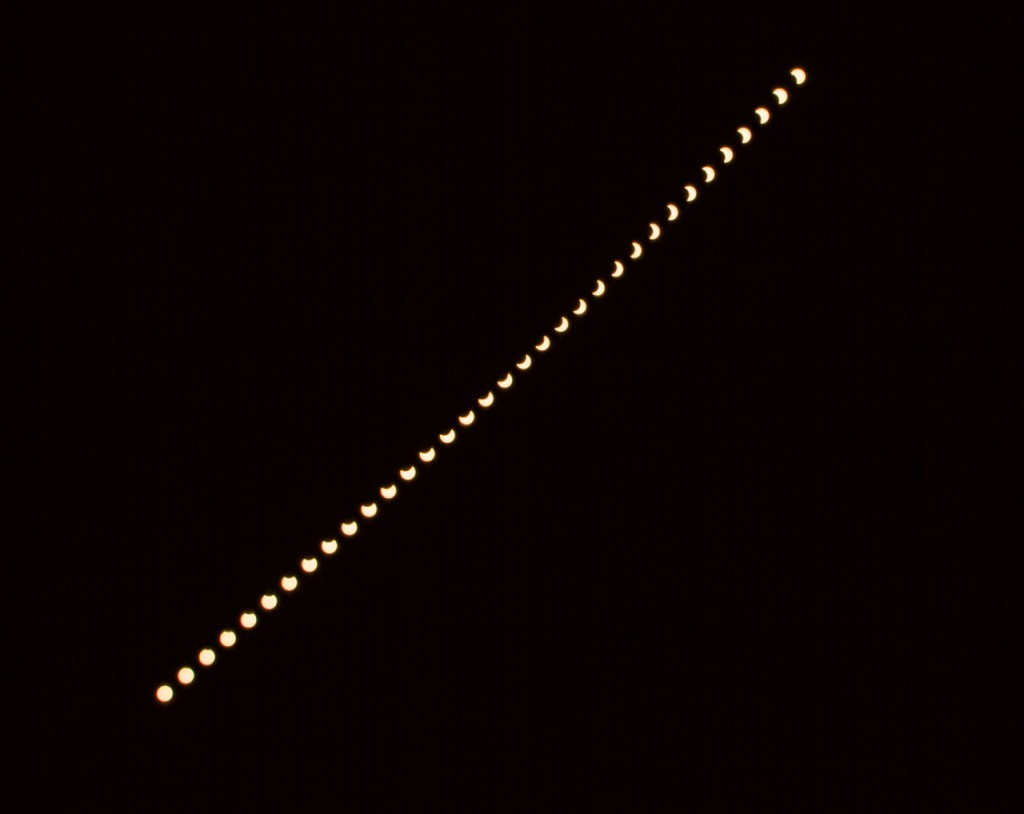
We get two opportunities soon to photograph a solar eclipse in the US. October 14, 2023 we have an annular eclipse and April 8, 2024 we have a total eclipse of the sun.
In the October 14th annular eclipse, the moon will partially block the sun. There will be an orange ring around the sun.
In the April 8th total eclipse, the moon will completely block the sun. The sun will go dark and then we get a tiny flare of light (Baily’s beads) as the moon moves to reveal the sun again.
You’ll need a couple of things to photography both events.
Now is the time to order your 16-stop solar filter! Don’t wait until the day before. Here’s a link to the filters offered by B&H Photo.
Solar eclipse without a 16-stop solar filter. Just doesn’t work!
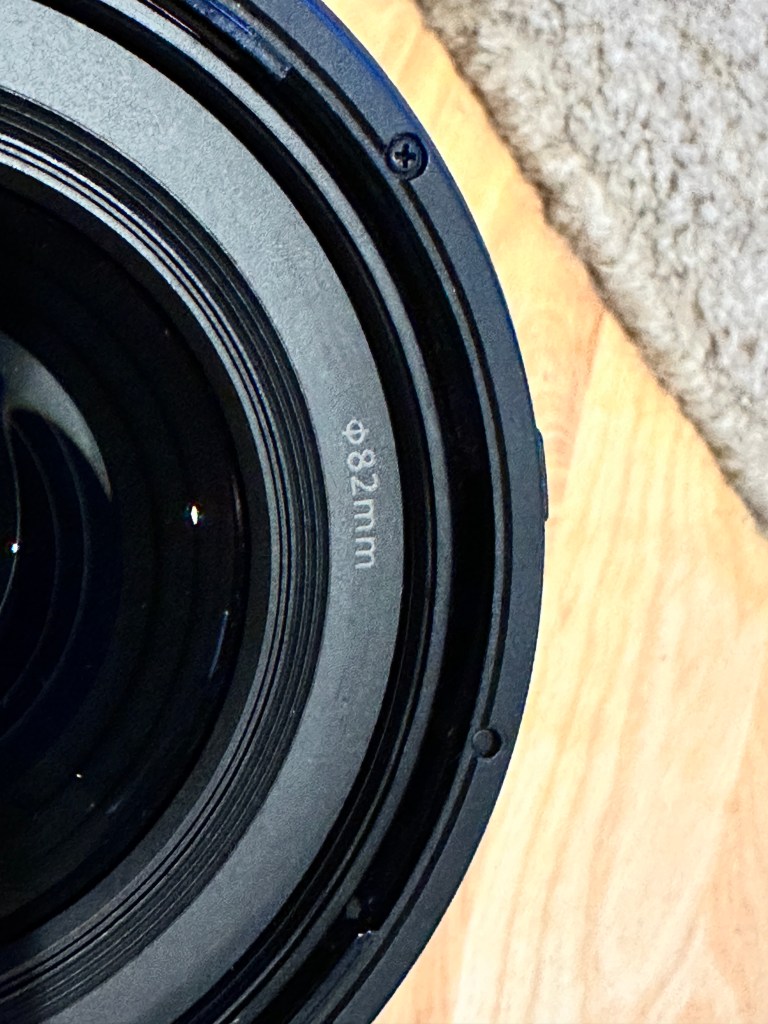
Be sure to order the filter that fits the front of your lens.
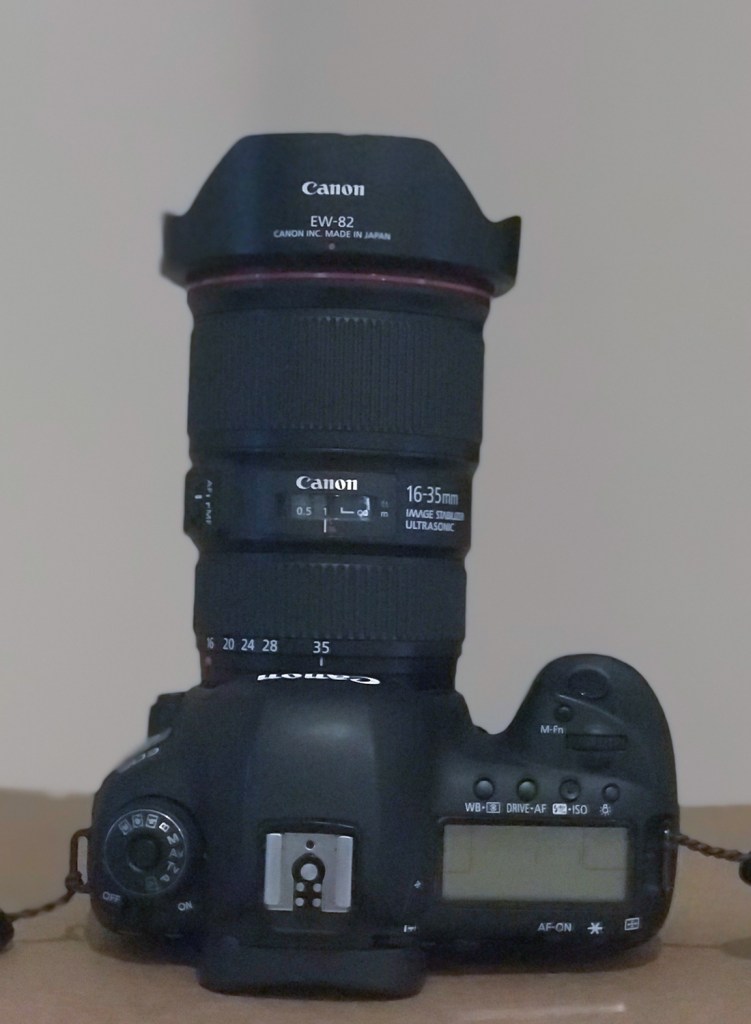
This lens takes a 82mm filter
You’ll also need a sturdy tripod. Order that today, too, if you need it.
You’ll need a shutter release. My favorite is the Vello RC-C2II ShutterBoss II. Buy the one for your camera. Buy the one with the cord and not the cordless.
Magnification — Here’s a blog post I wrote regarding lens choice. There’s a place for your telephoto zoom and a place for your wide angle lens.
Planning — Here’s a blog post I wrote about planning a couple of years ago.
I’ve photographed three eclipses and here’s what I’ve learned along the way.
Planning
Planning is essential. Have all the equipment assembled and ready to go an hour before the eclipse begins.
Focus on infinity and turn off auto focus.
Turn off image stabilization.
Manual exposure at f/4.5 during totality works well. When the sun is brighter f/16 for f/22 helps to cut some the light.
Spot meter with a focus point on the sun to get an accurate reading. Mirrorless camera users have the advantage of seeing the exact exposure so use that to your advantage.
Exposure compensation was needed when the sun was big.
Shutter speed easily stays between 1/5000 and 1/8000 for most of the eclipse.
A sturdy tripod is a must. Don’t kick it.
A programmable shutter release like the Vello Shutterboss II is perfect.
For a time lapse, set the Vello Shutterboss to take photos at precise intervals. A time lapse is best with a wide angle lens. That means a second camera, second solar filter, second tripod, and second Vello Shutterboss.
Prepare for Controtions
My first eclipse started early in the morning and it was in a northern latitude. The sun rose above the horizon and was still low when the eclipse ended.
My last eclipse ended after 1:00pm so the sun was high in the sky.
At my location on October 14th, annularity begins at 11:51 when the sun is 46.1 degrees above the horizon. When annularity ends at 11:54, the sun will be 46.5 degrees in the sky.
Camera aiming nearly directly overhead during solar eclipse
So what that means is my camera/lens combination has to be able to angle up at 46 degrees while it’s on the tripod. During a previous eclipse, the ball head got in the way, the camera body was hitting the ball head, etc. Make sure things work for your location.
Maybe a Gimbal head would work better than a ball head? Test your set-up ahead of time.
The sun is going to move in the frame a lot. The earth is rotating so the sun will move out of the frame. Be prepared to reposition the camera when needed.Plan ahead if you want to stack image later.
Enjoy!! Prepare ahead of time and don’t get stressed.
Questions have come up during my tests and in talks with other photographers.
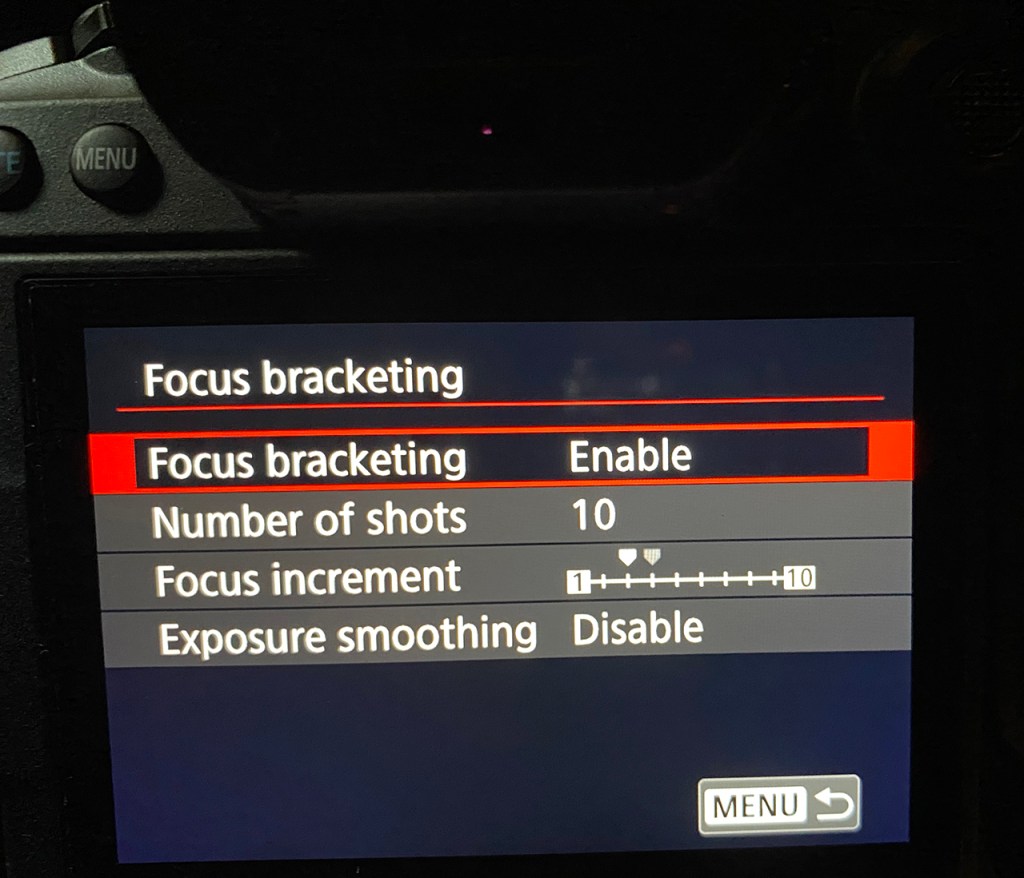
What increment should be used? The Canon R5 comes set at increment 3. That’s a good starting point and what I used on my first tests.
I changed to increment 7 for the purple passionflower blooms. I like 7 now.
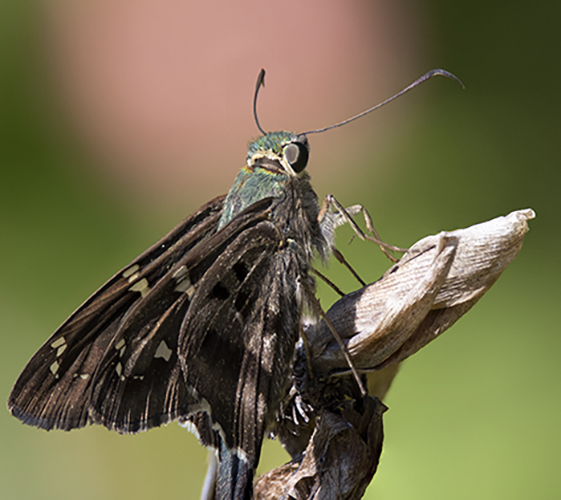
How many photos are needed for a good photo stack? Obviously, that depends on how deep the subject is. I used 10 on the long-tailed skipper and 10 on the red passionflower bloom. The skipper is much smaller than the flower.
In my tests, 10 photos seems to be a sweet spot. The Canon R5 takes less than a second to fire off the series of images. Push the shutter button one time and the camera does the rest.
I used Photoshop’s focus stacking and tried 3, 5, or 1o images. The stacks with 10 images were smoother and better aligned.
Where should the focus point be at the start of the stack? Focus should be on the closest point to the camera. That’s a lesson learned.
On the long-tailed skipper, I focused on the wing closest to the camera. In earlier tests, I focused on the head and the wing closest to the camera wasn’t sharp.
On the red passionflower, I focused on the flower in one photo. In the second photo, I focused on the buds in front of the bloom. Notice the difference?
Red passionflower bloom. Focus point at the beginning of the focus stack was on the bloom.Red passionflower bloom. Focus point at the beginning of the focus stack was on the buds in front of the bloom. NOTE: The fuzzy area to the left of one bud needs a bit of post-processing work.
All photos were taken with the Canon R5, 100-500mm lens, 1.4x extender, f/11, ISO 400.
Questions? What’s been your experience with the R5’s focus bracketing? Does your mirrorless camera have focus bracketing or stacking? Experience?
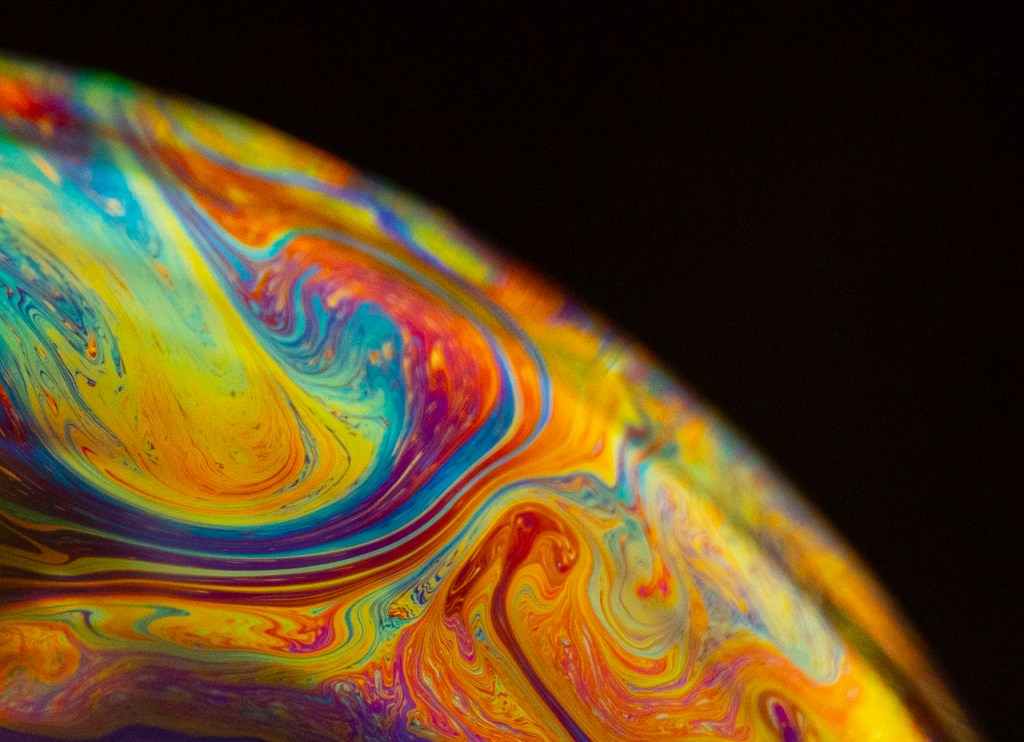
We learn so much about photography when we play. The photo above is a simple bubble but the view is magical.
Here’s what you need to create this photo.
1/8 of a cup of water, 1/8 of a cup of dish liquid, 2 tablespoons of glycerin, small dish, long straw. Lightly mix the three liquids in a small dish. Lightly mix is the key.
Put the dish on a black background.
Camera on a tripod with a lens focused to minimum distance. I used a Canon R5 with a 24-105mm lens. Shutter release is helpul but off-camera flash is the magic. Camera in the Manual mode, f/16, 1/200th of a second shutter speed, ISO 500, flash at ETTL. This means that your flash is going to do the work since the camera’s light meter won’t be balanced.
Put the straw in the liquid and slowly blow. Your goal is to create one bubble. If you blow fast, you get lots of little bubbles. One bubble and slowly blow to make that bubble bigger and bigger. The bubble will stay for one or two minutes thanks to the liquid solution.
Things that will drive you crazy are (1) reflections from overhead lights, (2) reflections from nearby windows, (3) reflection from the flash.
My advice is to “work it” to get rid of all those reflections. Turn off the lights, set-up away from a window, and hold the flash to the side. If you have a softbox handy or diffuser handy, then use those.
It’s inevitable that a mirrorless camera is in my future. I shot with Nikon film cameras for 15 years. Then I moved to Canon for digital SLRs and have been happy for 16 years. Will I make a brand shift when I go to mirrorless?
The nice folks at Olympus were kind enough to send me an OM-D E-M1 Mark II to test. (Thanks to Gary Farber at Hunt’s Camera & Video for your help!) This camera retails at $1,699 with a 20.4 megapixel sensor and 15 frames per second shooting. Check, check, and check on price, file size, and shooting speed.
There were some other features that were intriguing. The camera can shoot 60 frames per second is silent mode which would be amazing for birds. It has in-camera focus stacking and in-camera time lapse. Both of these are important to me.
I’ve used the Olympus OM-D E-M1 Mark II for a week and here are my initial impressions. (Check back tomorrow for more.)
Weight — Let’s get that out of the way first. I thought there would be more difference.
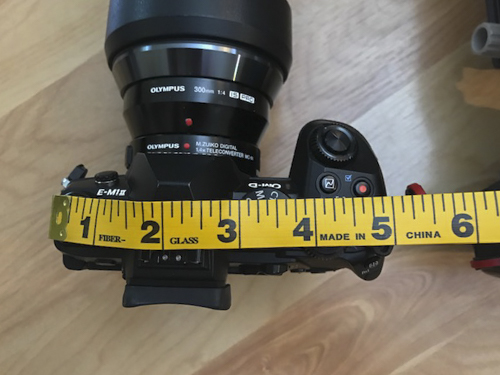
4.9 lbs OM-D E-M1 Mark II with 300mm lens & 1.4x teleconverter
4.9 lbs Canon 5D Mark IV with 300mm lens & 1.4x teleconverter
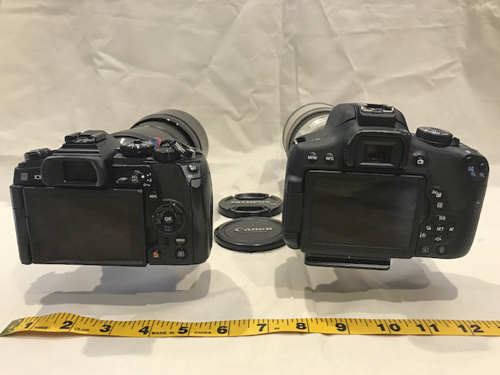
6-inches wide by 3-inches deep on the Canon 5D Mark IV
5-inches wide by 3.25-inches deep on the Canon Rebel T6i
OM-D E-M1
Canon 5D Mark IV
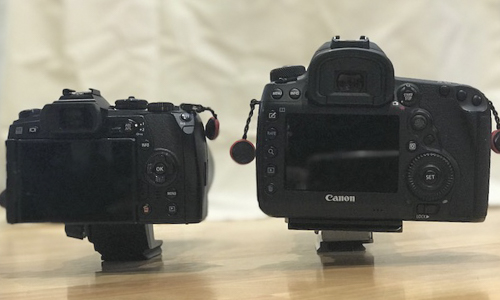
OM-D E-M1 on left and Canon 5D Mark IV on right
OM-D E-M1 on left and Canon Rebel T6i on right
Set-up — I wasn’t looking forward to this step. I’ve taught photography for 25-years and know Canon and Nikon cameras well. The Canon R was intuitive right out of the box. Sony, Olympus, and Fuji tend to put things in different places and call them by different names.
The OM-D E-M1 forced me to go to the user’s manual. I was able to get the camera set to my liking with the help of the manual. Dials and Fn buttons have to do double duty since the camera body is smaller.
Once I got the camera set-up to my liking, the features I needed were easy to reach and adjust. ISO, exposure adjustment, focus points were at my finger tips and I could shoot.
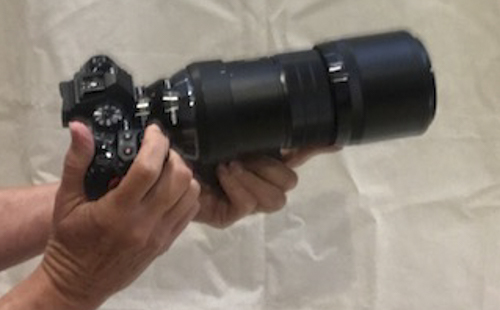
OM-D E-M1 Mark II w/ 300mm lens
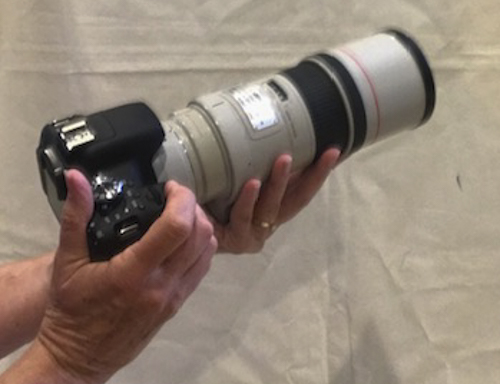
Canon 5D Mark IV w/ 300mm lens
Canon Rebel T6i w/300mm lens
But — What about the picture quality? So far, I’m impressed.
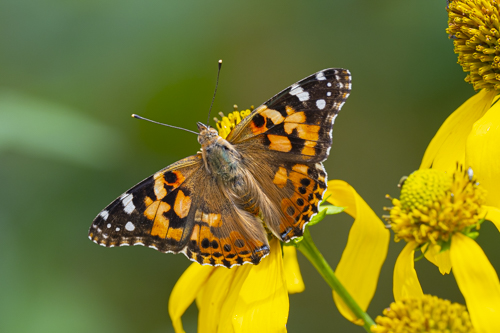
Painted lady with 300mm lens plus 1.4x extender ISO 400
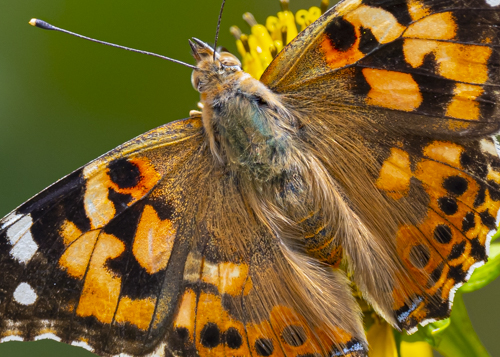
Painted lady blown up to 100%. Notice the body hairs
Rufous hummingbird in flight with 300mm lens plus 1.4x extender ISO 2000
Julia & Eric’s wedding with camera on silent mode 12-200mm lens at ISO 2000
Check back tomorrow for more about this camera and the OM-D M1X. Once again, thanks to Gary Farber at Hunt’s Photo & Video for your help with this loaner.
A friend emailed: Hi Kathy. I have a question and I can’t find an answer on the Internet. I am looking at a lens with a fixed aperture of f4. What I’m wondering is how do you get more depth of field with a fixed aperture? People are singing praise for this lens and report it is on their camera all the time. But I’m wondering how it would do for landscape where you would want everything in focus. Or if you were focusing on a closer object and had mountains in the background. Any thoughts? Thanks
The Canon 16-35mm f/4 lens has f/stops from f/4 to f/22
My Answer: A fixed f/4 lens might have an aperture range from f/4 to f/22. You’d use the f/4 to blur backgrounds and the f/22 for landscapes. The lens has lots of f/stops and not just one.
A “fixed” lens doesn’t change the f/stop as you zoom the lens. In the Canon 16-35mm lens, zoom back to 16mm and you can use f/4. Zoom out to 35mm and you can still use f/4.
A “variable f/stop lens” would change the f/stop as you
zoom. In the Canon 18-55mm lens, zoom
back to 18mm and you can use f/3.5. Zoom
out to 55mm and you can only go to f/5.6.
The f/3.5 is no longer available.
Traditionally, “fixed” f/stop lenses give crisper and
clearer photos. Fixed f/stop lenses are
usually more expensive and better made.
I think that’s the reason they give a better photo.
Blue Milkweed bloom measuring an inch across with thrips inside.
The image above was captured with a MOVO EXT-C5 Reverse Auto-focus macro lens adapter. The adapter lets you attach your lens to your camera backwards. This turns any lens into a super heavy-duty macro lens.
Here’s the MOVO EXT-C5 with a Canon 24mm lens in the middle. Notice that the part of the 24mm lens that usually connects with the camera is now facing away from the camera.
Indianmeal moth 1/4 inch long
Peacock feather
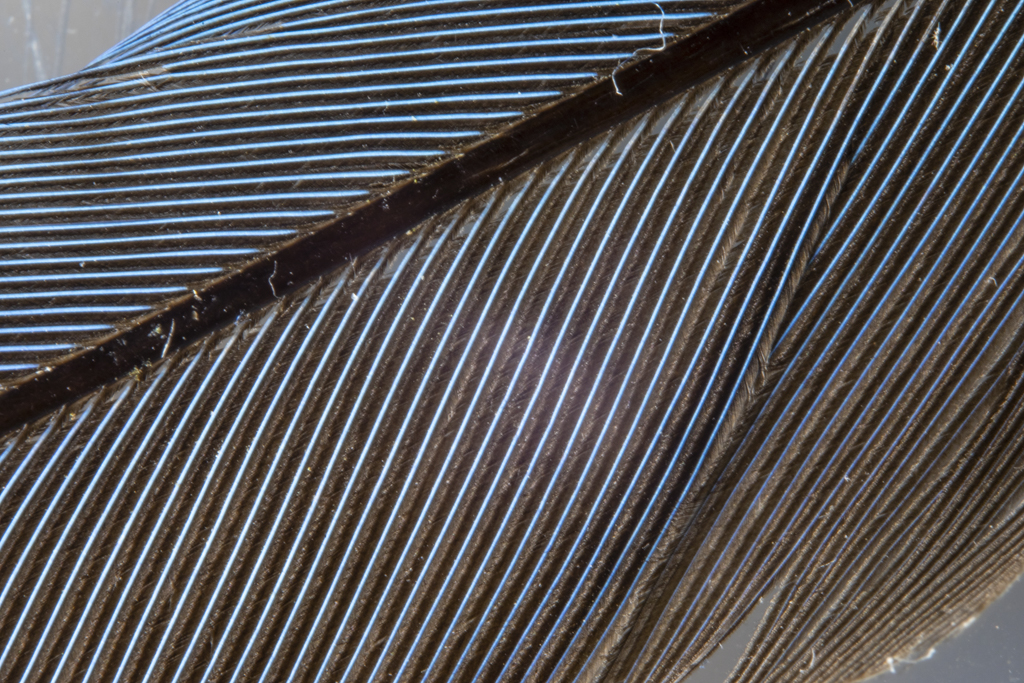
Blue jay,feather
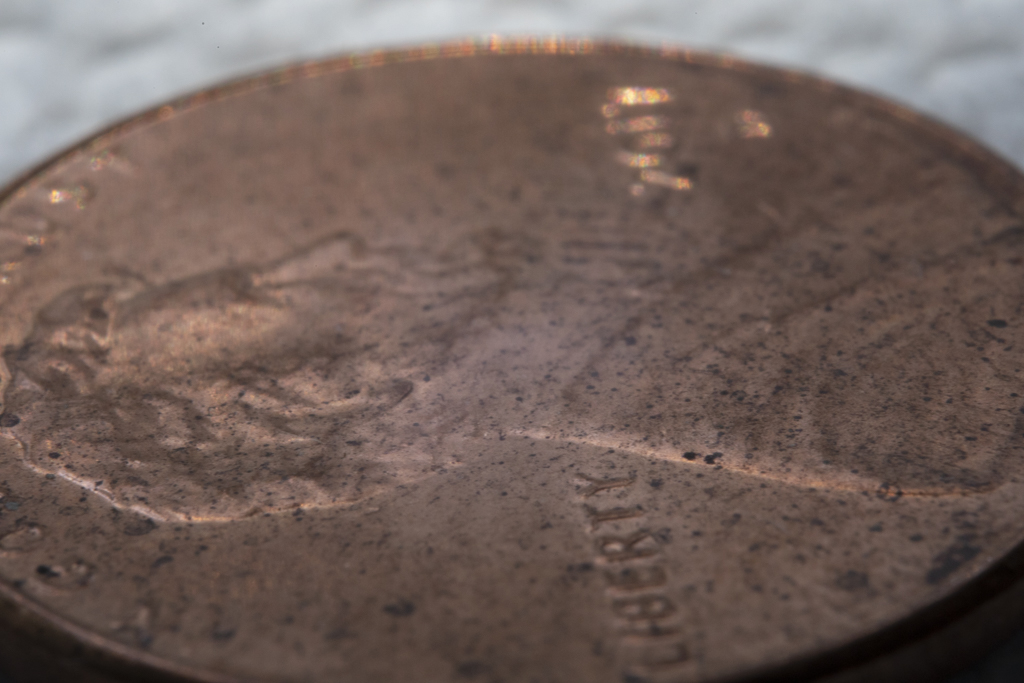
Penny to show depth-of-field at high magnification at f/22
While the MOVO EXT was fun to play with there are drawbacks. Depth-of-field is extremely narrow even at f/22. Camera shake ruins most images even when the camera is mounted on a sturdy tripod.
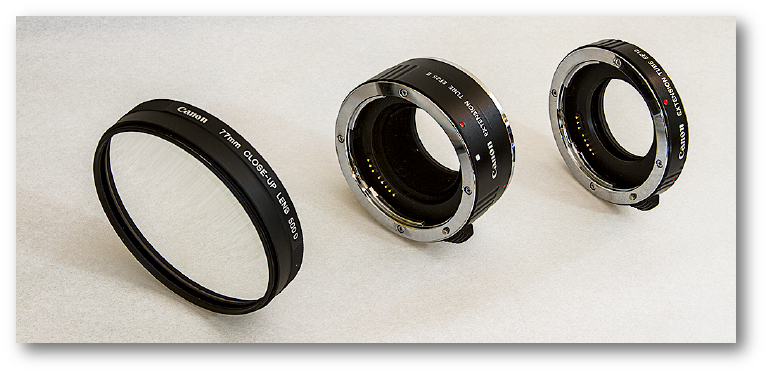
An alternative is adding an extension tube and/or close-up filter to your existing lens.
Canon 500D Close-up lens is no longer available unless you buy them used. I’m currently using the Marumi DHG Achromat Macro +3 that gives the same quality. Then add a 24mm Extension Tube or a 12mm Extension Tube for added magnification.
I’ve used the items above for years when I wanted to photograph something up-close. I find the extension tubes, close-up lens, or combination a lot easier to use than the MOVO EXT.
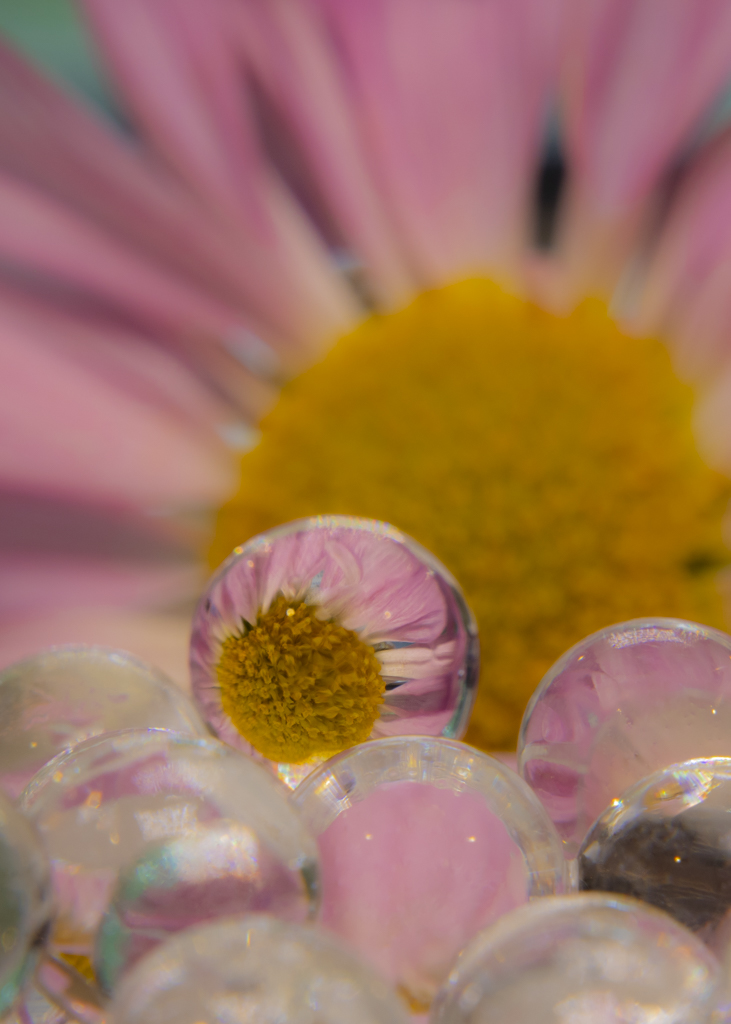
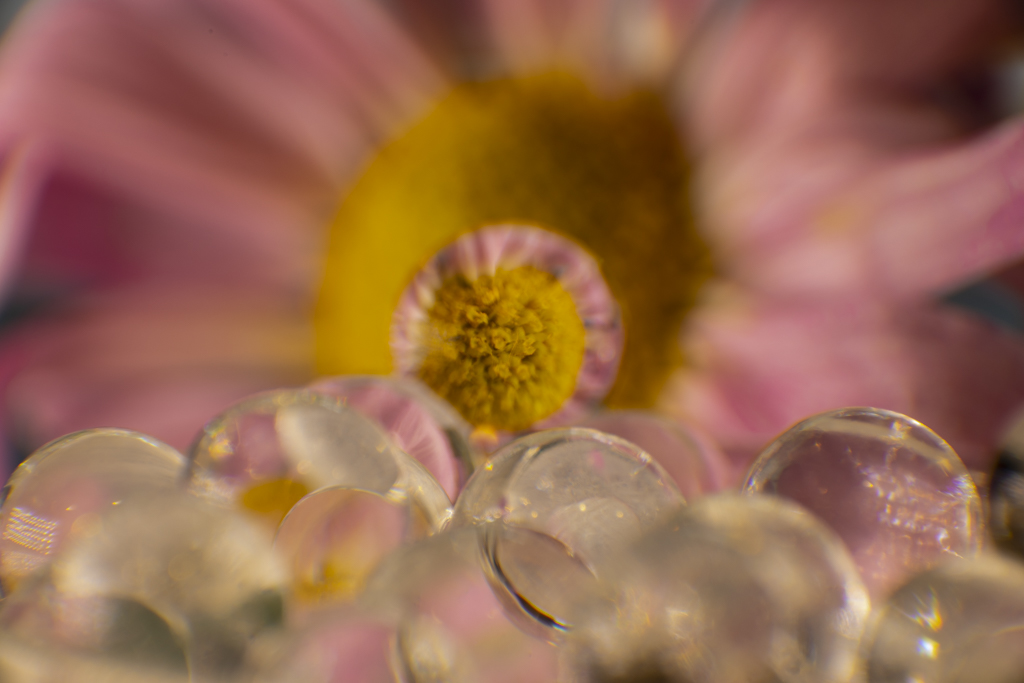
Chrysanthemum reflecting in a small glass bead. Extension tube and close-up lens.Same set-up with the MOVO EXT. Despite a lot of effort I could not get the main glass bead in focus.
Here’s a link to my old blog with a better explanation about a close-up lens.
In May of this year, Adobe gave us the Texture slider. You can find this in Adobe’s Lightroom Classic or Adobe Camera Raw.
The Texture slider enhances or reduces texture in a photo. Texture would be bird feathers, animal fur, tree bark, alligator skin, stucco, etc. The Texture slider does not enhance details in our nice blurry backgrounds. The Texture slider is a game changer on certain photos.
I’ve been a real champion of the Clarity slider since that tool was introduced by Adobe. Almost all my processing began with Clarity slider to 20, Vibrance to 20, and Saturation to 20. “Go to CVS first” was the line we used in class.
The Clarity slider, though, worked on details and textures throughout the image. Minor details in the blurry background were often enhanced.
Texture slider only works on textures. It’s a pretty smart tool that can really bring out key details in our photos.
The Texture slider is also available under the Adjustment Brush tool. This allows us to enhance or reduce the texture in one area of a photo.
Pretty neat tool. Give it a try. I’m sure you will like it and find many uses for the Texture slider.
Green violetear or Lesser violetear with the Texture slider blown up to 100%Same photo as above with the Clarity slider blown up to 100%. Notice how the background at top right has more detail. Not as soft as the image processed with the Texture slider. Same as above with no Clarify or Texture slider. Nice soft background thanks to a shallow f/stop. We don’t want to mess with that background during processing.
Texture on the left image. Clarity on the right image.
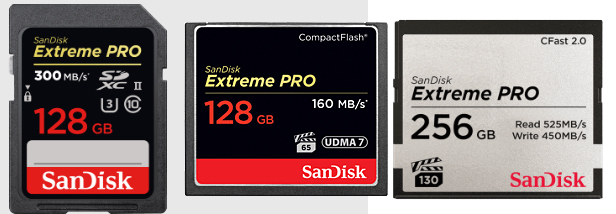
Wayne sent me an email asking if his next card should be a SD or a CF. Good question!
Here’s my reply:
I visited the Sandisk site to see what they are currently offering.
–CF Cards by Sandisk: 256 GB with 160 MB/s. 128 GB with 120 MB/s
–SD cards by Sandisk: 256 GB with 150 MB/s. 128 GB with 300 MB/s (That’s fast!!)
— CFast 2.0 by Sandisk: 512 BG with 450 MB/s (Wow doggie!!)
Background Information — In the beginning of the digital photography age we had Compact Flash cards, Standard Definition cards, and some other cards that have fallen by the wayside.
Compact Flash cards, or CF cards, were for the big, new digital cameras, like the 10D and D100 made by Canon and Nikon. Standard Definition cards, or SD cards, were for the tiny point-and-shoot cameras. Tiny cameras needed tiny cards.
Then camera like the Canon Rebel came out with SD slots. Eventually, the larger digital SLR cameras came out with SD slot and a CF slot. The Canon 6D is a larger digital SLR and it only takes the smaller SD cards.
What we have today is a choice. SD cards are just as fast as CF cards. Then CFast 2.0 are on the market with reasonable prices.
Canon wrote on their site that they are not abandoning the CF cards because so many pros use them. Good to know.
How fast of a card do you need? Do the math. Photo size x burst rate is the basic formula. 24MB raw file x 7 frames per second = 168 MB per second. That’s your starting point.
Ask also “how often do you hold the button down for 7 fps?” If the answer is often, then get a fast card. If the answer is never, then speed is not an issue when buying cards.
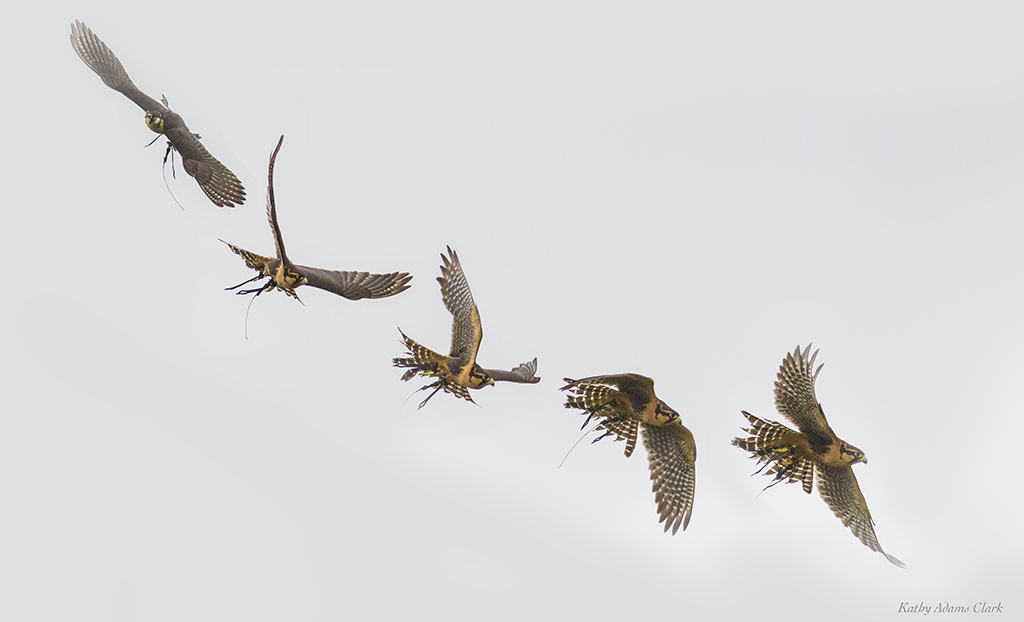
Sequence of an aplomado falcon in flight. We need fast card and fast “frames per second” to capture the action.
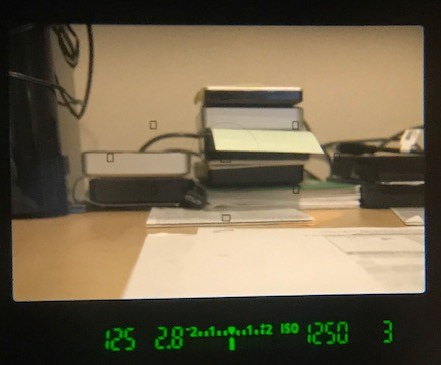
One last thing if you’re still with me. Buffer is also an issue. Look through your viewfinder on your camera. Push the shutter button half-way down. Look at the number is the bottom right corner or along the right side. The number might be 3 or 6 or 19 or 56. That number is how many photos the camera’s buffer (internal memory) can hold before the dreaded BUSY signal pops up and the camera stops firing. The buffer is based on the size of the photos you’re taking such as RAW or fine JPG. Bigger the photos the less photos that will fit in the buffer.