I hope all is well. I was hoping you could help me select a camera body for my African safari in Dec. I’m deciding between the Canon R6ii and R7. Do you think R7 crop factor is preferred to get more reach on the lenses. I will bring the 100-500rf lens. Any thoughts on a good 2nd lens? Will also bring my 7Dii as a second body. Thanks so much for your thoughts on this!
Jordan
My reply:
Thanks for asking, Jordan. You’re going to find that the R6ii is a more robust camera. I’d recommend the R6ii over the R7 in this situation. (Nikon Z8 and/or Sony A7rV for others)
You already own the 100-500 RF lens so that with the R6ii will be perfect.
I will suggest that you get the 1.4x extender for the 100-500 RF lens. I use that on my lens all the time.
My current set-up is R6ii, 100-500mm RF lens with a 1.4x extender. I used that all the time I was in Costa Rica and I’ll use it on my safari to Africa in May of this year.
Keep a 24-105mm or other medium wide lens on your 7Dii. The landscapes are amazing. Photos of the animals in the landscape are always a treasure, too.
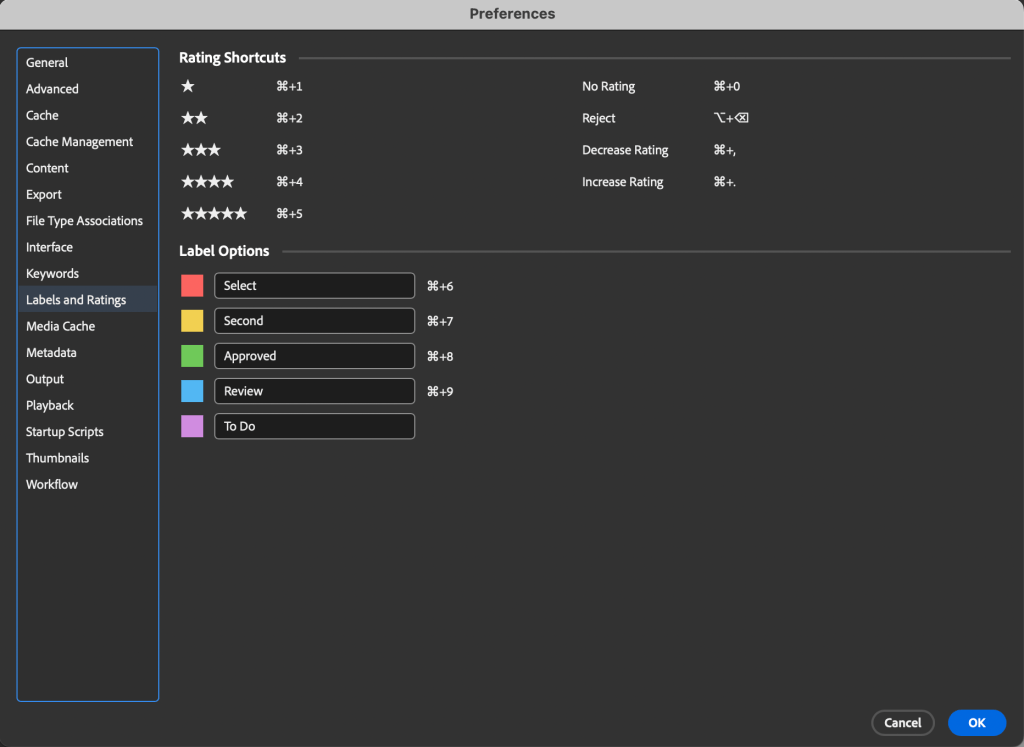
My friend Will wrote to ask me why the word “reject” was showing under his photo in Bridge.
Will wrote that he was using Adobe Bridge to edit photos from a recent shoot. The red “reject” was under some photos for an unknown reason.
Solution
I’ve used Bridge since it came out in 2005 and I’ve never seen the “reject.” I remember, though, hearing Lightroom users talk about rejecting photos versus just deleting them.
I checked the Settings in Bridge and found there was an option to “reject” when labeling images. See the screen capture below. Option + Delete key gives “reject.”
My Method
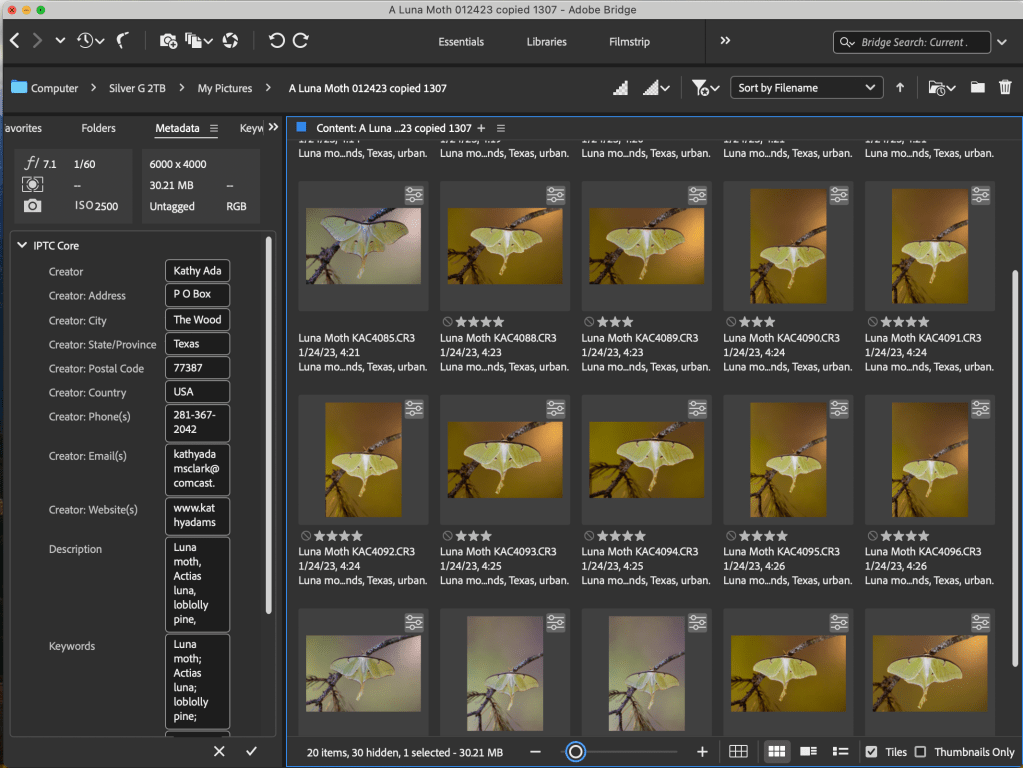
I don’t use the reject option when editing images. While editing a batch of images in Adobe Camera Raw, I enlarge each image to 100% and give it a rating. 5 stars is an amazing, great image; 4 stars is a really strong image; 3 stars is average and what’s expected; 2 stars is slightly blurred but maybe worth keeping; 1 star is not worth keeping; no stars is a delete.
Below is a screen capture of Bridge after I’ve edited all of the images as a batch in Adobe Camera Raw and rated them.
I’ll keep the images with 5, 4, or 3 stars. The images with less than three stars will be deleted. There’s no need to keep lesser quality images in the catalogue.
The star system also helps me select the best image later when I’m searching images in the Lightroom catalogue or Library. I can immediately go to the 5 or 4 star images versus looking at each image in a series again.
Great question from Will. It was fun finding the answer to his problem. I hope the answer and other information might help others.
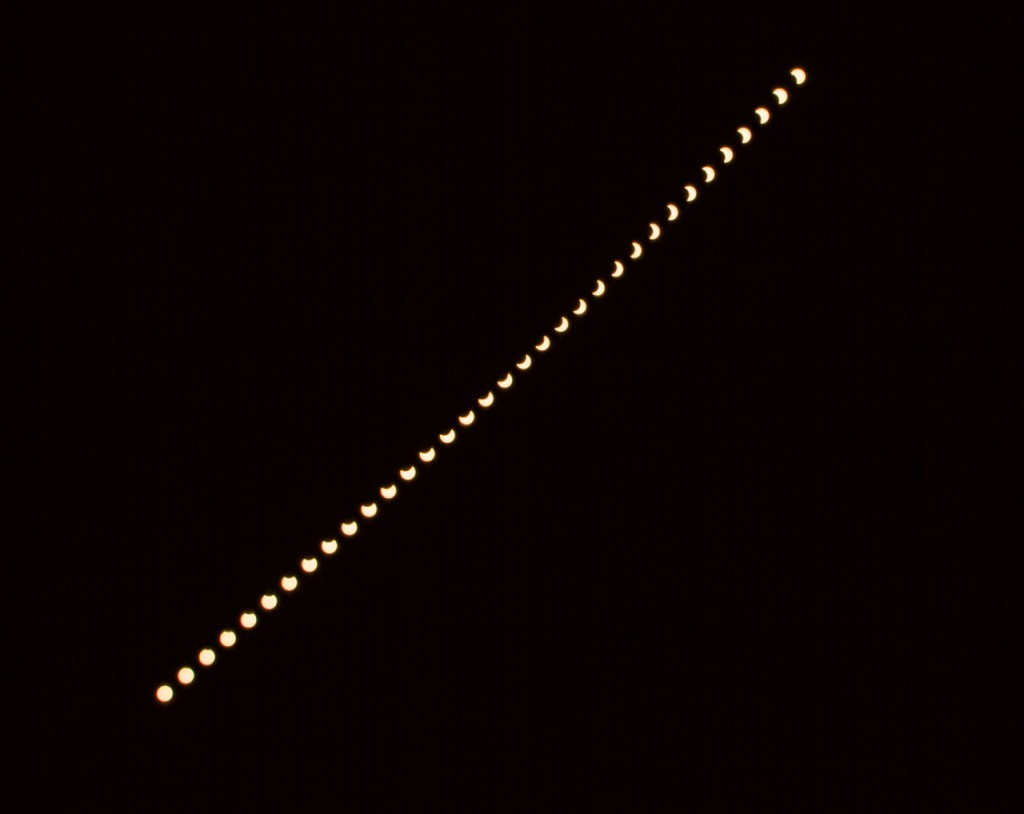
We get two opportunities soon to photograph a solar eclipse in the US. October 14, 2023 we have an annular eclipse and April 8, 2024 we have a total eclipse of the sun.
In the October 14th annular eclipse, the moon will partially block the sun. There will be an orange ring around the sun.
In the April 8th total eclipse, the moon will completely block the sun. The sun will go dark and then we get a tiny flare of light (Baily’s beads) as the moon moves to reveal the sun again.
You’ll need a couple of things to photography both events.
Now is the time to order your 16-stop solar filter! Don’t wait until the day before. Here’s a link to the filters offered by B&H Photo.
Solar eclipse without a 16-stop solar filter. Just doesn’t work!
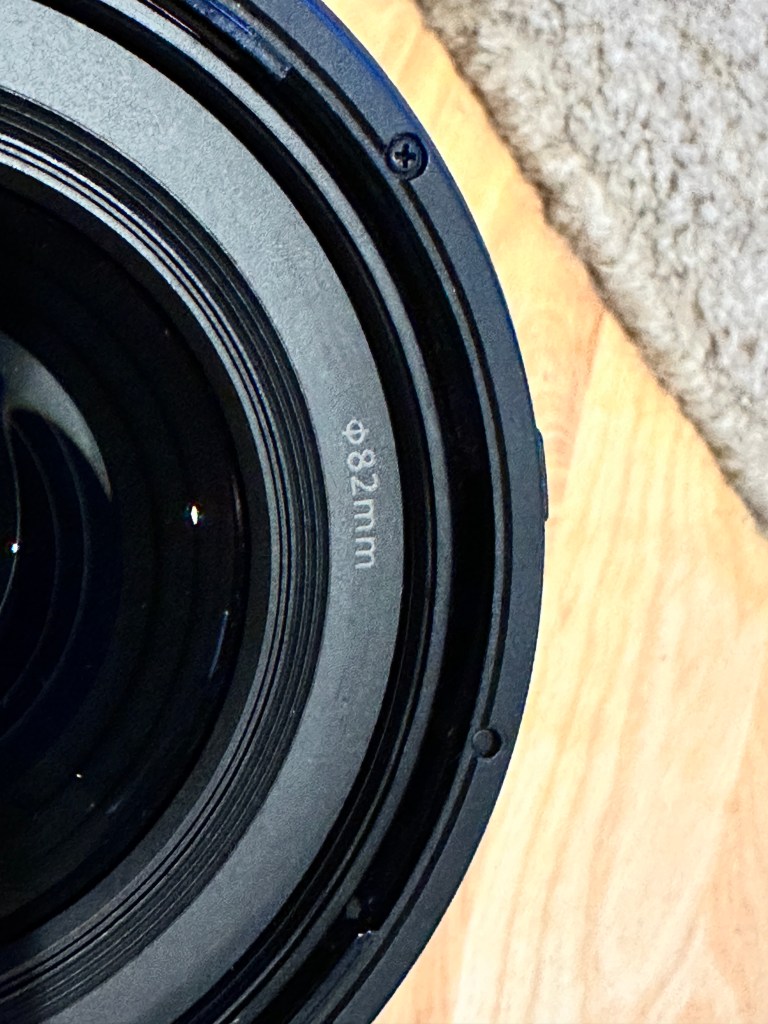
Be sure to order the filter that fits the front of your lens.
This lens takes a 82mm filter
You’ll also need a sturdy tripod. Order that today, too, if you need it.
You’ll need a shutter release. My favorite is the Vello RC-C2II ShutterBoss II. Buy the one for your camera. Buy the one with the cord and not the cordless.
Magnification — Here’s a blog post I wrote regarding lens choice. There’s a place for your telephoto zoom and a place for your wide angle lens.
Planning — Here’s a blog post I wrote about planning a couple of years ago.
I’ve photographed three eclipses and here’s what I’ve learned along the way.
Planning
Planning is essential. Have all the equipment assembled and ready to go an hour before the eclipse begins.
Focus on infinity and turn off auto focus.
Turn off image stabilization.
Manual exposure at f/4.5 during totality works well. When the sun is brighter f/16 for f/22 helps to cut some the light.
Spot meter with a focus point on the sun to get an accurate reading. Mirrorless camera users have the advantage of seeing the exact exposure so use that to your advantage.
Exposure compensation was needed when the sun was big.
Shutter speed easily stays between 1/5000 and 1/8000 for most of the eclipse.
A sturdy tripod is a must. Don’t kick it.
A programmable shutter release like the Vello Shutterboss II is perfect.
For a time lapse, set the Vello Shutterboss to take photos at precise intervals. A time lapse is best with a wide angle lens. That means a second camera, second solar filter, second tripod, and second Vello Shutterboss.
Prepare for Controtions
My first eclipse started early in the morning and it was in a northern latitude. The sun rose above the horizon and was still low when the eclipse ended.
My last eclipse ended after 1:00pm so the sun was high in the sky.
At my location on October 14th, annularity begins at 11:51 when the sun is 46.1 degrees above the horizon. When annularity ends at 11:54, the sun will be 46.5 degrees in the sky.
Camera aiming nearly directly overhead during solar eclipse
So what that means is my camera/lens combination has to be able to angle up at 46 degrees while it’s on the tripod. During a previous eclipse, the ball head got in the way, the camera body was hitting the ball head, etc. Make sure things work for your location.
Maybe a Gimbal head would work better than a ball head? Test your set-up ahead of time.
The sun is going to move in the frame a lot. The earth is rotating so the sun will move out of the frame. Be prepared to reposition the camera when needed.Plan ahead if you want to stack image later.
Enjoy!! Prepare ahead of time and don’t get stressed.
Cheryl sent me an email recently. She said she was taking the “once in a lifetime” African safari and wanted my advice on lenses.
This is an easy question to answer since I’ve led many trips to Africa to photography animals and birds. I also know how crazy it can be when packing for a place you’ve never visited.
My equipment list is pretty easy:
Telephoto zoom lens in the 500mm range. I recommend a zoom over a fixed lens because the animals get pretty close on a safari. I like to zoom back to get the full animal in the frame. Zoom out to 500mm to get just the face of a lion but zoom back to get the full body. I found when I took my fixed 500mm lens that I came home with a lot of photos of part of the animal.
Wide angle lens for general things in the 24-105mm range. This is a good lens to take photos around the lodge. It’s a great lens for taking photos of family, friends, or food. Also a nice lens for landscapes and sunsets.
Super wide angle lens for grand landscapes. That would be a 16-35mm for a full sensor camera or a 10-22mm for a cropped sensor camera. This is a wonderful lens for photographing the vastness of Africa.
Circular polarizing filter for the super wide angle lens. Be sure to buy the filter based on the filter size of the lens. The best circular polarizers are the Singh-Ray Lighter Brighter Neutral Thin circular polarizer. Be sure to get the “thin” filter so the edges don’t show in the photo.
I suggested Cheryl rent any of the lenses is she didn’t already own them. Renting a lens is a great way to give it a test run.
Cheryl was smart and rented the lens several weeks before her trip. She used it at a local wildlife refuge as a pre-safari test run. Then she rented it again for the actual safari.
I hope this helps if you have an African safari in the near future. Ask any questions below.
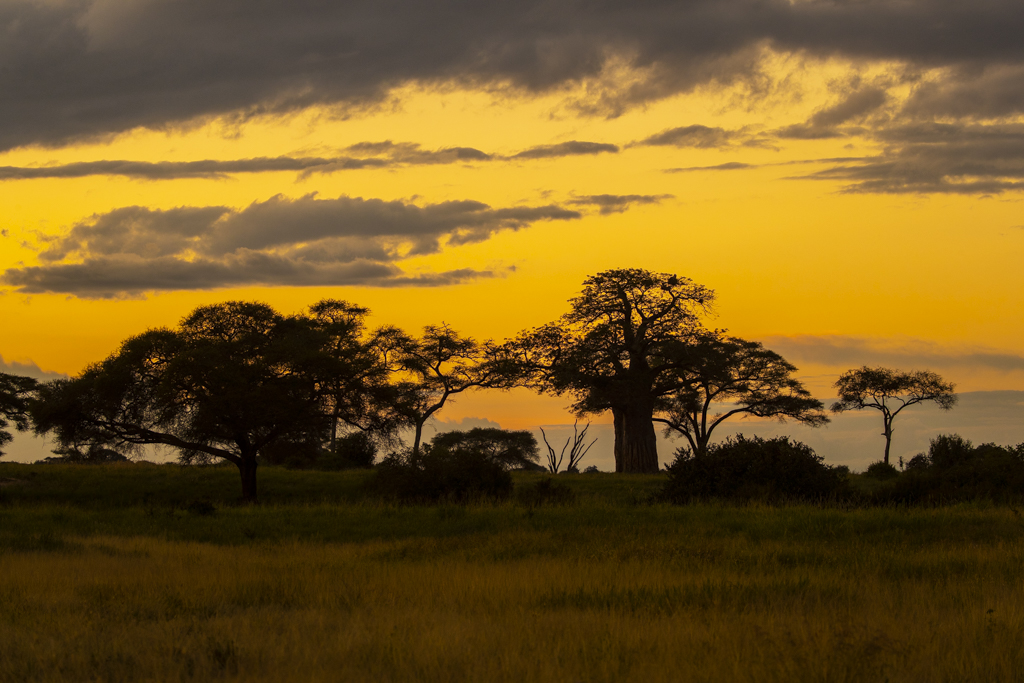
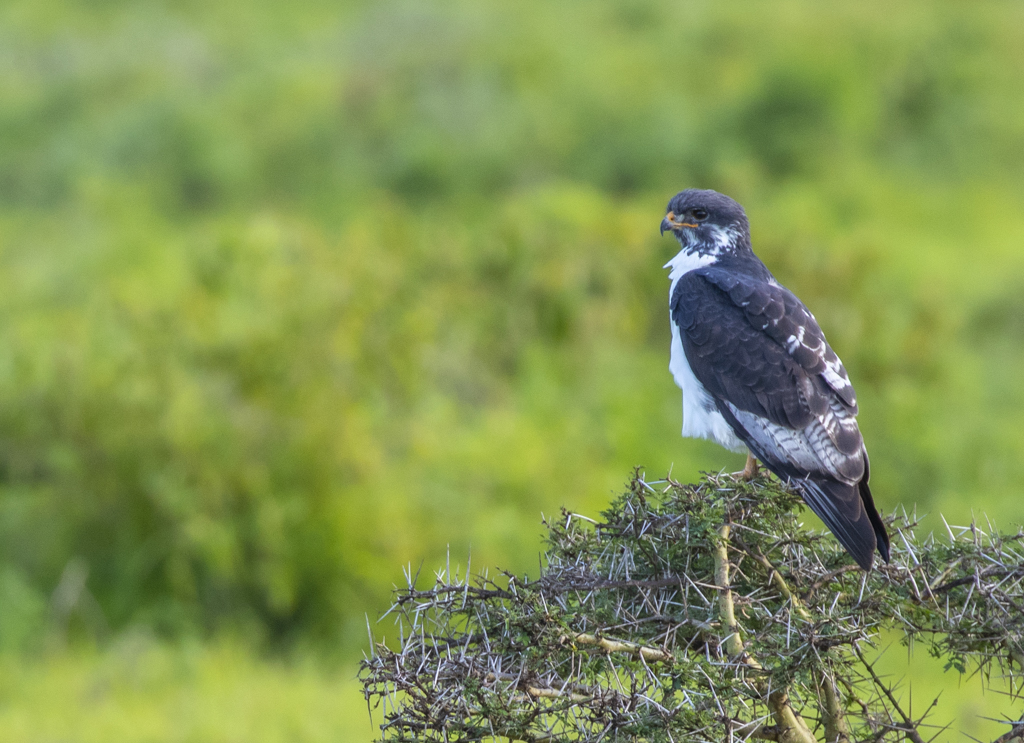
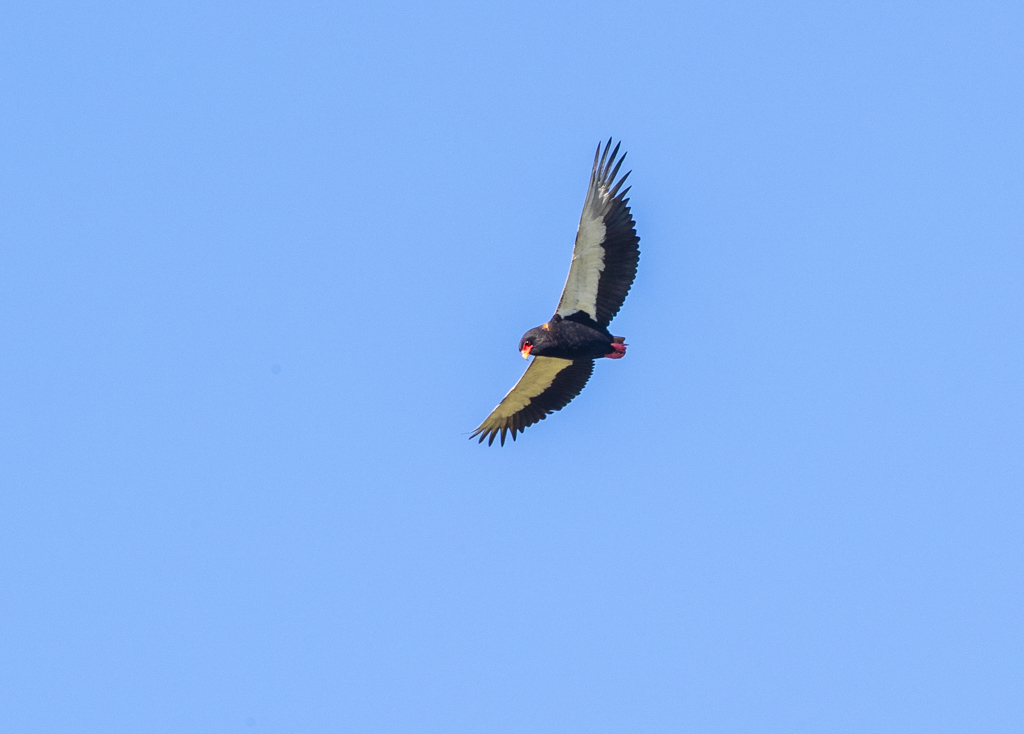
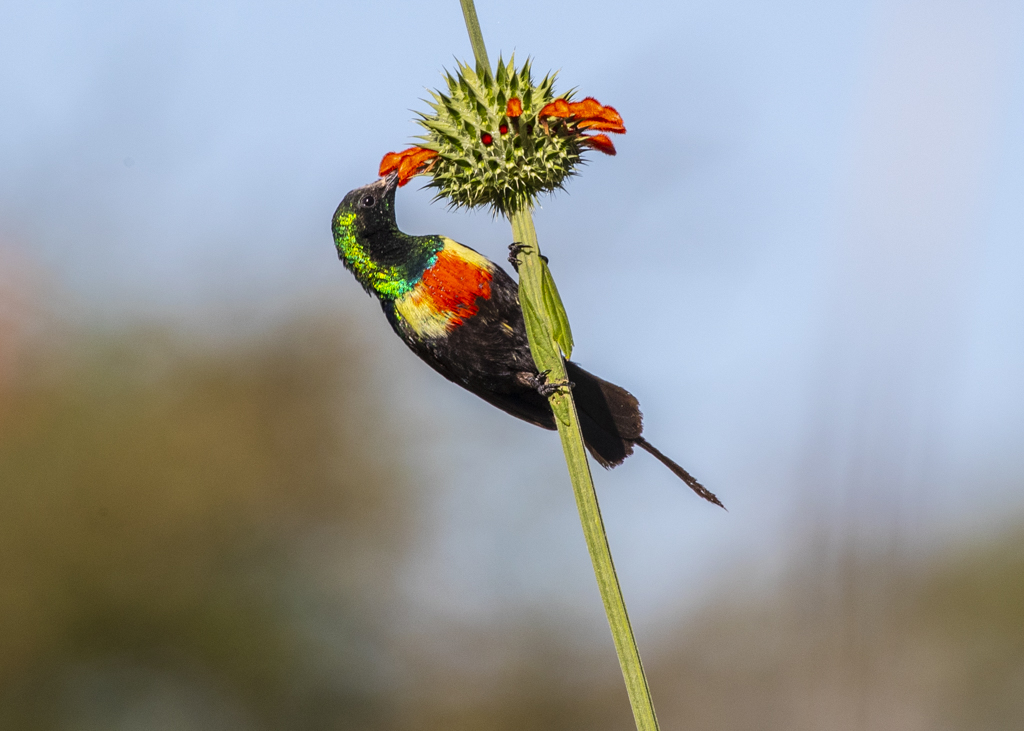
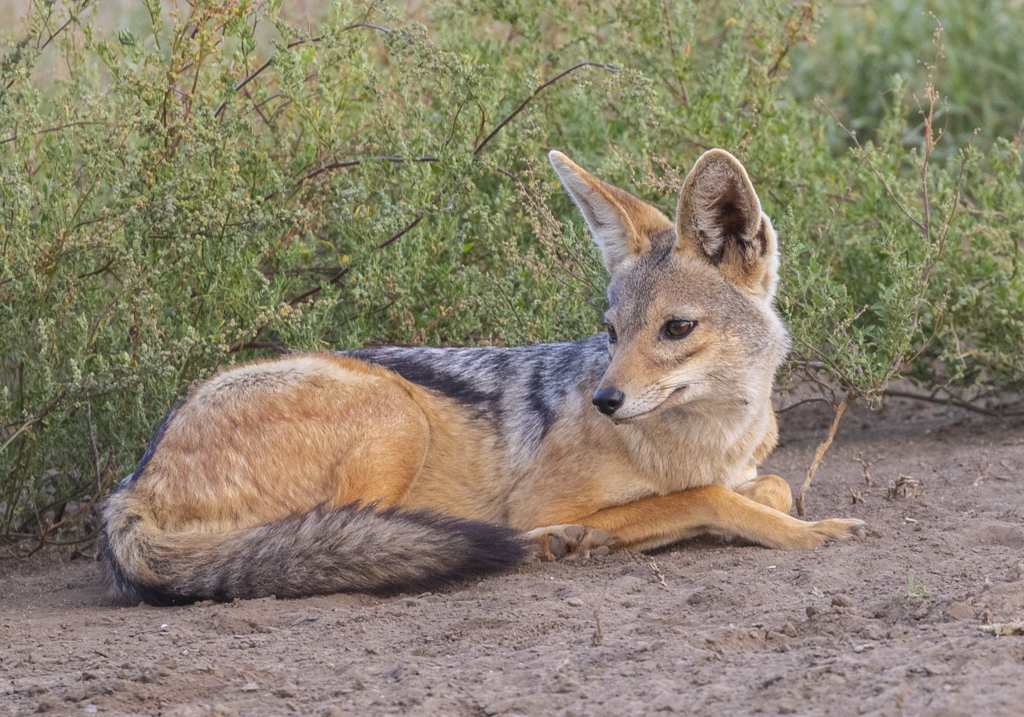
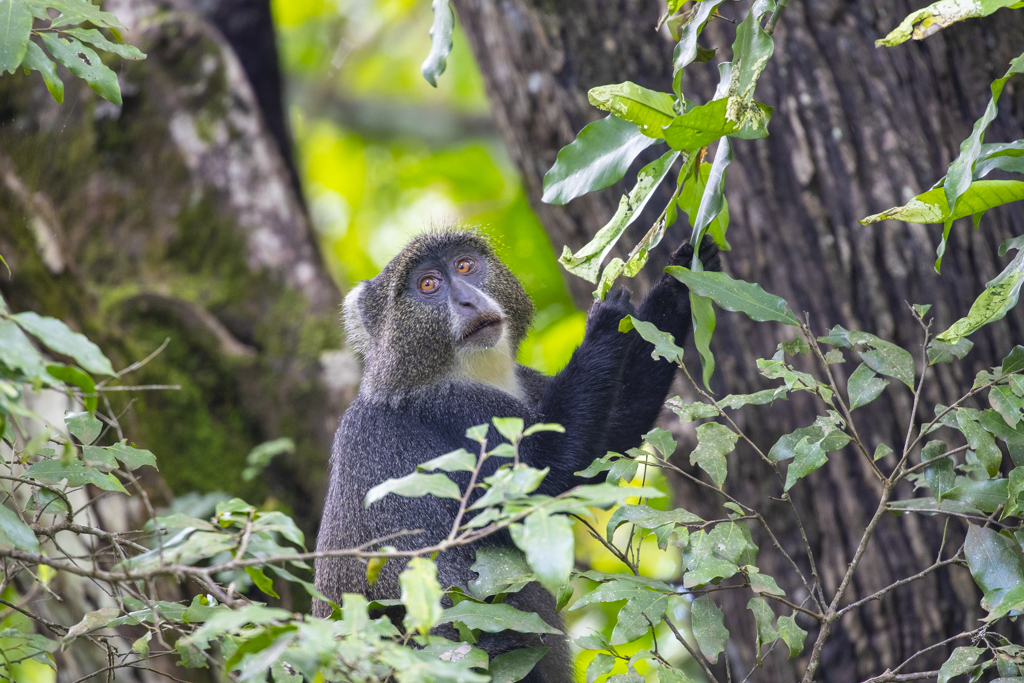
I’m leading a safari to Tanzania in May 2024. The dates are May 16-30, 2024. We’ve already booked our flights so this is a trip ready to go. Join us if you’d like. More details at Tanzania Photo Safari with Strabo Photo Tour Collection.
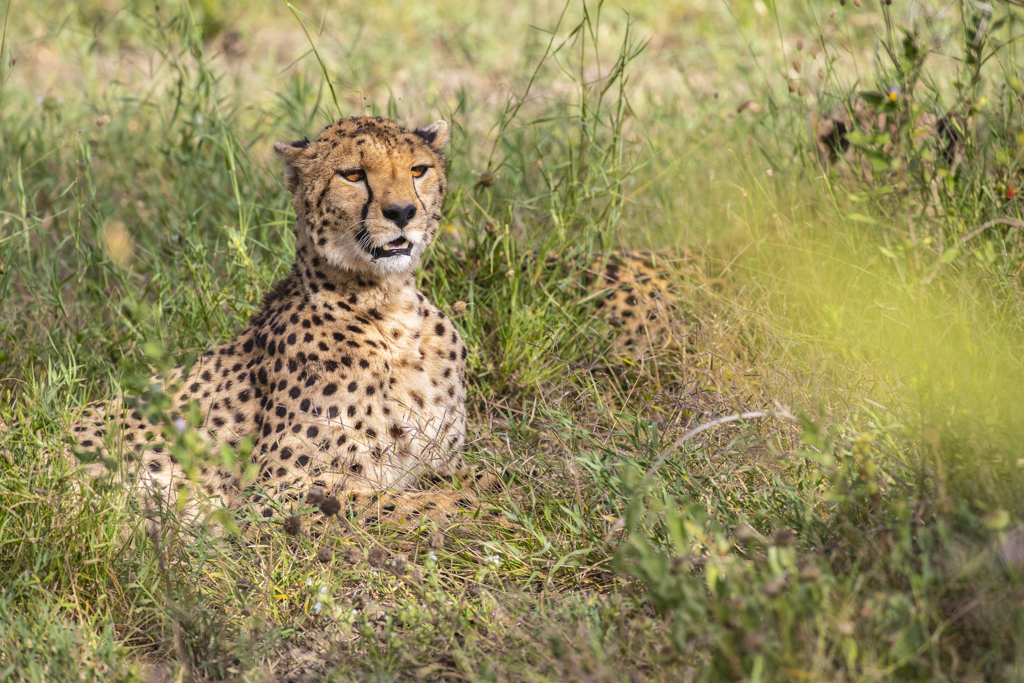
Here are some photos from my previous trips:
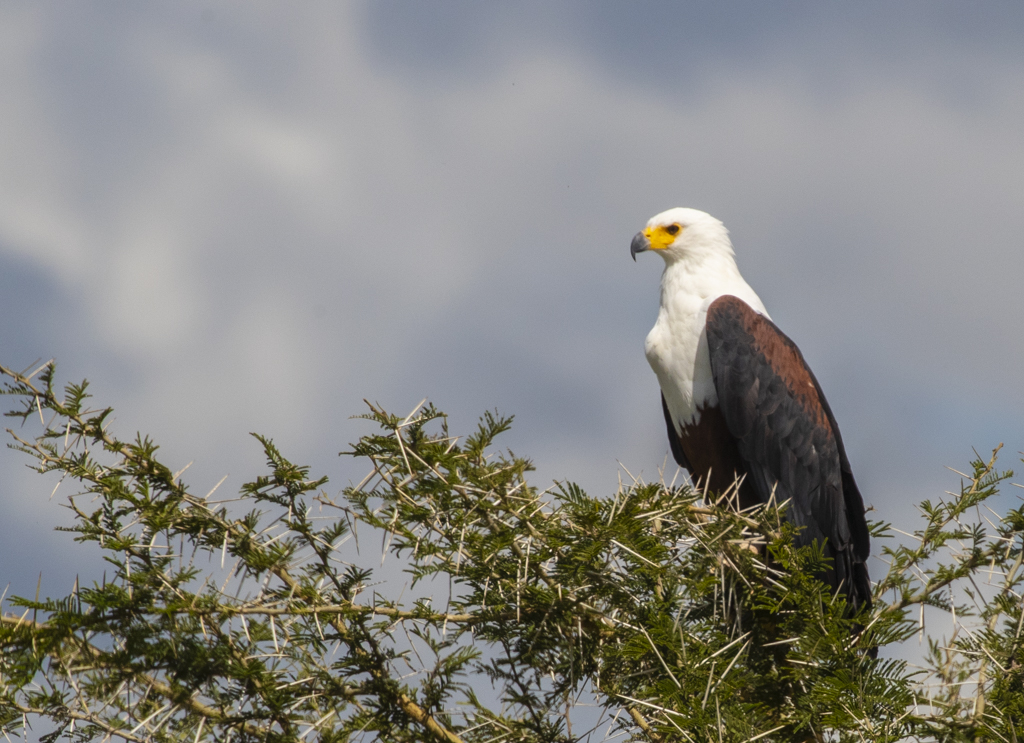
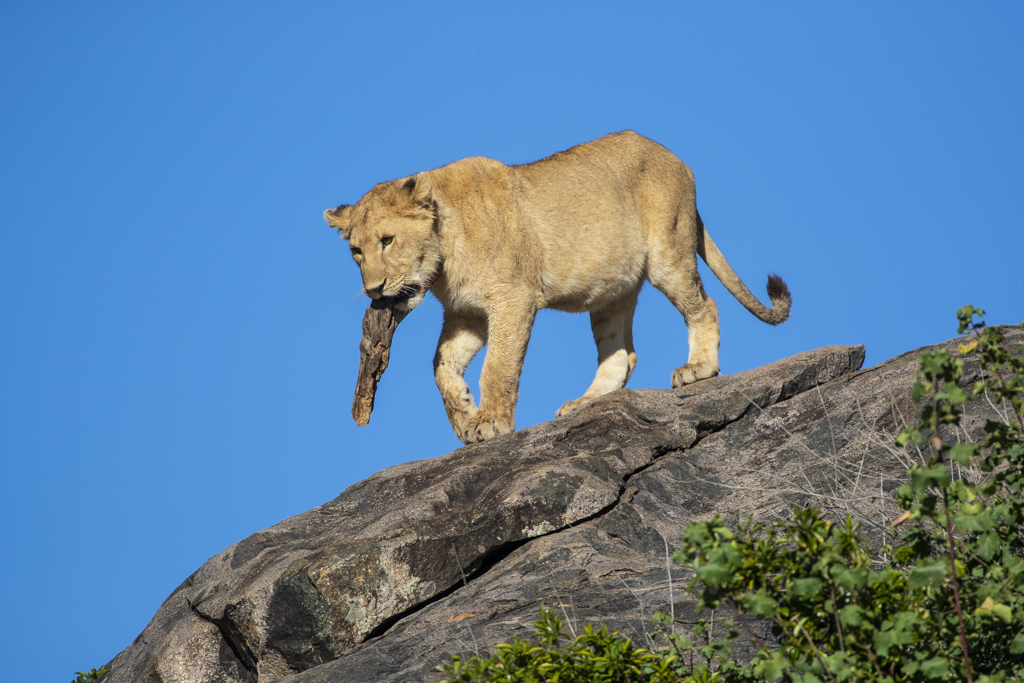
African fish eagleAfrican lion Cub playing with a stick Augur BuzzardBaobab treeBateleur eagleBeautiful sunbirdBeautiful sunbirdBlack coucal; black-backed Jackalblue monkeyBurchell’s Zebra; Collared sunbird
For those of you still using or new to the Canon R5, my friend Richard Day has amazing luck photographing birds with this camera. He’s using the same menu settings I’ve used but finds the following settings helpful.
Richard uses the back button when he wants to switch to Eye Detection AFUsed when you need to nudge the focus a bit on the lens. Very useful!Allows the camera to keep focusing. Per the owner’s manual, “You can manually adjust the focus after the AF operation if you keep holding down the shutter button halfway.” Good option. I agree. What color do you want “peaking” when you’re in MF? I have mine set to red. Anything surrounded by red is in focus.Turn this feature to Disable so your nose doesn’t select the focus point.This AF method can also be changed with the AF Point Selection button on the back of the camera.
I’ve moved on to a Canon R6 Mark II and a Canon R3 camera. I hope these settings help for those using the R5.
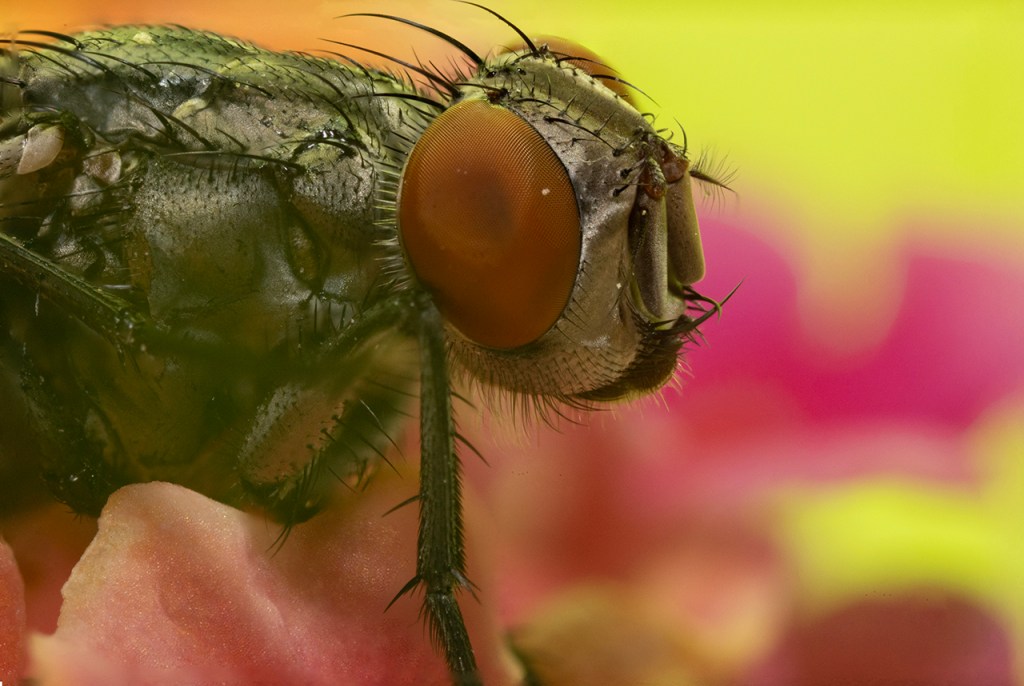
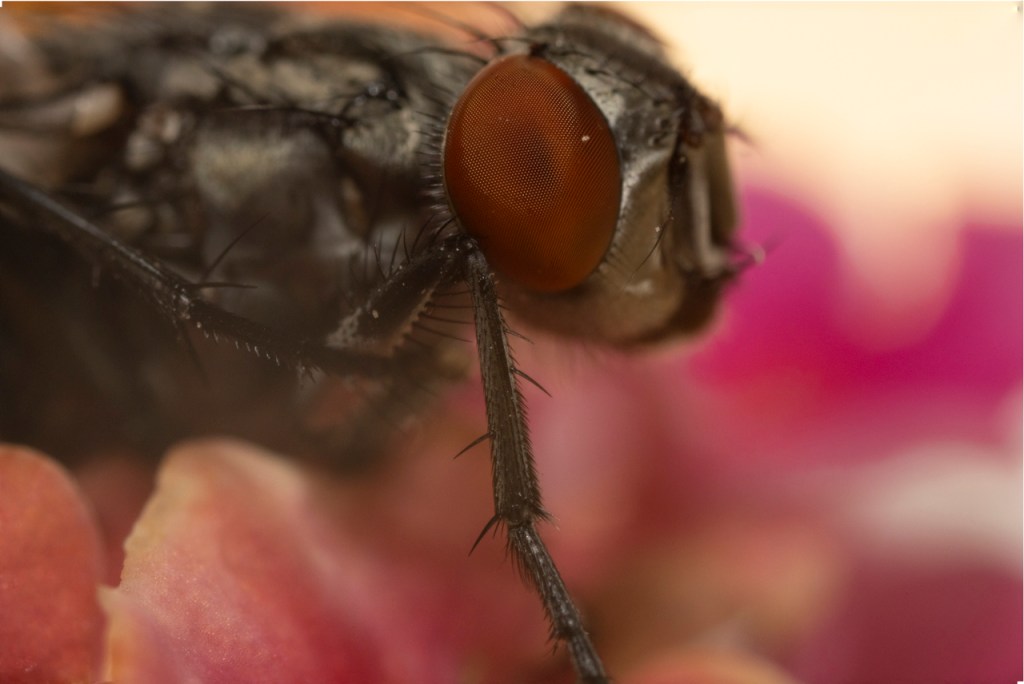
House Fly photographed at 5 times life size with the Lawoa 2.5-5x macro lens.
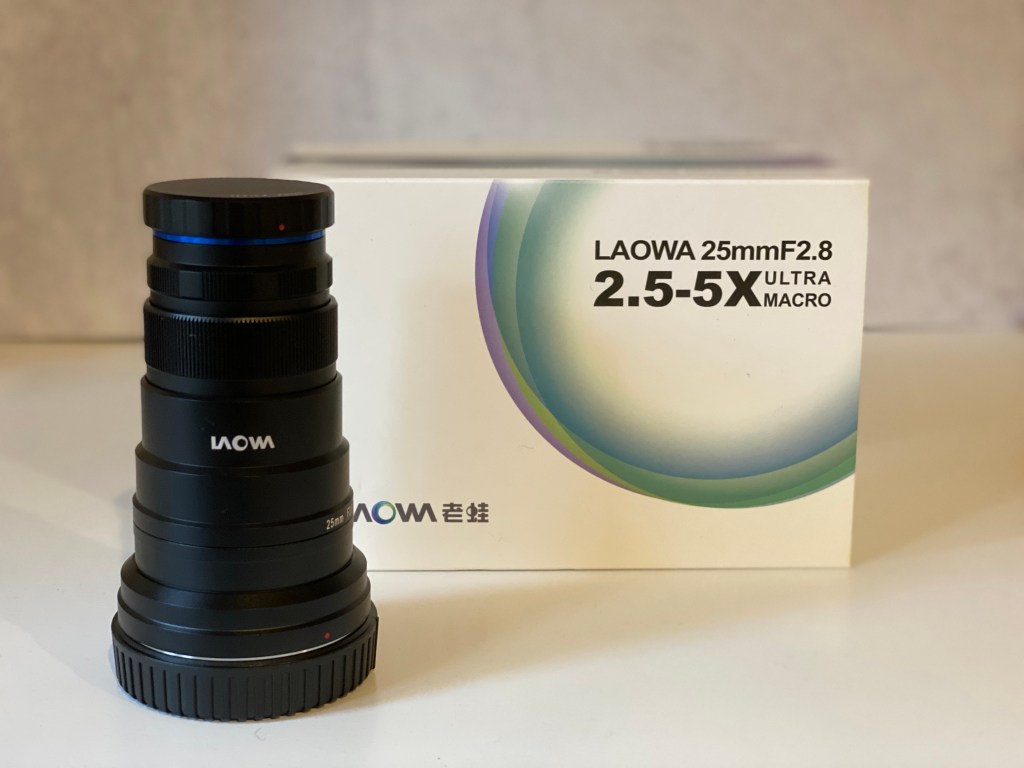
I saw an ad for the Lawoa macro lens that could photograph things up to 5 times life size. The price was only $399 and it came with a mount for my Canon R5 mirrorless camera. In a moment of weakness, I clicked the button and ordered the lens.
I’ve always loved high magnification macro photography but it was expensive. Canon has the MP-E 65mm that photographs 5 times life size but it’s well over $1,000 and I’d need an adapter for my mirrorless.
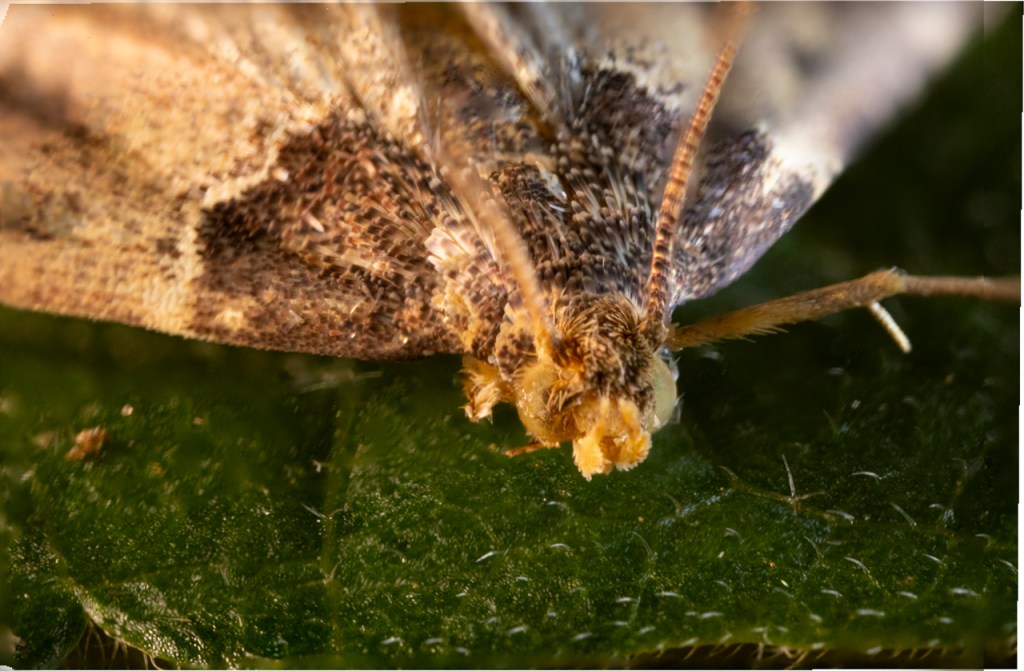
Once the Lawoa lens arrived, I needed to find a subject. I went on a search around the house and found a tiny moth about 1/3 of an inch long. Perfect subject except it didn’t want to be captured or photographed.
No, I am not going to kill a moth so I can photograph it. Nope! That’s not how I live my life.
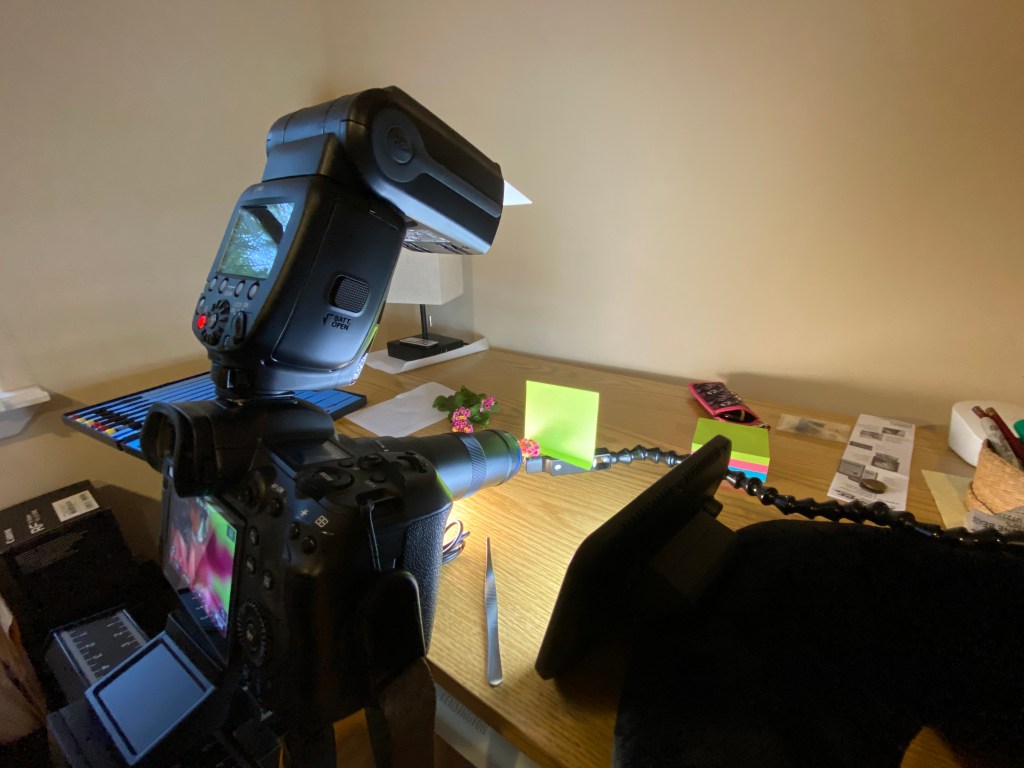
So an hour later, the moth was resting on a leaf under a glass jar in my office. Equipment was assembled for the photo session: Tripod, Neewer Pro 4 Way Focusing Rail Slider, camera, Laowa lens attached, flash, Savage LED light on the right, and Lume Cube LED light on the left. (Scroll down to see a photo of the set-up.)
Moth photographed at 5x life size. Actually 1/3 of an inch long.
My time with the moth was highly frustrating — for it and me. The moth wanted to wander off the leaf. When it settled I would move the leaf and get it back in the frame and focused. This is not easy when the subject is magnified 5 times.
The moth twitched its antenna often. This messed up any hopes of focus stacking.
Eventually, the moth was set free. I left the equipment in place until I found a new subject.
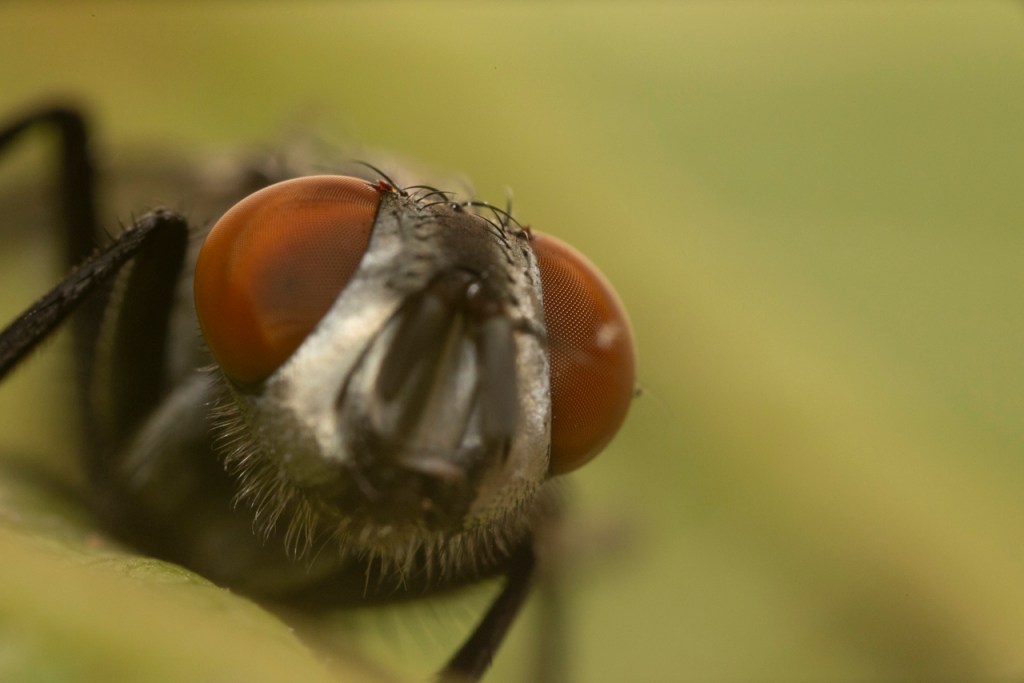
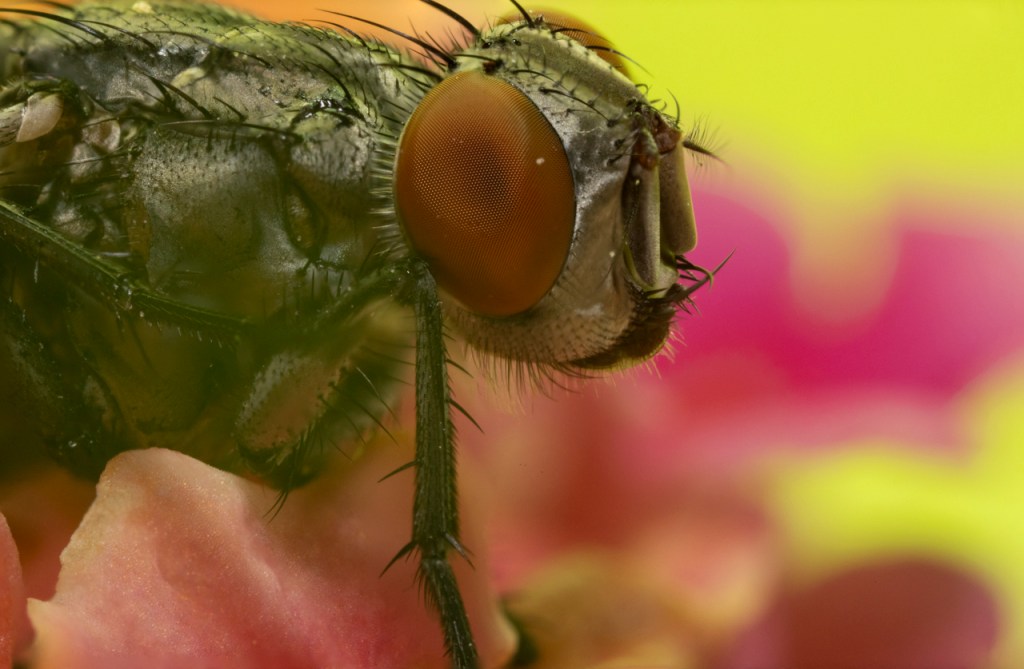
The next day a fly got in the house and needed to be swatted. Turns out the little fellow wasn’t totally dead so I had a moving subject once again. Back to putting my subject on a leaf and waiting for it to calm down.
Lesson learned on the moth was that focus stacking would be necessary to get the photos I wanted. I settled in to take 5 to 10 photos for each focus stack.
The Laowa is a manual focus lens so there’s no in-camera focus stacking or focus bracketing as Canon calls it. I needed to move the knob on the focus rail to create each set of focus staked images. (Practice this skill ahead of time.)
House fly, magnified 5x life size, and focus stackedHouse fly, magnified 5x life size, single image.A focus stacked image on the left versus a single image on the right.
The fly was still alive so the number of images I could get depended on its movements. Sometimes it sat still and other times it wiggled or twitched.
House fly with three photos in the focus stack.
In a series of images, maybe only two or three would work. Below is an example of only two photos.
House fly, using only two photos in the focus stack. Notice that the eye is in focus but the rest of the head is out of focus. House fly, focus stack using 10 images. House fly, again, but using only 5 images in this session.House fly using six photo in this session. The fly was moving so I had to wait for it to be still.
Focus Stacking in Photoshop
My software of choice is Photoshop for focus stacking. Open all the photos into a Layer stack. In Bridge, that’s (1) highlight the photos, (2) click on Tools>Photoshop>Load into Photoshop layers. In Lightroom, (1) select the images, (2) click Photo>Edit in>Open as Layers in Photoshop.
In Photoshop, highlight all the photos in the Layers palette. Edit>Auto Align Layers and wait. Then Edit>Auto Blend Layers and choose Stack from the options. Then wait again for Photoshop to do its work.
Moth photographed at 5x life size. This is a blend of six images. Notice the problems in the upper left corner.Same photo after working with Layers to correct issues in focus stacking.
Most of the time, Photoshop does a pretty good job. A bit more work might be needed to fix tiny details.
Equipment needed for high magnification photograph: tripod, shutter release, focusing rail, flash, continuous LED light(s), camera and lens. The fly is in the center of the flower.
Thanks for reading. Let me know below if you have any questions.
Star Trail captured in Big Bend National Park in July 2022.
Star trails, like the image above, are fairly easy to do. You’ll need some equipment to capture the images and Photoshop to blend the images. You’ll also need a dark sky with an unobstructed view. Ideally, the view should be to the north with Polaris in the middle of the frame.
You’ll need: Camera with a bulb setting, wide angle lens, sturdy tripod, programmable shutter release like the Vello Shutterboss II, fully charged battery, storage card with lots of room.
Set the programmable shutter release to take an unlimited number of photos at a 4 minute exposure with a 1 second break in-between exposures. (Suggestion: Do this inside in the light because it’s darn hard to read the instruction book in the dark when you’re trying to shoot.) Here’s my YouTube video tutorial.
Outside under a dark sky, put the camera on the tripod and point it at the northern sky. Hook up the programmable shutter release. Compose the photo to include some foreground or an interesting subject in the foreground. Point the camera at the north star for a star spiral.
Set the camera to Bulb, f/2.8 or lowest possible, ISO 800 if half moon or ISO 1600 if no moon. Note: f/1.8 might only need ISO 400.
Take a couple of test shots to get the stars in focus. Then turn off your auto focus and image stabilizer. (Suggestion: take these images are a really high ISO so the exposure is quicker. Enlarge these photos on the LCD panel to check focus. Delete them when ready to start shooting.) Here’s a blog posting about focusing on stars at night.
Reset the ISO to 800 or 1600. Make sure the camera is locked down on the tripod. Press the “Start” button on the programmable cable release. Monitor the first couple of shots to make sure the shutter stays open for 4 minutes, closes, and then reopens. Let the camera keep shooting for at least 30 minutes but hours are better.
I cover the camera with a towel and leave it outside all night.
To process the images, follow these instructions precisely to create a layer blend in Photoshop.
(1) Download the images into a folder.
(2) Open Photoshop Bridge and then open the folder.
(3) Highlight all the images. In Lightroom, highlight all the images after importing.
(4) In Bridge, click Tools>Photoshop>Load Files into Photoshop Layers. Photoshop should open with the images in a layer pallet. In Lightroom, click Photo>Edit In>Open As Layers in Photoshop. (Note: Lightroom, Bridge, and Photoshop should all be the same version. This doesn’t work if one of these is a different version.)
(5) All the images open in Photoshop as a series of Layers. If you don’t see the layers, click on Window>Layers to see the layer pallet. Select all the images in the layer pallet and change the blend mode to Lighten.
(6) You can apply Layer Masks and other things at this point to the individual layers. Most of the time, though, this is not necessary.
(7) Flatten the image to see your photo of the star trails. Open the photo in Filter>Camera Raw Filter or import back into Lightroom to do final processing with Textures, Vibrance, Saturation, Exposure, and Contrast.
Here’s a link to an older blog post about Direction Does Matter when making a star trail
Enjoy!! Let me know if there are any questions or comments. Thanks for reading.
My question relates to the fact that each folder of pictures has a different set of keywords that shows up in the keywords list. So I have to re-enter keywords. How can I make a list universally available? And how can I make it the only list of keywords? I use Bridge.
Will
Quick answer: Once you’ve entered a word on a keyword list, you shouldn’t have to re-enter that word when you’re working in a different folder of photos.
Long answer:
The Keyword list in Bridge can be exported/saved as a .txt document. You can import keyword lists as well. Then you can “Clear and Import” keyword lists. That brings a new list in and replaces the old list.
Most people, I suspect, have one list. That’s what happens in Lightroom. It’s just one big list. So that place you visited in Scotland stays on the list even though you’ll never use that keyword again.
I have Keyword lists. One for Costa Rican birds, for example. I have another for North American birds. I have a list for Italy. I have a list for Iceland, another for Norway, and another for Thailand. I import these when needed.
My “everyday” Keyword list is the North American birds. It has all my North American birds, butterflies, dragonflies, mammals, and plants. It has the seasons, bahaviors, and other things I might need for everyday processing. That list has locations I’ve birded and visited in the US since I seem to always photograph birds in addition to other things. I just went to Santa Fe so that’s now on my North American birds list.
I’ll go to Ireland in September. Before I leave, I’ll export my North American birds list to a folder on my computer where I keep all my keyword lists. That North American birds list will replace the one in the file, by the way. I’ve added things to it over the months so I want to keep the latest version.
Then I’ll “Clear and Import” with my Ireland keyword list. While working on photos in Ireland, I’ll add new locations. Beforehand, you can add new locations and things to an existing list since it’s just a .txt document. I could take the itinerary for my Ireland trip and add locations to it while it’s still a .txt document on my computer. (formatting is important by the way. See below.)
While in Ireland and until I finish processing those photos, the Ireland keyword list will be on my computer. This can be a pain if I wanted to switch between processing backyard birds and going back to the Ireland photos. That’s why some people like one big list.
A screen capture of the Keyword list for Costa Rican birds.
I was eager to try the autofocus on the R7 with a variety of subjects.
I used the same settings on all the photos: Servo, AF[1], Subject Tracking, Subject to Detect is Animals, Eye detection is Enabled. Servo AF is on Case 2 which is “Continue to track subjects, ignoring possible obstacles.”
For those of you new to AF[1], it is a wide zone where the camera looks for a subject based on face and/or motion. Once the camera has found a subject, the focus point lights up with blue dots. Then we can move the camera around to compose the shot while the camera stays on the subject.
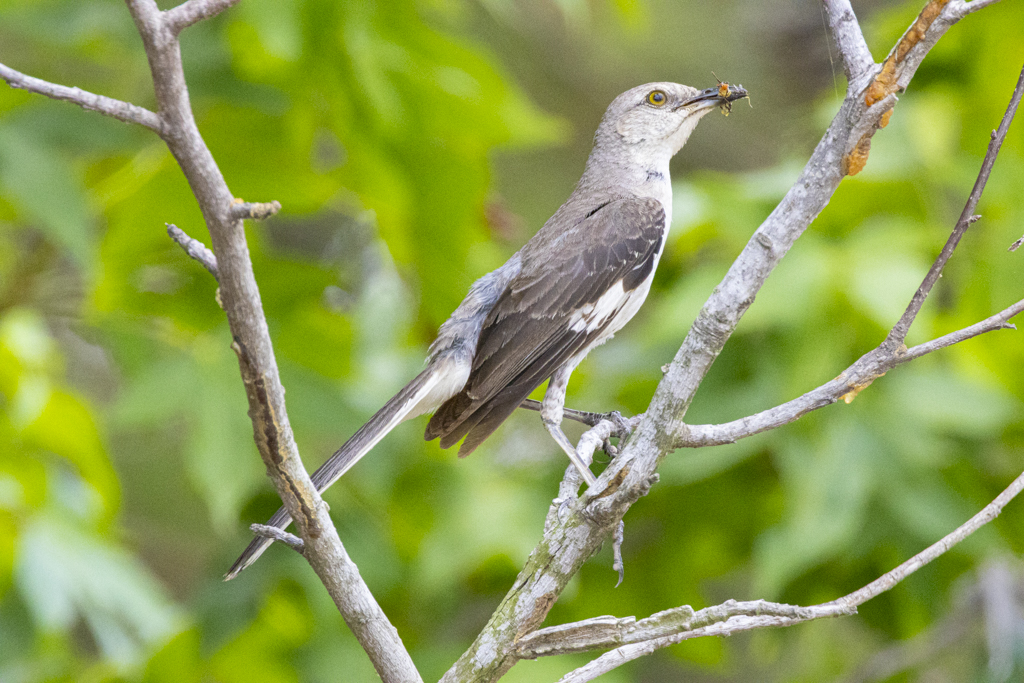
Northern mockingbird. The R7 found the bird without hesitation and locked on to the eye.Great-tailed grackle. I didn’t push the focus button until the bird’s face came into view. Once the eye was clear of the pine needles, then the R7 found the eye and locked on.Gray Hairstreak. Tiny butterfly. The Flexible Zone AF 1 (AF[1]) was not the best choice for this small butterfly. The R7 found the subject because it was moving. The focus point bounced between the butterfly’s real eye and the fake eye at the base of the tails. I should have changed to 1-point AF and put that point on the butterfly’s eye. Not bad, though.Gray Hairstreak. Same as above with a slight change in my angle to get a green background. Clouded Skipper. The R7 found the butterfly’s eye without a problem. It locked on and held focus.The same clouded skipper perched on a purple passionflower. The R7 stayed on the butterfly but I confused the camera. The R7 tried to focus on the structure on the passionflower. This camera is smart but the photographer has to remember to give clear directions. My error in not changing to the 1-point AF area. Then the camera would have known exactly where to focus.Honeybee on bee bush. The AF[1] focus area stayed with bee without any effort.
I found the Autofocus on the R7 quick and precise. The R7 is not a mind reader (though it does amazing things) so we have to remember to change AF Areas based on the subject.
The only time the R7 failed to acquire focus was on a tiny subject at the top of a stick. I moved the camera down the stick until it acquired focus. Then I moved the camera back up to the subject and the R7 held. This is not unusual with AF in mirrorless but not as bad as I’ve seen in earlier cameras.
All photos in this post were taken with the 100-500mm RF lens, 1.4x extender. All the insects were at the edge of the minimum focusing distance of 3.94 ft.
All photos are uncropped.
Questions? Post below. I’d love to hear your comments and feedback. Thanks for reading.